Custom XCom backends
One of the most significant features in the Airflow 2.0 release was the TaskFlow API. The TaskFlow API was introduced to solve the challenge of explicitly passing messages between Airflow tasks. The TaskFlow API abstracts the task and dependency management layer and improves the experience of working with XComs.
As part of this update, support was introduced for configuring custom XCom backends. This means that rather than store XComs in the Airflow metadata database by default, you can push and pull XComs to and from an external system such as Amazon S3, Google Cloud Storage (GCS), or Hadoop Distributed File System (HDFS). You can also implement your own serialization and deserialization methods to define how XComs are handled.
This guide discusses the benefits of using an XCom backend, shows an example of implementing an XCom backend with Airflow S3, and describes how to set this up if you're running Airflow on Astro.
All code used in this tutorial is located in the Astronomer Registry.
Assumed knowledge
To get the most out of this guide, you should have an understanding of:
- XComs basics. See the Airflow documentation on XComs.
- Passing data between tasks. See Passing data between Airflow tasks.
- The TaskFlow API. See the TaskFlow API in Airflow 2.0
When to use custom XCom backends
Before you set up an XCom backend, it's important to understand when you might want to do so and, importantly, when you might not.
XCom backends provide much more flexibility than you would have using traditional XComs with the Airflow metadata database. When using a custom XCom backend:
- XComs don't need to be JSON serializable because you can store the data however you want.
- The size of your XCom information is not limited by the size of your metadata database.
- You can implement custom retention or backup policies.
- You can access XComs without needing to access the metadata database.
An XCom backend is ideal for production environments because you can more easily manage what happens to your XComs over time, and you don't need to worry about periodically cleaning up the metadata database with another DAG.
An XCom backend is a good solution when you want to pass information between your tasks flexibly and sustainably, such as when you are using an operator that returns metadata by default. However, although a custom XCom backend allows you to pass more data between your tasks, Airflow isn't designed to be a processing framework.
XComs were designed to pass messages between your tasks, such as metadata or other small amounts of data. If you want to pass large amounts of data between tasks, Astronomer recommends using an external processing framework such as Apache Spark, and using Airflow only for orchestration.
For more information on these concepts, see Passing Data Between Airflow Tasks.
Example use case: Great Expectations
Using Great Expectations with Airflow is an ideal use case for implementing a custom XCom backend. Great Expectations is an open source Python-based data validation framework. The Great Expectations Airflow provider allows seamless integration with Airflow.
The GreatExpectationsOperator can be used in Airflow DAGs to perform data quality checks before moving to downstream tasks. The operator returns various results from the tests that were run on your data. Because these results are not returned in a JSON serializable format, the only way to use them with the default XCom backend is to enable XCom pickling. Given the security implications of pickling, this is not ideal for a production environment. You can resolve this shortcoming by implementing a custom XCom backend to programmatically process the results and save them to an external file system.
For more information about using Great Expectations with Airflow, see Integrating Airflow and Great Expectations.
Set up an XCom backend
In this section, you'll set up an XCom backend with Airflow. It is assumed that you are running Airflow in a Dockerized set-up.
1. Configure your backend
The first step to setting up a custom XCom backend is to configure the backend you want to use. This guide uses an Amazon S3 backend on AWS, but the process is similar for other services such as Azure blob storage or GCS.
In your Amazon S3 account:
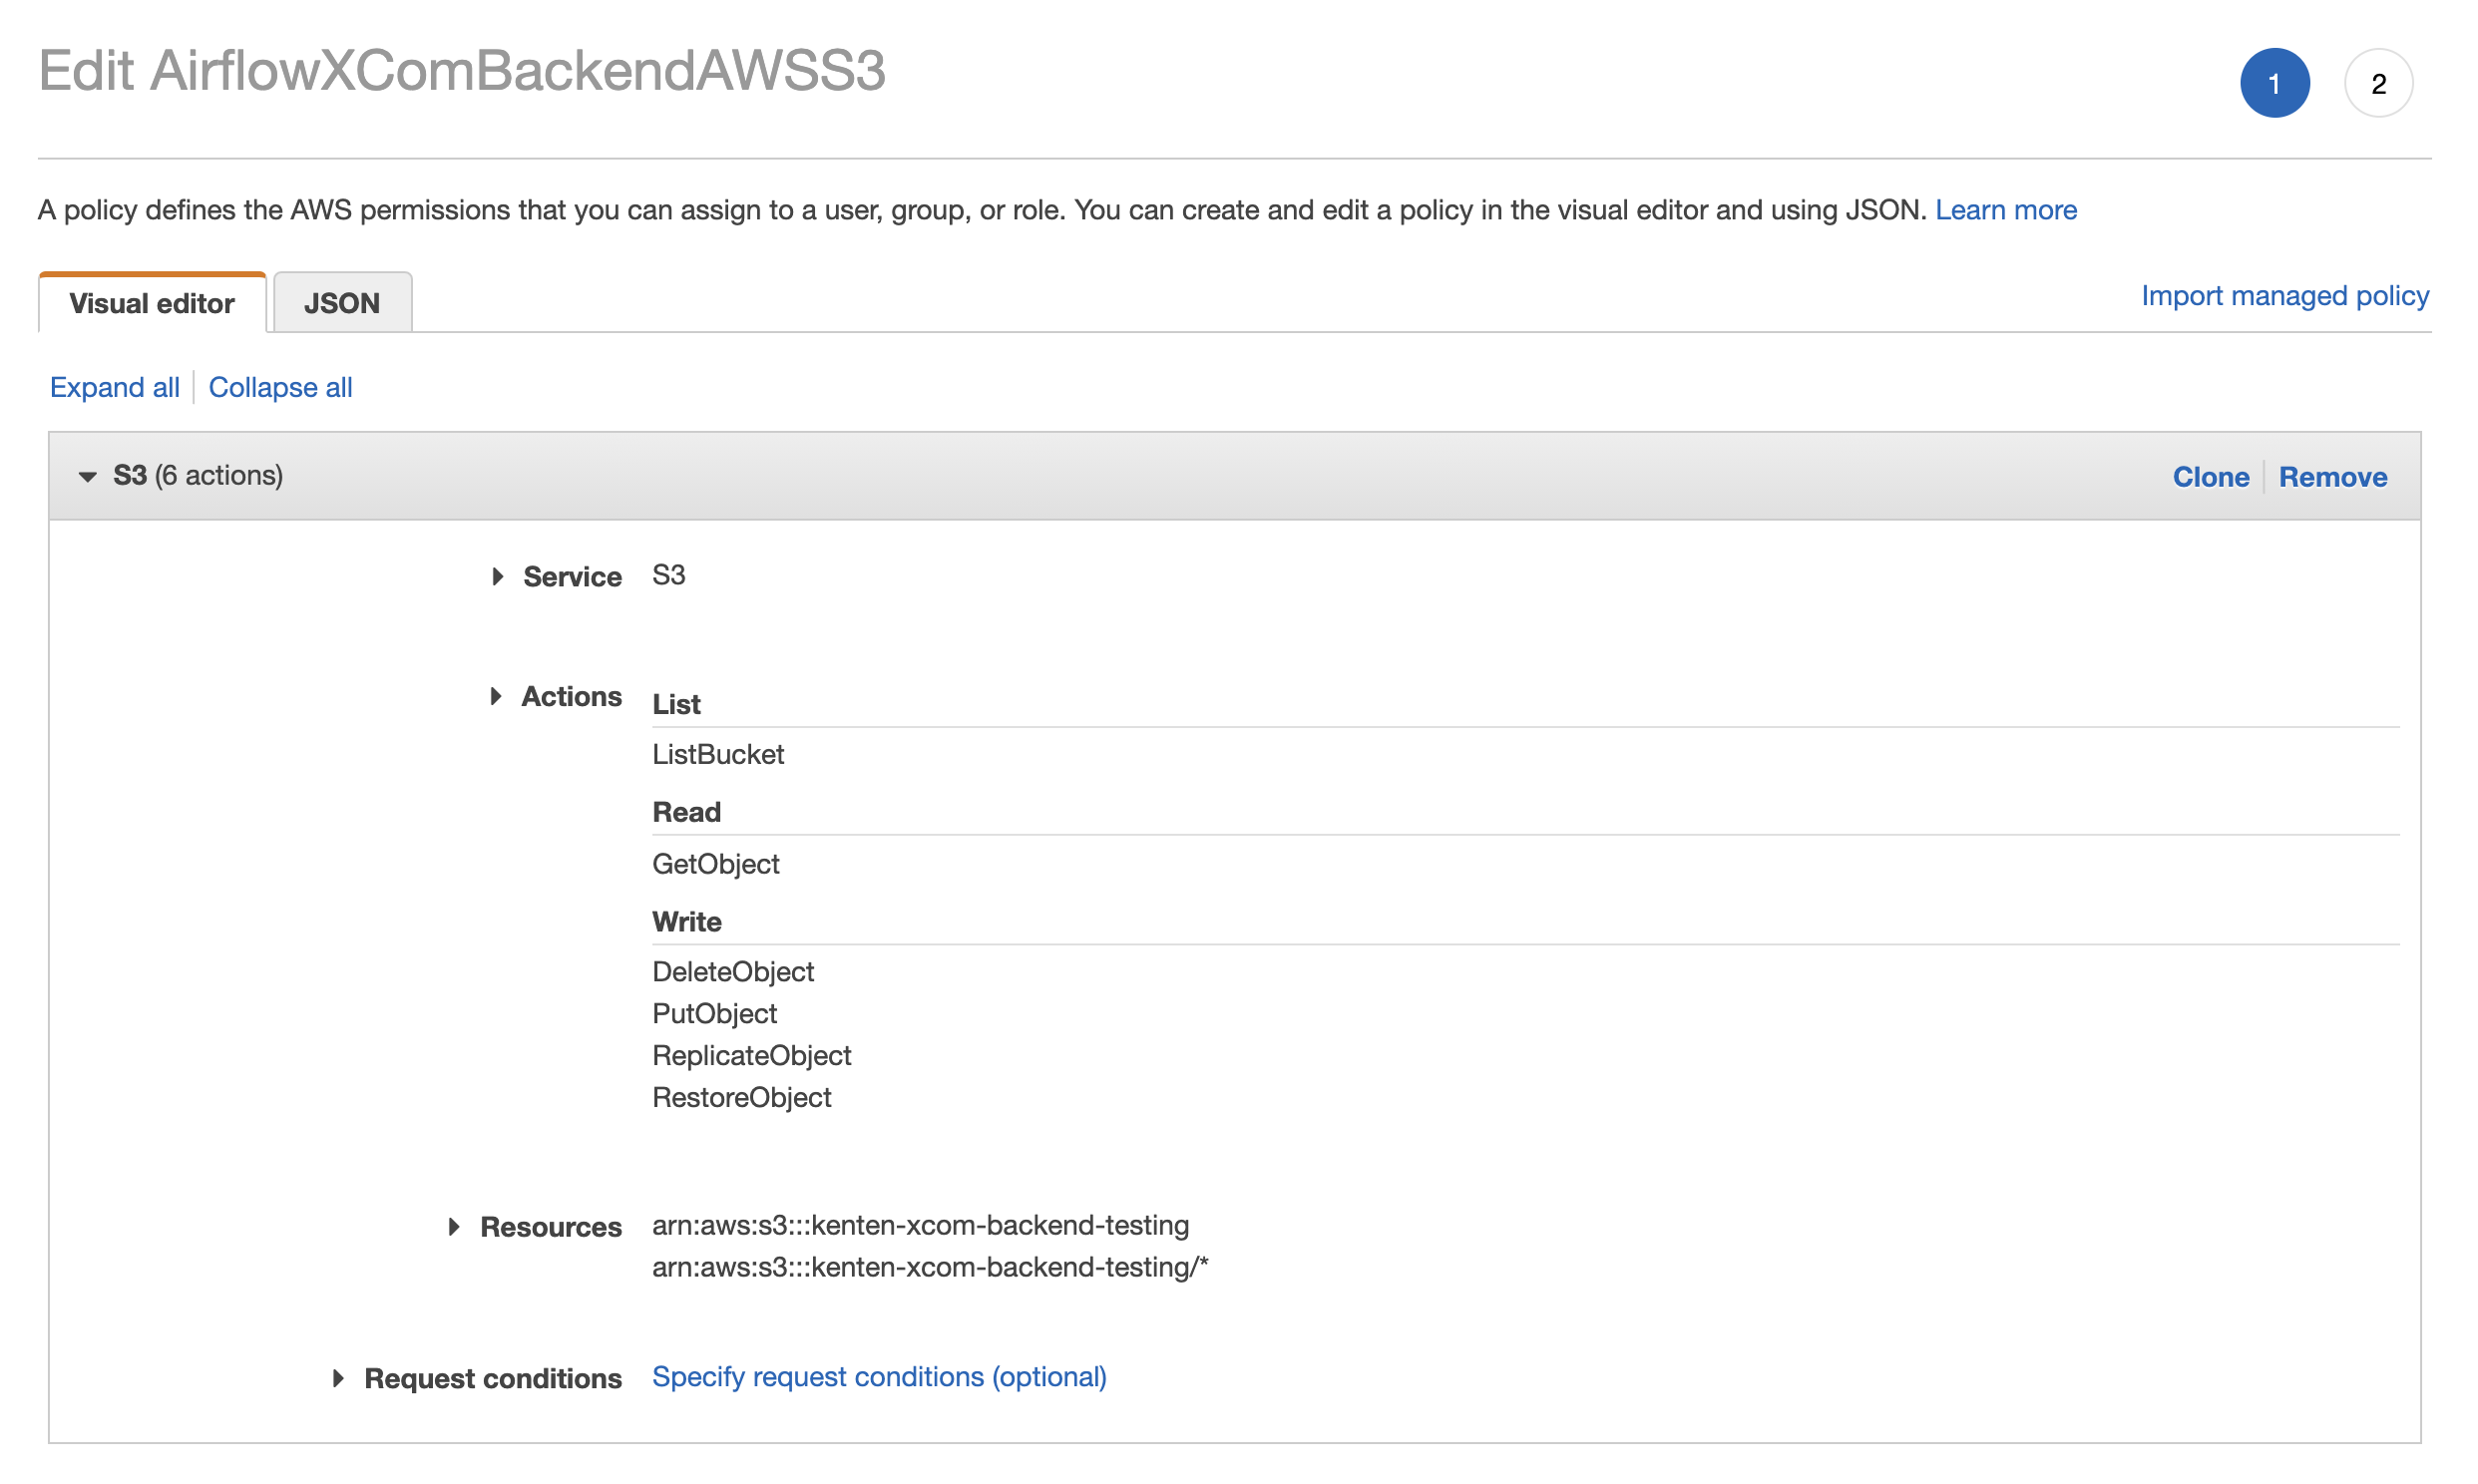
Create a bucket. In Amazon S3, make sure to block public access, enable versioning, and give the bucket a unique name.
Create a policy for your bucket that will allow Airflow to access it. Ensure the policy allows read and write actions over the bucket as shown in the following image:
Create a user such as airflow-xcoms with programmatic access and attach the policy you created in Step 2 to that user. Copy the access and secret keys.
2. Configure your Airflow environment
A connection is required to allow Airflow to connect to your custom backend. You can define the connection with the AIRFLOW_CONN_AWS_DEFAULT environment variable, or set up an aws_default connection in the Airflow UI. In this example, you'll set up the connection in the Airflow UI.
If Airflow is running in the same environment as your XCom Backend, you can assume a role rather instead of providing credentials. This increases security.
Using the access credentials you created previously, your settings look similar to this image:

3. Configure your serialization and deserialization methods
The final step to setting up your custom XCom backend is configuring your serialization and deserialization methods and applying them to your Airflow environment. Serialization and deserialization define how your XComs are programmatically handled when passing them between Airflow and your custom backend.
The main benefit to implementing a custom method is that unlike regular XComs, which only allow for JSON serializable messages, you can handle any datatype in whatever way suits your organization. Your custom XCom backend class inherits from the Airflow BaseXCom class, so you may want to start by reviewing the code to learn how it functions.
For this example, you'll define a Python file with serialization and deserialization methods that work with pandas dataframes. When a task pushes an XCom value of a pandas dataframe type to your backend, the data is converted to a CSV and saved to Amazon S3. When pulling the XCom (deserializing) from the backend, the method converts the CSV back into a pandas dataframe. The XCom backend bucket name must be specified in the class.
from typing import Any
from airflow.models.xcom import BaseXCom
from airflow.providers.amazon.aws.hooks.s3 import S3Hook

import pandas as pd
import uuid

class S3XComBackend(BaseXCom):
    PREFIX = "xcom_s3://"
    BUCKET_NAME = "your-bucket-name"

    @staticmethod
    def serialize_value(value: Any):
        if isinstance(value, pd.DataFrame):

            hook        = S3Hook()
            key         = "data_" + str(uuid.uuid4())
            filename    = f"{key}.csv"

            value.to_csv(filename)
            hook.load_file(
                filename=filename,
                key=key,
                bucket_name=S3XComBackend.BUCKET_NAME,
                replace=True
            )
            value = S3XComBackend.PREFIX + key
        return BaseXCom.serialize_value(value)

    @staticmethod
    def deserialize_value(result) -> Any:
        result = BaseXCom.deserialize_value(result)
        if isinstance(result, str) and result.startswith(S3XComBackend.PREFIX):
            hook    = S3Hook()
            key     = result.replace(S3XComBackend.PREFIX, "")
            filename = hook.download_file(
                key=key,
                bucket_name=S3XComBackend.BUCKET_NAME,
                local_path="/tmp"
            )
            result = pd.read_csv(filename)
        return result
To add this class to your Airflow environment, complete the following steps:
Create a folder and a file in your host directory and paste the
S3XComBackendclass code above into the file:# Create a folder/file in your host directory
include/s3_xcom_backend.pyMount the folder you created in step 1 as a Docker volume in your Airflow project. If you're using docker-compose, you can add the following to your
docker-compose.yamlfile:volumes:
- ./include:/opt/airflow/includeSpecify your XCom backend by defining the
AIRFLOW__CORE__XCOM_BACKENDAirflow environment variable. If you're using docker-compose, you can add the following to yourdocker-compose.yamlfile:environment:
- AIRFLOW__CORE__XCOM_BACKEND=include.s3_xcom_backend.S3XComBackendTo run this docker-compose example, you need to set your Python Path in your
docker-compose.yamlfile. For example,PYTHONPATH: /opt/airflow/.
When you restart Airflow and run a DAG with pandas dataframe XComs, the XComs get pushed to your Amazon S3 backend as shown in the following image:

If you've changed your XCom Backend class by modifying s3_xcom_backend.py, you'll need to restart Airflow with docker-compose down && docker-compose up -d to implement the changes.
Using XCom backends on Astro
In this example, you'll use the Great Expectations use case for storing operator results XComs. If you haven't installed the Astronomer CLI, install it using the CLI Quickstart.
- Configure your backend. See Set up an XCom backend.
- Open an existing Astronomer project, or initialize a new one using
astro dev init. - Add the XCom backend Python file with serialization and deserialization methods to the
include/directory of your Astronomer project. - Add the
AIRFLOW__CORE_XCOM_BACKENDenvironment variable to your Astronomer project. For this example, it beAIRFLOW__CORE__XCOM_BACKEND=include.s3_xcom_backend.S3XComBackend. There are a few ways to add an environment variable to your Astronomer Deployment, which are detailed in the Environment Variables guide. This example assumes that you added the variable to your Dockerfile. - Deploy your project code to Astronomer, or start Airflow locally by running
astro dev start. - Add an Airflow connection to connect to your backend. If you are using a secrets backend with Astronomer, you can add the connection there.
- Test your new XCom backend by running the following sample DAG.
This example creates serialization and deserialization methods that take the results of the GreatExpectationsOperator and converts them to JSON and then saves to an Amazon S3 file. Your custom backend class looks similar to this:
from typing import Any
from airflow.models.xcom import BaseXCom
from airflow.providers.amazon.aws.hooks.s3 import S3Hook

import json
import uuid

class S3XComBackend(BaseXCom):
    PREFIX = "xcom_s3://"
    BUCKET_NAME = "kenten-xcom-backend-testing"

    @staticmethod
    def serialize_value(value: Any):
        if not isinstance(value, (str, dict, list)):
            hook        = S3Hook()
            key         = "data_" + str(uuid.uuid4())
            filename    = f"{key}.json"

            with open(filename, 'w') as f:
                json.dump(json.loads(str(value)), f)

            hook.load_file(
                filename=filename,
                key=key,
                bucket_name=S3XComBackend.BUCKET_NAME,
                replace=True
            )
            value = S3XComBackend.PREFIX + key
        return BaseXCom.serialize_value(value)

    @staticmethod
    def deserialize_value(result) -> Any:
        result = BaseXCom.deserialize_value(result)
        if isinstance(result, str) and result.startswith(S3XComBackend.PREFIX):
            hook    = S3Hook()
            key     = result.replace(S3XComBackend.PREFIX, "")
            filename = hook.download_file(
                key=key,
                bucket_name=S3XComBackend.BUCKET_NAME,
                local_path="/tmp"
            )
            result = json.load(filename)
        return result
To test this, you'll use a variation of the example DAG in the Great Expectations provider page on the Astronomer Registry. For this DAG to work, you'll also need Great Expectations checkpoints, validation suits, and data to test. These items are located in the example repo.
Your example DAG looks similar to this:
from airflow import DAG
from great_expectations_provider.operators.great_expectations import GreatExpectationsOperator

import logging
import os
from datetime import datetime, timedelta

# This runs an expectation suite against a sample data asset. You may need to change these paths if you do not have your `data`
# directory living in a top-level `include` directory. Ensure the checkpoint yml files have the correct path to the data file.
base_path = os.path.dirname(os.path.dirname(os.path.abspath(__file__)))
data_file = os.path.join(base_path, 'include',
                         'data/yellow_tripdata_sample_2019-01.csv')
ge_root_dir = os.path.join(base_path, 'include', 'great_expectations')

default_args = {
    'owner': 'airflow',
    'depends_on_past': False,
    'email_on_failure': False,
    'email_on_retry': False,
    'retries': 1,
    'retry_delay': timedelta(minutes=1)
}

with DAG(
    dag_id='example_great_expectations_dag',
    start_date=datetime(2021, 1, 1),
    max_active_runs=1,
    schedule_interval='@daily',
    default_args=default_args,
    catchup=False
    ) as dag:

    ge_batch_kwargs_pass = GreatExpectationsOperator(
        task_id='ge_batch_kwargs_pass',
        expectation_suite_name='taxi.demo',
        batch_kwargs={
            'path': data_file,
            'datasource': 'data__dir'
        },
        data_context_root_dir=ge_root_dir,
    )

    # This runs an expectation suite against a data asset that passes the tests
    ge_batch_kwargs_list_pass = GreatExpectationsOperator(
        task_id='ge_batch_kwargs_list_pass',
        assets_to_validate=[
            {
                'batch_kwargs': {
                    'path': data_file,
                    'datasource': 'data__dir'
                },
                'expectation_suite_name': 'taxi.demo'
            }
        ],
        data_context_root_dir=ge_root_dir,
    )

    # This runs a checkpoint that will pass. Make sure the checkpoint yml file has the correct path to the data file.
    ge_checkpoint_pass = GreatExpectationsOperator(
        task_id='ge_checkpoint_pass',
        run_name='ge_airflow_run',
        checkpoint_name='taxi.pass.chk',
        data_context_root_dir=ge_root_dir,
    )


    ge_batch_kwargs_list_pass >> ge_batch_kwargs_pass >> ge_checkpoint_pass
When you run this DAG, you will see three XCom files in your Amazon S3 bucket, one for each operator. With this implementation, you donn't need to enable XCom pickling, you can version and access your XCom data easily, and you are not filling up the Airflow metadata database, making this a much more sustainable way of using this popular operator.