Use the KubernetesPodOperator
The KubernetesPodOperator (KPO) runs a Docker image in a dedicated Kubernetes Pod. By abstracting calls to the Kubernetes API, the KubernetesPodOperator lets you start and run Pods from Airflow using DAG code.
In this guide, you'll learn:
- The requirements for running the KubernetesPodOperator.
- When to use the KubernetesPodOperator.
- How to configure the KubernetesPodOperator.
- The differences between the KubernetesPodOperator and the Kubernetes executor.
You'll also learn how to use the KubernetesPodOperator to run a task in a language other than Python, how to use the KubernetesPodOperator with XComs, and how to launch a Pod in a remote AWS EKS Cluster.
Assumed knowledge
To get the most out of this guide, you should have an understanding of:
- Airflow operators. See Operators 101.
- Kubernetes basics. See the Kubernetes Documentation.
Requirements
To use the KubernetesPodOperator you need to install the Kubernetes provider package. To install it with pip, run:
pip install apache-airflow-providers-cncf-kubernetes==<version>
If you use the Astro CLI, you can alternatively install the package by adding the following line to your Astro project:
apache-airflow-providers-cncf-kubernetes==<version>
Review the Airflow Kubernetes provider Documentation to make sure you install the correct version of the provider package for your version of Airflow.
You also need an existing Kubernetes cluster to connect to. This is commonly the same cluster that Airflow is running on, but it doesn't have to be.
You don't need to use the Kubernetes executor to use the KubernetesPodOperator. You can choose one of the following executors:
- Local executor
- LocalKubernetes executor
- Celery executor
- Kubernetes executor
- CeleryKubernetes executor
On Astro, the infrastructure needed to run the KubernetesPodOperator with the Celery executor is included with all clusters by default. For more information, see Run the KubernetesPodOperator on Astro.
Run the KubernetesPodOperator locally
Setting up your local environment to use the KubernetesPodOperator can help you avoid time consuming deployments to remote environments.
To set up your local environment using the Astro CLI, see Test and troubleshoot the KubernetesPodOperator locally.
You can use the Helm Chart for Apache Airflow to run open source Airflow within a local Kubernetes cluster. See Getting Started With the Official Airflow Helm Chart.
When to use the KubernetesPodOperator
The KubernetesPodOperator runs any Docker image provided to it. Frequent use cases are:
- Running a task in a language other than Python. This guide includes an example of how to run a Haskell script with the KubernetesPodOperator.
- Having full control over how much compute resources and memory a single task can use.
- Executing tasks in a separate environment with individual packages and dependencies.
- Running tasks that use a version of Python not supported by your Airflow environment.
- Running tasks with specific Node (a virtual or physical machine in Kubernetes) constraints, such as only running on Nodes located in the European Union.
A comparison of the KubernetesPodOperator and the Kubernetes executor
Executors determine how your Airflow tasks are executed. The Kubernetes executor and the KubernetesPodOperator both dynamically launch and terminate Pods to run Airflow tasks. As the name suggests, the Kubernetes executor affects how all tasks in an Airflow instance are executed. The KubernetesPodOperator launches only its own task in a Kubernetes Pod with its own configuration. It does not affect any other tasks in the Airflow instance. To configure the Kubernetes executor, see Kubernetes Executor.
The following are the primary differences between the KubernetesPodOperator and the Kubernetes executor:
- The KubernetesPodOperator requires a Docker image to be specified, while the Kubernetes executor doesn't.
- The KubernetesPodOperator defines one isolated Airflow task. In contrast, the Kubernetes executor is implemented at the configuration level of the Airflow instance, which means all tasks run in their own Kubernetes Pod. This might be desired in some use cases that require auto-scaling, but it's not ideal for environments with a high volume of shorter running tasks.
- In comparison to the KubernetesPodOperator, the Kubernetes executor has less abstraction over Pod configuration. All task-level configurations have to be passed to the executor as a dictionary using the
BaseOperator'sexecutor_configargument, which is available to all operators. - If a custom Docker image is passed to the Kubernetes executor's
basecontainer by providing it to either thepod_template_fileor thepod_overridekey in the dictionary for theexecutor_configargument, Airflow must be installed or the task will not run. A possible reason for customizing this Docker image would be to run a task in an environment with different versions of packages than other tasks running in your Airflow instance. This is not the case with the KubernetesPodOperator, which can run any valid Docker image.
Both the KubernetesPodOperator and the Kubernetes executor can use the Kubernetes API to create Pods for running tasks. Typically, the KubernetesPodOperator is ideal for controlling the environment in which the task runs, while the Kubernetes executor is ideal for controlling resource optimization. It's common to use both the Kubernetes executor and the KubernetesPodOperator in the same Airflow environment, where all tasks need to run on Kubernetes but only some tasks require additional environment configurations.
How to configure the KubernetesPodOperator
The KubernetesPodOperator launches any valid Docker image provided to it in a dedicated Kubernetes Pod on a Kubernetes cluster. The KubernetesPodOperator supports arguments for some of the most common Pod settings. For advanced use cases, you can specify a Pod template file that supports all possible Pod settings.
The KubernetesPodOperator can be instantiated like any other operator within the context of a DAG.
Required arguments
task_id: A unique string identifying the task within Airflow.namespace: The namespace within your Kubernetes cluster to which the new Pod is assigned.name: The name of the Pod being created. This name must be unique for each Pod within a namespace.image: The Docker image to launch. Images from hub.docker.com can be passed with just the image name, but you must provide the full URL for custom repositories.
Optional arguments
random_name_suffix: Generates a random suffix for the Pod name if set toTrue. Avoids naming conflicts when running a large number of Pods.labels: A list of key and value pairs which can be used to logically group decoupled objects together.ports: Ports for the Pod.reattach_on_restart: Defines how to handle losing the worker while the Pod is running. When set toTrue, the existing Pod reattaches to the worker on the next try. When set toFalse, a new Pod will be created for each try. The default isTrue.is_delete_operator_pod: Determines whether to delete the Pod when it reaches its final state or when the execution is interrupted. The default isTrue.get_logs: Determines whether to use thestdoutof the container as task-logs to the Airflow logging system.log_events_on_failure: Determines whether events are logged in case the Pod fails. The default isFalse.env_vars: A dictionary of environment variables for the Pod.resources: A dictionary with resource requests (keys:request_memory,request_cpu) and limits (keys:limit_memory,limit_cpu,limit_gpu). See the Kubernetes Documentation on Resource Management for Pods and Containers for more information.volumes: A list ofk8s.V1Volumes, see also the Kubernetes example DAG from the Airflow documentation.affinityandtolerations: Dictionaries of rules for Pod to Node assignments. Like thevolumesparameter, these also require ak8sobject.pod_template_file: The path to a Pod template file.full_pod_spec: A complete Pod configuration formatted as a Pythonk8sobject.
There are many other arguments that can be used to configure the Pod and pass information to the Docker image. For a list of the available KubernetesPodOperator arguments, see the KubernetesPodOperator source code.
The following KubernetesPodOperator arguments can be used with Jinja templates: image, cmds, arguments, env_vars, labels, config_file, pod_template_file, and namespace.
Configure a Kubernetes connection
If you leave in_cluster=True, you only need to specify the KubernetesPodOperator's namespace argument to establish a connection with your Kubernetes cluster. The Pod specified by the KubernetesPodOperator runs on the same Kubernetes cluster as your Airflow instance.
If you are not running Airflow on Kubernetes, or want to send the Pod to a different cluster than the one currently hosting your Airflow instance, you can create a Kubernetes Cluster connection which uses the Kubernetes hook to connect to the Kubernetes API of a different Kubernetes cluster. This connection can be passed to the KubernetesPodOperator using the kubernetes_conn_id argument and requires the following components to work:
- A
KubeConfigfile, provided as either a path to the file or in JSON format. - The cluster context from the provided
KubeConfigfile.
The following image shows how to set up a Kubernetes cluster connection in the Airflow UI.
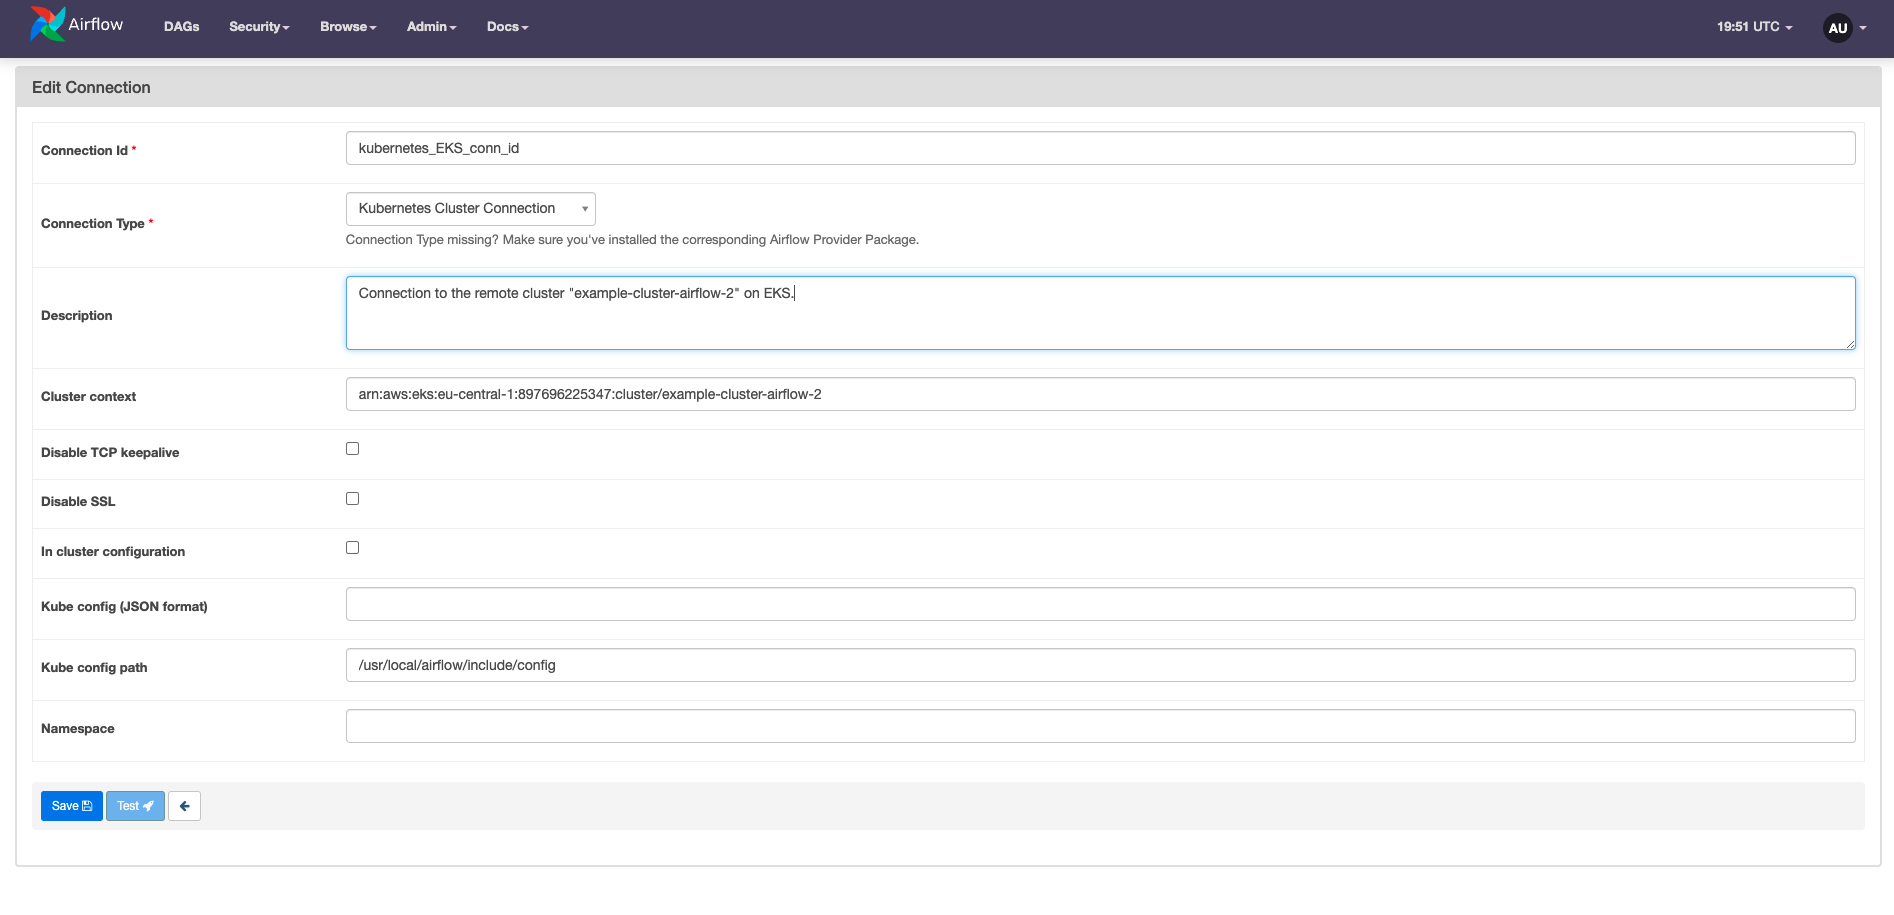
The components of the connection can also be set or overwritten at the task level by using the arguments config_file (to specify the path to the KubeConfig file) and cluster_context. Setting these parameters in airflow.cfg has been deprecated.
Example: Use the KubernetesPodOperator to run a script in another language
A frequent use case for the KubernetesPodOperator is running a task in a language other than Python. To do this, you build a custom Docker image containing the script.
In the following example, the Haskell script runs and the value NAME_TO_GREET is printed on the console:
import System.Environment

main = do
        name <- getEnv "NAME_TO_GREET"
        putStrLn ("Hello, " ++ name)
The Dockerfile creates the necessary environment to run the script and then executes it with a CMD command:
FROM haskell
WORKDIR /opt/hello_name
RUN cabal update
COPY ./haskell_example.cabal /opt/hello_name/haskell_example.cabal
RUN cabal build --only-dependencies -j4
COPY . /opt/hello_name
RUN cabal install
CMD ["haskell_example"]
After making the Docker image available, it can be run from the KubernetesPodOperator with the image argument. The following example DAG showcases a variety of arguments of the KubernetesPodOperator, including how to pass NAME_TO_GREET to the Haskell code.
from airflow import DAG
from datetime import datetime
from airflow.providers.cncf.kubernetes.operators.kubernetes_pod import (
                                                        KubernetesPodOperator)
from airflow.configuration import conf

# get the current Kubernetes namespace Airflow is running in
namespace = conf.get("kubernetes", "NAMESPACE")

# set the name that will be printed
name = 'your_name'

# instantiate the DAG
with DAG(
    start_date=datetime(2022,6,1),
    catchup=False,
    schedule_interval='@daily',
    dag_id='KPO_different_language_example_dag'
) as dag:

    say_hello_name_in_haskell = KubernetesPodOperator(
        # unique id of the task within the DAG
        task_id='say_hello_name_in_haskell',
        # the Docker image to launch
        image='<image location>',
        # launch the Pod on the same cluster as Airflow is running on
        in_cluster=True,
        # launch the Pod in the same namespace as Airflow is running in
        namespace=namespace,

        # Pod configuration
        # name the Pod
        name='my_pod',
        # give the Pod name a random suffix, ensure uniqueness in the namespace
        random_name_suffix=True,
        # attach labels to the Pod, can be used for grouping
        labels={'app':'backend', 'env':'dev'},
        # reattach to worker instead of creating a new Pod on worker failure
        reattach_on_restart=True,
        # delete Pod after the task is finished
        is_delete_operator_pod=True,
        # get log stdout of the container as task logs
        get_logs=True,
        # log events in case of Pod failure
        log_events_on_failure=True,
        # pass your name as an environment var
        env_vars={"NAME_TO_GREET": f"{name}"}
        )
Example: Use the KubernetesPodOperator with XComs
XCom is a commonly used Airflow feature for passing small amounts of data between tasks. You can use the KubernetesPodOperator to both receive values stored in XCom and push values to XCom.
The following example DAG shows an ETL pipeline with an extract_data task that runs a query on a database and returns a value. The TaskFlow API automatically pushes the return value to XComs.
The transform task is a KubernetesPodOperator which requires that the XCom data is pushed from the upstream task before it, and then launches an image created with the following Dockerfile:
FROM python

WORKDIR /

# creating the file to write XComs to
RUN mkdir -p airflow/xcom
RUN echo "" > airflow/xcom/return.json

COPY multiply_by_23.py ./

CMD ["python", "./multiply_by_23.py"]
When using XComs with the KubernetesPodOperator, you must create the file airflow/xcom/return.json in your Docker container (ideally from within your Dockerfile), because Airflow can only look for XComs to pull at that specific location. IN the following example, the Docker image contains a simple Python script to multiply an environment variable by 23, package the result into JSON, and then write that JSON to the correct file to be retrieved as an XCom. The XComs from the KubernetesPodOperator are pushed only if the task is marked successful.
import os

# import the result of the previous task as an environment variable
data_point = os.environ['DATA_POINT']

# multiply the data point by 23 and package the result into a json
multiplied_data_point = str(23 * int(data_point))
return_json = {"return_value":f"{multiplied_data_point}"}

# write to the file checked by Airflow for XComs
f = open('./airflow/xcom/return.json', 'w')
f.write(f"{return_json}")
f.close()
The load_data task pulls the XCom returned from the transform task and prints it to the console.
The full DAG code is provided in the following example. To avoid task failure, turn on do_xcom_push after you create the airflow/xcom/return.json within the Docker container run by the KubernetesPodOperator.
from airflow import DAG
from datetime import datetime
from airflow.providers.cncf.kubernetes.operators.kubernetes_pod import (
                                                          KubernetesPodOperator)
from airflow.configuration import conf
from airflow.decorators import task

import random

# get the current Kubernetes namespace Airflow is running in
namespace = conf.get("kubernetes", "NAMESPACE")

# instantiate the DAG
with DAG(
    start_date=datetime(2022,6,1),
    catchup=False,
    schedule_interval='@daily',
    dag_id='KPO_XComs_example_dag'
) as dag:

    @task
    def extract_data():
        # simulating querying from a database
        data_point = random.randint(0,100)
        return data_point

    transform = KubernetesPodOperator(
        # set task id
        task_id='transform',
        # specify the Docker image to launch
        image='<image location>',

        # launch the Pod on the same cluster as Airflow is running on
        in_cluster=True,
        # launch the Pod in the same namespace as Airflow is running in
        namespace=namespace,

        # Pod configuration
        # naming the Pod
        name='my_pod',
        # log stdout of the container as task logs
        get_logs=True,
        # log events in case of Pod failure
        log_events_on_failure=True,
        # pull a variable from XComs using Jinja templating and provide it
        # to the Pod as an environment variable
        env_vars={"DATA_POINT": """{{ ti.xcom_pull(task_ids='extract_data',
                                                 key='return_value') }}"""},
        # push the contents from xcom.json to Xcoms. Remember to only set this
        # argument to True if you have created the `airflow/xcom/return.json`
        # file within the Docker container run by the KubernetesPodOperator.
        do_xcom_push=True
        )

    @task
    def load_data(**context):
        # pull the XCom value that has been pushed by the KubernetesPodOperator
        transformed_data_point = context['ti'].xcom_pull(
                                               task_ids='transform',
                                               key='return_value')
        print(transformed_data_point)

    # set dependencies (tasks defined using Decorators need to be called)
    extract_data() >> transform >> load_data()
Example: Use KubernetesPodOperator to run a Pod in a separate cluster
If some of your tasks require specific resources such as a GPU, you might want to run them in a different cluster than your Airflow instance. In setups where both clusters are used by the same AWS or GCP account, this can be managed with roles and permissions. There is also the possibility to use a CI account and enable cross-account access to AWS EKS cluster resources.
This example shows how to set up an EKS cluster on AWS and run a Pod on it from an Airflow instance where cross-account access is not available.The same process applicable to other Kubernetes services such as GKE.
Some platforms which can host Kubernetes clusters have their own specialised operators. For excample, the GKEStartPodOperator and the EksPodOperator.
Step 1: Set up an EKS cluster on AWS
Create an EKS cluster IAM role with a unique name and add the following permission policies:
AmazonEKSWorkerNodePolicyAmazonEKS_CNI_PolicyAmazonEC2ContainerRegistryReadOnly
Update the trust policy of this new role to include your user and necessary AWS Services. This step ensures that the role can be assumed by your user.
{
"Version": "2012-10-17",
"Statement": [
    {
    "Effect": "Allow",
    "Principal": {
        "AWS": "arn:aws:iam::<aws account id>:<your user>",
        "Service": [
            "ec2.amazonaws.com",
            "eks.amazonaws.com"
        ]
    },
    "Action": "sts:AssumeRole"
    }
]
}
Add the new role to your local AWS config file, which by default is located at
~/.aws/config. See the AWS documentation.[default]
region = <your region>
[profile <name of the new role>]
role_arn = <EKS role arn>
source_profile = <your user>Make sure your default credentials include a valid and active key for your username. See Programmatic access.
Make a copy of
~/.aws/credentialsand~/.aws/configavailable to your Airflow environment. If you run Airflow using the Astro CLI, create a new directory called.awsin theincludefolder of your Astro project and copy both files into it.Create a new EKS cluster and assign the newly created role to it.
Step 2: Retrieve the KubeConfig file from the EKS cluster
Use a
KubeConfigfile to remotely connect to your new EKS cluster. Run the following command to retrieve it:aws eks --region <your-region> update-kubeconfig --name <cluster-name>This command copies information relating to the new cluster into your existing
KubeConfigfile at~/.kube/config.Check this file before making it available to Airflow. It should appear similar to the following configuration. Add any missing configurations to the file.
apiVersion: v1
clusters:
- cluster:
    certificate-authority-data: <your certificate>
    server: <your AWS server address>
name: <arn of your cluster>
contexts:
- context:
    cluster: <arn of your cluster>
    user: <arn of your cluster>
name: <arn of your cluster>
current-context: <arn of your cluster>
kind: Config
preferences: {}
users:
- name: <arn of your cluster>
user:
    exec:
    apiVersion: client.authentication.k8s.io/v1alpha1
    args:
    - --region
    - <your cluster's AWS region>
    - eks
    - get-token
    - --cluster-name
    - <name of your cluster>
    - --profile
    - default
    command: aws
    interactiveMode: IfAvailable
    provideClusterInfo: false
Confirm that the
KubeConfigfile is formatted properly and make it available to Airflow. If you're an Astro CLI user, you can do this by adding the file to theincludedirectory of your Astro project.
Step 3: Add a new namespace to the EKS cluster
It is best practice to use a new namespace for the Pods that Airflow spins up in your cluster. To create a namespace for your Pods, access the EKS cluster and run:
# create a new namespace on the EKS cluster
kubectl create namespace <your-namespace-name>
Step 4: Adjust the Airflow configuration files
This step will differ depending on your Airflow setup.
Local Apache Airflow
To access your cluster from a local instance of Apache Airflow, install awscli, apache-airflow-providers-cncf-kubernetes, and apache-airflow-providers-amazon on the machine running Airflow.
Airflow on Docker with the Astro CLI
To access the cluster from Airflow using the Astro CLI, add the following line to your Dockerfile to copy your config and credentials file from /include/.aws into the container:
COPY --chown=astro:astro include/.aws /home/astro/.aws
To authenticate yourself to the remote cluster, add the following line to your packages.txt file:
awscli
Add the following lines to your requirements.txt file:
apache-airflow-providers-cncf-kubernetes
apache-airflow-providers-amazon
Step 5: Add AWS connection ID
In the Airflow UI, go to Admin > Connections and complete these fields:
- Connection ID: Any
- Connection Type: Amazon Web Services
- Login: Your AWS access key ID
- Password: Your AWS secret access key
Step 6: Create the DAG with the KubernetesPodOperator
When you create new Deployments, you'll need to set one additional argument in the KubernetesPodOperator: labels={"airflow_kpo_in_cluster": "False"} to connect to a remote cluster. If you are trying to set up the KubernetesPodOperator connecting to a remote cluster in an existing deployment please contact Customer Support.
The following DAG utilizes several classes from the Amazon provider package to dynamically spin up and delete Pods for each task in a newly created node group. If your remote Kubernetes cluster already has a node group available, you only need to define your task in the KubernetesPodOperator itself.
The example DAG contains 5 consecutive tasks:
- Create a node group according to the users' specifications (in the example using GPU resources).
- Use a sensor to check that the cluster is running correctly.
- Use the KubernetesPodOperator to run any valid Docker image in a Pod on the newly created node group on the remote cluster. The example DAG uses the standard
Ubuntuimage to print "hello" to the console using abashcommand. - Delete the node group.
- Verify that the node group has been deleted.
# import DAG object and utility packages
from airflow import DAG
from datetime import datetime
from airflow.configuration import conf

# import the KubernetesPodOperator
from airflow.providers.cncf.kubernetes.operators.kubernetes_pod import (
                                                        KubernetesPodOperator)

# import EKS related packages from the Amazon Provider
from airflow.providers.amazon.aws.hooks.eks import EKSHook, NodegroupStates
from airflow.providers.amazon.aws.operators.eks import (
                      EKSCreateNodegroupOperator, EKSDeleteNodegroupOperator)
from airflow.providers.amazon.aws.sensors.eks import EKSNodegroupStateSensor

# custom class to create a node group with Nodes on EKS
class EKSCreateNodegroupWithNodesOperator(EKSCreateNodegroupOperator):

    def execute(self, context):
        # instantiating an EKSHook on the basis of the AWS connection (Step 5)
        eks_hook = EKSHook(
            aws_conn_id=self.aws_conn_id,
            region_name=self.region,
        )

        # define the Node group to create
        eks_hook.create_nodegroup(
            clusterName=self.cluster_name,
            nodegroupName=self.nodegroup_name,
            subnets=self.nodegroup_subnets,
            nodeRole=self.nodegroup_role_arn,
            scalingConfig={
                'minSize': 1,
                'maxSize': 1,
                'desiredSize': 1
            },
            diskSize=20,
            instanceTypes=['g4dn.xlarge'],
            amiType='AL2_x86_64_GPU',   # get GPU resources
            updateConfig={
                'maxUnavailable': 1
            },
        )

# instantiate the DAG
with DAG(
    start_date=datetime(2022,6,1),
    catchup=False,
    schedule_interval='@daily',
    dag_id='KPO_remote_EKS_cluster_example_dag'
) as dag:

    # task 1 creates the node group
    create_gpu_nodegroup=EKSCreateNodegroupWithNodesOperator(
        task_id='create_gpu_nodegroup',
        cluster_name='<your cluster name>',
        nodegroup_name='gpu-nodes',
        nodegroup_subnets=['<your subnet>', '<your subnet>'],
        nodegroup_role_arn='<arn of your EKS role>',
        aws_conn_id='<your aws conn id>',
        region='<your region>'
    )

    # task 2 check for node group status, if it is up and running
    check_nodegroup_status=EKSNodegroupStateSensor(
        task_id='check_nodegroup_status',
        cluster_name='<your cluster name>',
        nodegroup_name='gpu-nodes',
        mode='reschedule',
        timeout=60 * 30,
        exponential_backoff=True,
        aws_conn_id='<your aws conn id>',
        region='<your region>'
    )

    # task 3 the KubernetesPodOperator running a task
    # here, cluster_context and the config_file are defined at the task level
    # it is of course also possible to abstract these values
    # in a Kubernetes Cluster Connection
    run_on_EKS=KubernetesPodOperator(
        task_id="run_on_EKS",
        cluster_context='<arn of your cluster>',
        namespace="airflow-kpo-default",
        name="example_pod",
        image='ubuntu',
        cmds=['bash', '-cx'],
        arguments=["echo hello"],
        get_logs=True,
        is_delete_operator_pod=False,
        in_cluster=False,
        config_file='/usr/local/airflow/include/config',
        startup_timeout_seconds=240,
    )

    # task 4 deleting the node group
    delete_gpu_nodegroup=EKSDeleteNodegroupOperator(
        task_id='delete_gpu_nodegroup',
        cluster_name='<your cluster name>',
        nodegroup_name='gpu-nodes',
        aws_conn_id='<your aws conn id>',
        region='<your region>'
    )

    # task 5 checking that the node group was deleted successfully
    check_nodegroup_termination=EKSNodegroupStateSensor(
        task_id='check_nodegroup_termination',
        cluster_name='<your cluster name>',
        nodegroup_name='gpu-nodes',
        aws_conn_id='<your aws conn id>',
        region='<your region>',
        mode='reschedule',
        timeout=60 * 30,
        target_state=NodegroupStates.NONEXISTENT
    )

    # setting the dependencies
    create_gpu_nodegroup >> check_nodegroup_status >> run_on_EKS
    run_on_EKS >> delete_gpu_nodegroup >> check_nodegroup_termination
If you've configured a local command line connection to the remote cluster, you can use kubectl to view the remote Pod while it runs. For example:
