Pass data between tasks
Sharing data between tasks is a very common use case in Airflow. If you've been writing DAGs, you probably know that breaking them up into smaller tasks is a best practice for debugging and recovering quickly from failures. What do you do when one of your downstream tasks requires metadata about an upstream task, or processes the results of the task immediately before it?
There are a few methods you can use to implement data sharing between your Airflow tasks. In this tutorial, you'll walk through the two most commonly used methods, learn when to use them, and use some example DAGs to understand how they can be implemented.
All code in this guide can be found in the Github repo.
Assumed knowledge
To get the most out of this guide, you should have an understanding of:
- Airflow operators. See Operators 101.
- DAG writing best practices. See DAG writing best practices in Apache Airflow.
Best practices
Before you dive into the specifics, there are a couple of important concepts to understand before you write DAGs that pass data between tasks.
Ensure idempotency
An important concept for any data pipeline, including an Airflow DAG, is idempotency. This is the property whereby an operation can be applied multiple times without changing the result. This concept is often associated with your entire DAG. If you execute the same DAGRun multiple times, you will get the same result. However, this concept also applies to tasks within your DAG. If every task in your DAG is idempotent, your full DAG is idempotent as well.
When designing a DAG that passes data between tasks, it's important that you ensure that each task is idempotent. This helps with recovery and ensures no data is lost if a failure occurs.
Consider the size of your data
Knowing the size of the data you are passing between Airflow tasks is important when deciding which implementation method to use. As you'll learn, XComs are one method of passing data between tasks, but they are only appropriate for small amounts of data. Large data sets require a method making use of intermediate storage and possibly utilizing an external processing framework.
XCom
The first method for passing data between Airflow tasks is to use XCom, which is a key Airflow feature for sharing task data.
What is XCom
XCom is a built-in Airflow feature. XComs allow tasks to exchange task metadata or small amounts of data. They are defined by a key, value, and timestamp.
XComs can be "pushed", meaning sent by a task, or "pulled", meaning received by a task. When an XCom is pushed, it is stored in the Airflow metadata database and made available to all other tasks. Any time a task returns a value (for example, when your Python callable for your PythonOperator has a return), that value is automatically pushed to XCom. Tasks can also be configured to push XComs by calling the xcom_push() method. Similarly, xcom_pull() can be used in a task to receive an XCom.
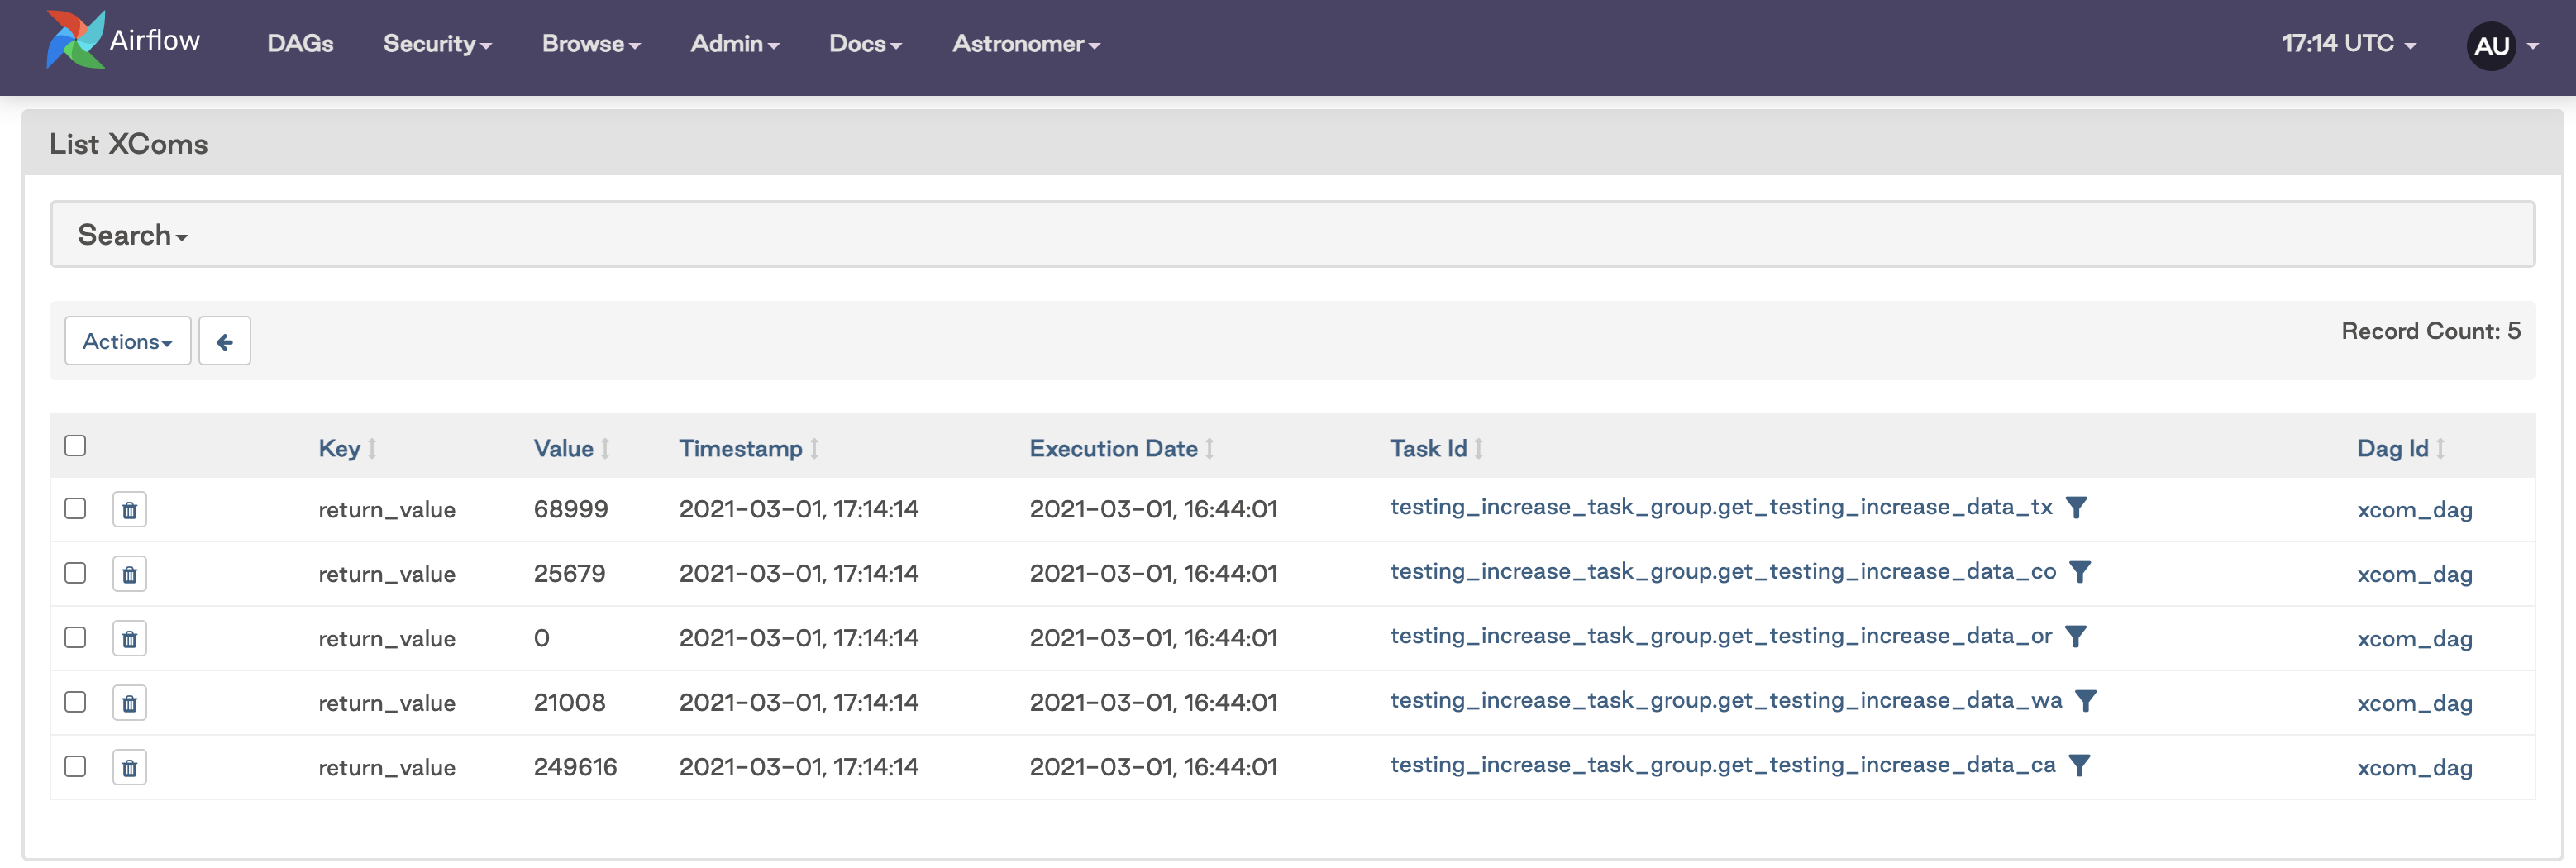
You can view your XComs in the Airflow UI by going to Admin > XComs. You should see something like this:
When to use XComs
XComs should be used to pass small amounts of data between tasks. For example, task metadata, dates, model accuracy, or single value query results are all ideal data to use with XCom.
While there is nothing stopping you from passing small data sets with XCom, be very careful when doing so. This is not what XCom was designed for, and using it to pass data like pandas dataframes can degrade the performance of your DAGs and take up storage in the metadata database.
XCom cannot be used for passing large data sets between tasks. The limit for the size of the XCom is determined by which metadata database you are using:
- Postgres: 1 Gb
- SQLite: 2 Gb
- MySQL: 64 Kb
You can see that these limits aren't very big. And even if you think your data might meet the maximum allowable limit, don't use XComs. Instead, use intermediary data storage, which is more appropriate for larger amounts of data.
Custom XCom backends
Custom XCom Backends are a new feature available in Airflow 2.0 and greater. Using an XCom backend means you can push and pull XComs to and from an external system such as S3, GCS, or HDFS rather than the default of Airflow's metadata database. You can also implement your own serialization and deserialization methods to define how XComs are handled. This is a concept in its own right and you can learn more by reading Custom XCom Backends.
Example DAG using XComs
In this section, you'll review a DAG that uses XCom to pass data between tasks. The DAG uses XComs to analyze the increase in total number of Covid tests for the current day for a particular state. To implement this use case, the first task makes a request to the Covid Tracking API and pulls the totalTestResultsIncrease parameter from the results. The second task takes the results from the first task and performs an analysis. This is a valid use case for XCom, because the data being passed between the tasks is a single integer.
from airflow import DAG
from airflow.operators.python_operator import PythonOperator
from datetime import datetime, timedelta

import requests
import json

url = 'https://covidtracking.com/api/v1/states/'
state = 'wa'

def get_testing_increase(state, ti):
    """
    Gets totalTestResultsIncrease field from Covid API for given state and returns value
    """
    res = requests.get(url+'{0}/current.json'.format(state))
    testing_increase = json.loads(res.text)['totalTestResultsIncrease']

    ti.xcom_push(key='testing_increase', value=testing_increase)

def analyze_testing_increases(state, ti):
    """
    Evaluates testing increase results
    """
    testing_increases=ti.xcom_pull(key='testing_increase', task_ids='get_testing_increase_data_{0}'.format(state))
    print('Testing increases for {0}:'.format(state), testing_increases)
    #run some analysis here

# Default settings applied to all tasks
default_args = {
    'owner': 'airflow',
    'depends_on_past': False,
    'email_on_failure': False,
    'email_on_retry': False,
    'retries': 1,
    'retry_delay': timedelta(minutes=5)
}

with DAG('xcom_dag',
         start_date=datetime(2021, 1, 1),
         max_active_runs=2,
         schedule_interval=timedelta(minutes=30),
         default_args=default_args,
         catchup=False
         ) as dag:

    opr_get_covid_data = PythonOperator(
        task_id = 'get_testing_increase_data_{0}'.format(state),
        python_callable=get_testing_increase,
        op_kwargs={'state':state}
    )

    opr_analyze_testing_data = PythonOperator(
        task_id = 'analyze_data',
        python_callable=analyze_testing_increases,
                op_kwargs={'state':state}
    )

    opr_get_covid_data >> opr_analyze_testing_data
In this DAG there are two PythonOperator tasks which share data using the xcom_push and xcom_pull functions. In the get_testing_increase function, the xcom_push method was used to allow the key name to be specified. Alternatively, the function could be configured to return the testing_increase value, because any value returned by an operator in Airflow is automatically pushed to XCom. If this method was used, the XCom key would be "returned_value".
For the xcom_pull call in the analyze_testing_increases function, you specify the key and task_ids associated with the XCom you want to retrieve. This allows you to pull any XCom value (or multiple values) at any time into a task. It does not need to be from the task immediately prior as shown in this example.
If you run this DAG and then go to the XComs page in the Airflow UI, you'll see that a new row has been added for your get_testing_increase_data_wa task with the key testing_increase and Value returned from the API.

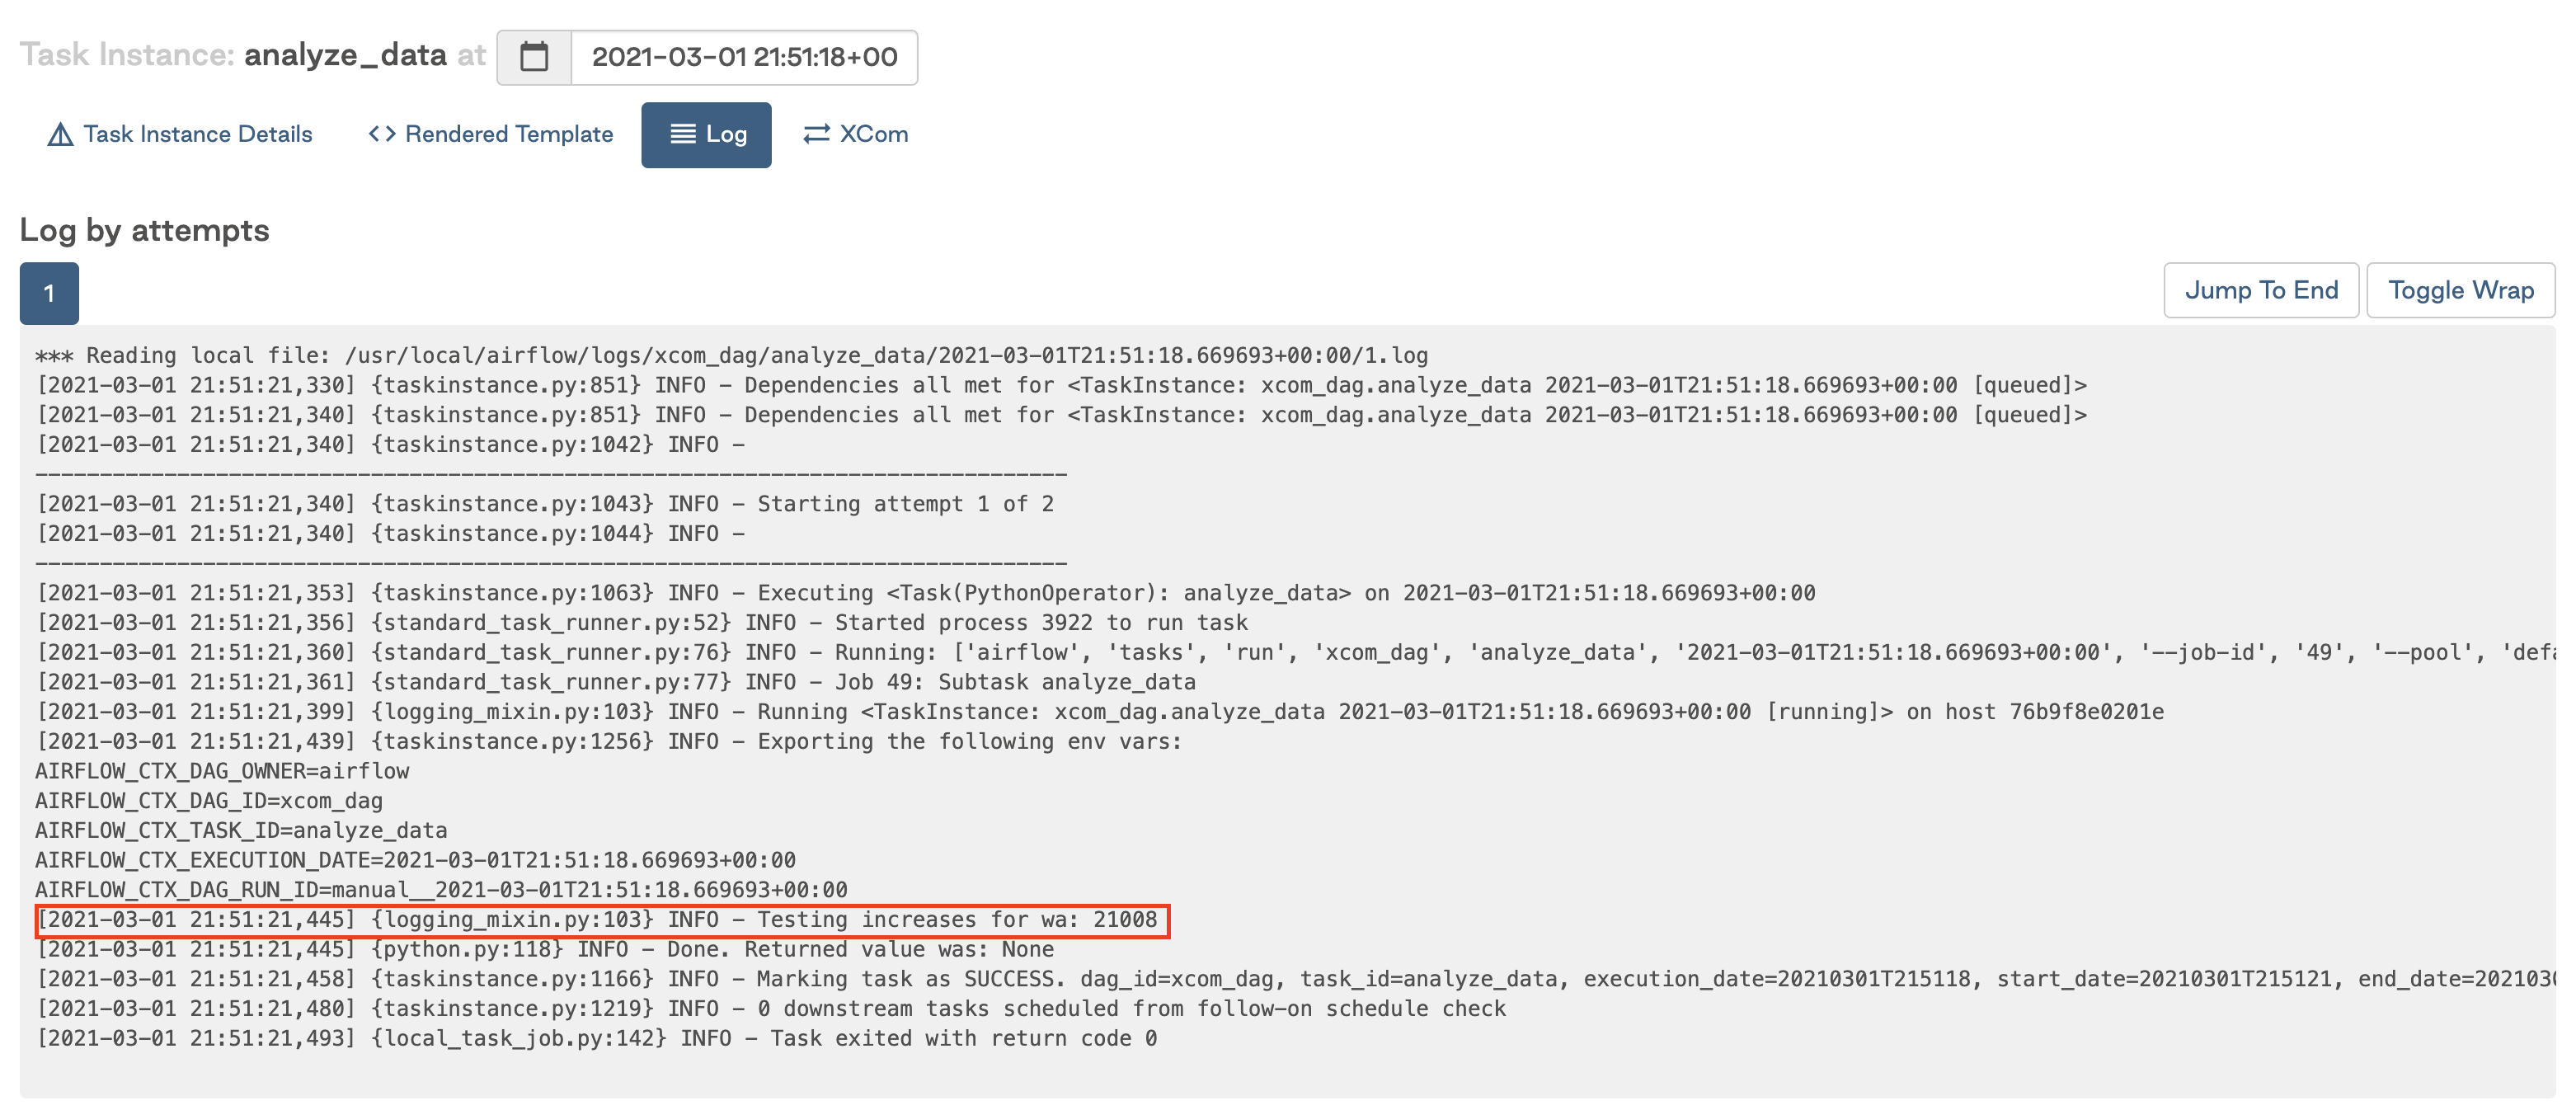
In the logs for the analyze_data task, you can see the value from the prior task was printed, meaning the value was successfully retrieved from XCom.
TaskFlow API
Another way to implement the previous DAG is to use the TaskFlow API that was released with Airflow 2.0. With the TaskFlow API, returned values are pushed to XCom as usual, but XCom values can be pulled simply by adding the key as an input to the function as shown in the following DAG:
from airflow.decorators import dag, task
from datetime import datetime

import requests
import json

url = 'https://covidtracking.com/api/v1/states/'
state = 'wa'

default_args = {
    'start_date': datetime(2021, 1, 1)
}

@dag('xcom_taskflow_dag', schedule_interval='@daily', default_args=default_args, catchup=False)
def taskflow():

    @task
    def get_testing_increase(state):
        """
        Gets totalTestResultsIncrease field from Covid API for given state and returns value
        """
        res = requests.get(url+'{0}/current.json'.format(state))
        return{'testing_increase': json.loads(res.text)['totalTestResultsIncrease']}

    @task
    def analyze_testing_increases(testing_increase: int):
        """
        Evaluates testing increase results
        """
        print('Testing increases for {0}:'.format(state), testing_increase)
        #run some analysis here

    analyze_testing_increases(get_testing_increase(state))

dag = taskflow()
This DAG is functionally the same as the previous one, but thanks to the TaskFlow API there is less code required overall, and no additional code required for passing the data between the tasks using XCom.
Intermediary data storage
As mentioned previously, XCom is a great option for sharing data between tasks because it doesn't rely on any tools external to Airflow itself. However, it is only designed to be used for very small amounts of data. What if the data you need to pass is a little bit larger, for example a small dataframe?
The best way to manage this use case is to use intermediary data storage. This means saving your data to some system external to Airflow at the end of one task, then reading it in from that system in the next task. This is commonly done using cloud file storage such as S3, GCS, or Azure Blob Storage, but it could also be done by loading the data in either a temporary or persistent table in a database.
While this is a great way to pass data that is too large to be managed with XCom, you should still exercise caution. Airflow is meant to be an orchestrator, not an execution framework. If your data is very large, it is probably a good idea to complete any processing using a framework like Spark or compute-optimized data warehouses like Snowflake or dbt.
Example DAG
Building on the previous COVID example, you are now interested in getting all of the daily COVID data for a state and processing it. This case would not be ideal for XCom, but since the data returned is a small dataframe, it can be processed with Airflow.
from airflow import DAG
from airflow.operators.python_operator import PythonOperator
from airflow.providers.amazon.aws.hooks.s3 import S3Hook
from datetime import datetime, timedelta

from io import StringIO
import pandas as pd
import requests

s3_conn_id = 's3-conn'
bucket = 'astro-workshop-bucket'
state = 'wa'
date = '{{ yesterday_ds_nodash }}'

def upload_to_s3(state, date):
    '''Grabs data from Covid endpoint and saves to flat file on S3
    '''
    # Connect to S3
    s3_hook = S3Hook(aws_conn_id=s3_conn_id)

    # Get data from API
    url = 'https://covidtracking.com/api/v1/states/'
    res = requests.get(url+'{0}/{1}.csv'.format(state, date))

    # Save data to CSV on S3
    s3_hook.load_string(res.text, '{0}_{1}.csv'.format(state, date), bucket_name=bucket, replace=True)

def process_data(state, date):
    '''Reads data from S3, processes, and saves to new S3 file
    '''
    # Connect to S3
    s3_hook = S3Hook(aws_conn_id=s3_conn_id)

    # Read data
    data = StringIO(s3_hook.read_key(key='{0}_{1}.csv'.format(state, date), bucket_name=bucket))
    df = pd.read_csv(data, sep=',')

    # Process data
    processed_data = df[['date', 'state', 'positive', 'negative']]

    # Save processed data to CSV on S3
    s3_hook.load_string(processed_data.to_string(), '{0}_{1}_processed.csv'.format(state, date), bucket_name=bucket, replace=True)

# Default settings applied to all tasks
default_args = {
    'owner': 'airflow',
    'depends_on_past': False,
    'email_on_failure': False,
    'email_on_retry': False,
    'retries': 1,
    'retry_delay': timedelta(minutes=1)
}

with DAG('intermediary_data_storage_dag',
         start_date=datetime(2021, 1, 1),
         max_active_runs=1,
         schedule_interval='@daily',
         default_args=default_args,
         catchup=False
         ) as dag:

    generate_file = PythonOperator(
        task_id='generate_file_{0}'.format(state),
        python_callable=upload_to_s3,
        op_kwargs={'state': state, 'date': date}
    )

    process_data = PythonOperator(
        task_id='process_data_{0}'.format(state),
        python_callable=process_data,
        op_kwargs={'state': state, 'date': date}
    )

    generate_file >> process_data
In this DAG you used the S3Hook to save data retrieved from the API to a CSV on S3 in the generate_file task. The process_data task then takes the data from S3, converts it to a dataframe for processing, and then saves the processed data back to a new CSV on S3.