Install Astro on GCP
This is where you'll find instructions for installing Astro on the Google Cloud Platform (GCP).
To complete the installation process, you'll:
- Create an account on Astro.
- Activate your Astro data plane by enabling Google Cloud APIs and adding service accounts to your project's IAM.
- Share information about your Google Cloud project with Astronomer.
When you've completed the installation process, Astronomer will create a cluster within your Google Cloud project to host the resources and Apache Airflow components necessary to deploy DAGs and execute tasks.
For more information about managing Google Cloud projects, see GCP documentation.
Set up
- Self-hosted
- Astronomer-hosted
Prerequisites
- A Google Cloud project with billing enabled. For security reasons, the install process is not currently supported on a Google Cloud project that has other tooling running in it.
- A user with Owner permissions in your project.
- Google Cloud Shell.
- A minimum CPU quota of 36. To adjust your project's quota limits up or down, see Managing your quota using the Cloud console.
- A minimum N2_CPU quota of 24. To adjust your project's quota limits up or down, see Managing your quota using the Cloud console.
- A subscription to the Astro Status Page. This ensures that you're alerted when an incident occurs or scheduled maintenance is required.
- The following domains added to your organization's allowlist for any user and CI/CD environments:
https://cloud.astronomer.io/https://astro-<your-org>.datakin.com/https://<your-org>.astronomer.run/https://api.astronomer.io/https://images.astronomer.cloud/https://auth.astronomer.io/https://updates.astronomer.io/https://install.astronomer.io/
For more information about the resources required to run Astro on GCP, see GCP Resource Reference.
VPC peering prerequisites (optional)
If any of your GCP resources are on a private network, you can access them using one of the following options:
- Private Services Connect
- A VPC Peering connection between Astronomer's VPC and the VPCs for your broader network
Astro uses 4 different CIDR blocks for creating the infrastructure for your Astronomer cluster. If you plan on peering with an existing VPC and want to use custom values for your CIDRs, then you must additionally provide your own CIDR ranges (RFC 1918 IP Space) of /19 or better for the following services:
- Subnet CIDR: Used by nodes in your GKE cluster (Default:
172.20.0.0/19) - Pod CIDR: Used by GKE pods (Default:
172.21.0.0/19) - Service Address CIDR: Used by GKE services (Default:
172.22.0.0/19) - Service VPC Peering: Used by Private Service Connections (Default:
172.23.0.0/19)
Access Astro
Go to https://cloud.astronomer.io/ and create an account, or enter your email address, and then click Continue.
Select one of the following options to access the Cloud UI:
- Enter your password and click Continue.
- To authenticate with an identity provider (IdP), click Continue with SSO, enter your username and password, and then click Sign In.
- To authenticate with your GitHub account, click Continue with GitHub, enter your username or email address, enter your password, and then click Sign in.
- To authenticate with your Google account, click Continue with Google, choose an account, enter your username and password, and then click Sign In.
If you're the first person in an Organization to authenticate, you're added as a Workspace Admin to a new Workspace named after your Organization. You can add other team members to the Workspace without the assistance of Astronomer support. See Add a user. To integrate an identity provider (IdP) with Astro, see Set up an identity provider.
Activate the data plane
The data plane is a collection of infrastructure components for Astro that run in your cloud and are fully managed by Astronomer. This includes a central database, storage for Airflow tasks logs, and the resources required for task execution.
Run the following commands in your Google Cloud Shell:
gcloud services enable storage-component.googleapis.com
gcloud services enable storage-api.googleapis.com
gcloud services enable compute.googleapis.com
gcloud services enable container.googleapis.com
gcloud services enable deploymentmanager.googleapis.com
gcloud services enable cloudresourcemanager.googleapis.com
gcloud services enable cloudkms.googleapis.com
gcloud services enable sqladmin.googleapis.com
gcloud services enable servicenetworking.googleapis.com
gcloud services enable dns.googleapis.com
curl \
https://storage.googleapis.com/storage/v1/projects/$GOOGLE_CLOUD_PROJECT/serviceAccount \
--header "Authorization: Bearer `gcloud auth application-default print-access-token`"   \
--header 'Accept: application/json'   --compressed
Run the following commands in your Google Cloud Shell:
export MY_PROJECT_NUMBER=$(gcloud projects describe $GOOGLE_CLOUD_PROJECT --format="value(projectNumber)")
gcloud projects add-iam-policy-binding $GOOGLE_CLOUD_PROJECT --member=serviceAccount:$MY_PROJECT_NUMBER@cloudservices.gserviceaccount.com --role=roles/owner
gcloud projects add-iam-policy-binding $GOOGLE_CLOUD_PROJECT --member=serviceAccount:astronomer@astro-remote-mgmt.iam.gserviceaccount.com --role=roles/owner
Provide setup information to Astronomer
Once you've activated your data plane, provide Astronomer with:
- Your GCP project ID.
- Your preferred Astro cluster name.
- The GCP region that you want to host your cluster in.
- Your preferred node instance type.
- Your preferred CloudSQL instance type.
- Your preferred maximum node count.
- (Optional) Your custom CIDR ranges for connecting to Astronomer's services.
If you don't specify your organization's preferred configurations, Astronomer creates a cluster in us-central1 with a node pool of e2-standard-4 nodes. For more information, see GCP resource reference.
VPC peering with Astronomer
Astro supports Private Services Connect, which allows private consumption of services across VPC networks that belong to different projects or organizations. If you have created custom services that are not published using Private Services Connect, then you might want to peer with Astronomer. To set up peering, provide the following information to Astronomer:
- VPC Name/ID and region for peering with Astronomer.
- The IPs of your DNS servers.
Astronomer support creates the cluster
After you provide Astronomer support with the setup information for your organization, Astronomer support creates your first cluster on GCP.
Wait for confirmation from Astronomer support that the cluster has been created before creating a Deployment.
If you submitted a VPC peering request, you'll need to accept the request from Astronomer after Astro is installed. To accept the request, see Use VPC Network Peering.
When VPC peering with Astronomer is complete, configure and validate the following items to ensure successful network communications between Astro and your resources:
- Egress routes
- Network ACLs or Security Group rules of your resources
This feature is currently Private Preview. Contact Astronomer support to enable it.
When providing hosting services, Astronomer adheres to industry best practices and standards including the Health Insurance Portability and Accountability Act (HIPAA), Service Organization Control 2 (SOC2), and General Data Protection Regulation (GDPR).
Prerequisites
The setup process assumes that you've already provided Astronomer support with the following information:
- Your preferred cluster installation region. See the supported region lists for GCP.
- Optional. Your preferred worker instance type for your first cluster. See GCP cluster configurations.
- Optional. Your VPC peering requirements for GCP.
- The email address of your first Astro user.
If you haven't provided this information to Astronomer support, contact your Astronomer representative.
Astronomer support creates the cluster
Astronomer support creates your first Astro cluster in a dedicated GCP account after you've provided your setup information.
Wait for confirmation that the installation is successful before you access Astro and create a Deployment.
Access Astro
Optional. If you haven't created an Astronomer account, go to https://cloud.astronomer.io/ and create an account.
Go to https://cloud.astronomer.io/, enter your email address, and then click Continue.
Select one of the following options to access the Cloud UI:
- Enter your password and click Continue.
- To authenticate with an identity provider (IdP), click Continue with SSO, enter your username and password, and then click Sign In.
- To authenticate with your GitHub account, click Continue with GitHub, enter your username or email address, enter your password, and then click Sign in.
- To authenticate with your Google account, click Continue with Google, choose an account, enter your username and password, and then click Sign In.
If you're the first person in an Organization to authenticate, you're added as a Workspace Admin to a new Workspace named after your Organization. You can add other team members to the Workspace without the assistance of Astronomer support. See Add a user. To integrate an identity provider (IdP) with Astro, see Set up an identity provider.
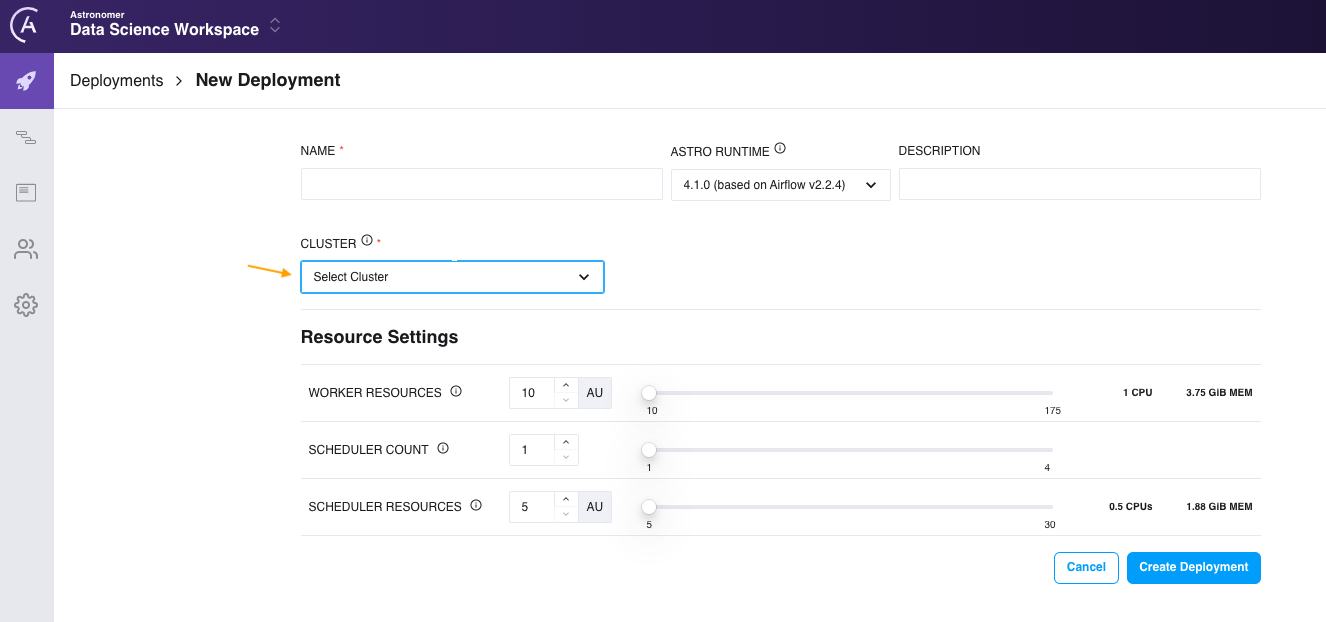
Create a Deployment
When Astronomer support confirms that your Astro cluster has been created, you can create a Deployment and start deploying DAGs. See Create a Deployment. When you create your Deployment, the Astro cluster created by Astronomer support appears as an option in the Cluster list as shown in the following image.