Deploy code to Astro
Pushing your Astro project, including your DAG code, to a Deployment with the Astro CLI is the foundation for managing changes on Astro. It also serves as the foundation for any CI/CD-based deploys.
Prerequisites
- The Astro CLI installed in an empty directory.
- An Astro Workspace with at least one Deployment.
- An Astro project.
- Docker.
Step 1: Authenticate to Astro
Once you've tested your DAGs locally, you're ready to push them to Astro. To start, authenticate to the Astro CLI by running:
astro login
After running this command, you will be prompted to open your web browser and log in to the Cloud UI. Once you complete this login, you will be automatically authenticated to the CLI.
If you have Deployment API key credentials set as OS-level environment variables on your local machine, you can deploy directly to Astro without needing to manually authenticate. This setup is required for automating code deploys with CI/CD.
Step 2: Push DAGs to an Astro Deployment
To deploy your DAGs, run:
astro deploy
This command returns a list of Deployments available in your Workspace and prompts you to pick one.
After you select a Deployment, the CLI parses your DAGs to ensure that they don't contain basic syntax and import errors. This test is equivalent to the one that runs during astro dev parse in a local Airflow environment. If any of your DAGs fail this parse, the deploy to Astro also fails.
If your code passes the parse, the CLI builds your Astro project directory into a new Docker image and then pushes the image to your Deployment on Astro.
To force a deploy even if your project has DAG errors, you can run astro deploy --force.
To validate your code before deploying it to Astro, you can run astro deploy --pytest. Adding the --pytest flag makes the CLI run all tests in your project's tests directory using pytest. If any of these tests fail, your code deploy also fails. This can help you prevent your team from deploying DAGs to Astro that aren't production-grade.
For more information about using Pytest, see Test and troubleshoot locally.
Step 3: Validate your changes
After the deploy completes, Docker image information for your Deployment is available in the Image tag field in the footer of the Airflow UI. Depending on how your organization deploys to Astro, the Image tag field displays a unique identifier generated by a Continuous Integration (CI) tool or a timestamp generated by the Astro CLI on astro deploy. The Image tag field in the Airflow UI footer identifies the Docker image running on the webserver of your Deployment. This information can help you determine if your deploy was successful, but it does not identify the Docker image running on your scheduler, triggerer, or workers. To confirm a code push, contact Astronomer support.
In the Cloud UI, select a Workspace and then select the Deployment you pushed code to.
Click Open Airflow.
Scroll to the bottom of the page and view the Image tag information in the footer:

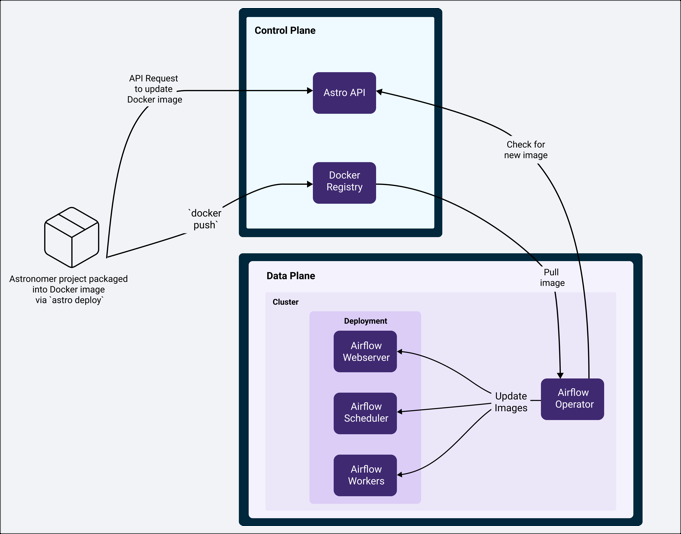
What happens during a code deploy
When you deploy code to Astro, your Astro project is built into a Docker image. This includes system-level dependencies, Python-level dependencies, DAGs, and your Dockerfile. It does not include any of the metadata associated with your local Airflow environment, including task history and Airflow connections or variables that were set locally. This Docker image is then pushed to all containers running the Apache Airflow application on Astro.
With the exception of the Airflow webserver and some Celery workers, Kubernetes gracefully terminates all containers during this process. This forces them to restart and begin running your latest code.
If you deploy code to a Deployment that is running a previous version of your code, then the following happens:
Tasks that are
runningwill continue to execute on existing Celery workers and will not be interrupted unless the task does not complete within 24 hours of the code deploy.One or more new worker(s) will spin up alongside your existing workers and immediately start executing scheduled tasks based on your latest code.
These new workers will execute downstream tasks of DAG runs that are in progress. For example, if you deploy to Astronomer when
Task Aof your DAG is running,Task Awill continue to run on an old Celery worker. IfTask BandTask Care downstream ofTask A, they will both be scheduled on new Celery workers running your latest code.This means that DAG runs could fail due to downstream tasks running code from a different source than their upstream tasks. DAG runs that fail this way need to be fully restarted from the Airflow UI so that all tasks are executed based on the same source code.
Astronomer sets a grace period of 24 hours for all workers to allow running tasks to continue executing. This grace period is not configurable. If a task does not complete within 24 hours, its worker will be terminated. Airflow will mark the task as a zombie and it will retry according to the task's retry policy. This is to ensure that our team can reliably upgrade and maintain Astro as a service.
If you want to force long-running tasks to terminate sooner than 24 hours, specify an execution_timeout in your DAG's task definition.