Install Astro on Azure
To complete the installation process, you'll:
- Add the Astronomer Service Principal to your Azure Active Directory (Azure AD) instance.
- Assign the Astronomer Service Principal an Owner role to your subscription.
- Register Microsoft Azure features.
When you've completed the installation process, Astronomer support creates a cluster within your Azure subscription to host the resources and Apache Airflow components necessary to deploy DAGs and execute tasks.
For more information about managing Azure subscriptions with the Azure CLI, see How to manage Azure subscriptions with the Azure CLI.
Set up
- Self-hosted
- Astronomer-hosted
Prerequisites
A clean Azure subscription. For security reasons, Azure subscriptions with existing tooling running aren't supported. Also, the subscription must be included in an Azure management group that doesn't apply Azure policies. See What are Azure management groups.
An Azure AD user with the following role assignments:
Application Administrator. See Understand roles in Azure Active Directory.Ownerwith permission to create and manage subscription resources of all types. See Azure built-in roles.These role assignments are required for cluster creation, and can be removed after the cluster is created.
Microsoft Azure CLI or Azure Az PowerShell module. See How to install the Azure CLI and Install the Azure Az PowerShell module.
A minimum quota of 48 Standard Ddv5-series vCPUs in the deployment region. You can use Dv5-series vCPUs, but you'll need 96 total vCPUs composed of 48 Ddv5-series vCPUs and 48 Dv5-series vCPUs. To adjust your quota limits up or down, see Increase VM-family vCPU quotas.
A subscription to the Astro status page. This ensures that you're alerted when an incident occurs or when scheduled maintenance is planned.
The following domains added to your organization's allowlist for any user and CI/CD environments:
https://cloud.astronomer.io/https://astro-<your-org>.datakin.com/https://<your-org>.astronomer.run/https://api.astronomer.io/https://images.astronomer.cloud/https://auth.astronomer.io/https://updates.astronomer.io/https://install.astronomer.io/
For more information about the resources required to run Astro on Azure, see Azure Resource Reference.
VNet peering prerequisites (Optional)
To give Astro access to any Azure resources on a private network, you must create a VNet peering connection between Astronomer's VNet and the VNets for your broader network.
To create a VNet peering connection, contact Astronomer Support and provide the following details:
- Azure TenantID of the target VNet
- Subscription ID of the target VNet
- Region of the target VNet
- VNet ID of the target VNet
- ResourceGroup of the target VNet
- A CIDR block (RFC 1918 IP Space) no smaller than a
/19range. This CIDR block can't overlap with any Azure VNet(s) that you will peer with later. The default CIDR range is172.20.0.0/19. - ResourceID, for example:
/subscriptions/<Subscription Id>/resourceGroups/myResourceGroupA/providers/Microsoft.Network/virtualNetworks/myVnetA. You can find the resource ID in the Azure portal by following step 7 in Create peering - Azure portal.
Additionally, ensure that your Azure AD user has at least one of the following role assignments:
- Network Contributor: This permission is required for any VNet deployed through Resource Manager.
- Classic Network Contributor: This permission is required for any VNet deployed through the classic deployment model.
From here, Astronomer support will set up the VNet connection to Astro.
Access Astro
Go to https://cloud.astronomer.io/ and create an account, or enter your email address, and then click Continue.
Select one of the following options to access the Cloud UI:
- Enter your password and click Continue.
- To authenticate with an identity provider (IdP), click Continue with SSO, enter your username and password, and then click Sign In.
- To authenticate with your GitHub account, click Continue with GitHub, enter your username or email address, enter your password, and then click Sign in.
- To authenticate with your Google account, click Continue with Google, choose an account, enter your username and password, and then click Sign In.
If you're the first person in an Organization to authenticate, you're added as a Workspace Admin to a new Workspace named after your Organization. You can add other team members to the Workspace without the assistance of Astronomer support. See Add a user. To integrate an identity provider (IdP) with Astro, see Set up an identity provider.
Prepare for data plane activation
The data plane is a collection of Astro infrastructure components that run in your cloud and are managed by Astronomer. This includes a central database, storage for Airflow tasks logs, and the resources required for task execution.
- Azure CLI on Bash
- PowerShell
Run the following command to log in to your Azure account:
az loginRun the following command to select your Azure subscription:
az account set -s <subscription-id>Run the following command to add the Astronomer Service Principal to Azure AD:
az ad sp create --id a67e6057-7138-4f78-bbaf-fd9db7b8aab0Run the following commands to get details about the Azure subscription and create a new role assignment for the Astronomer service principal:
subid=$(az account show --query id --output tsv)
az role assignment create --assignee a67e6057-7138-4f78-bbaf-fd9db7b8aab0 --role Owner --scope /subscriptions/$subid
Run the following commands to register the
EncryptionAtHostfeature:az feature register --namespace "Microsoft.Compute" --name "EncryptionAtHost"
while [ $(az feature list --query "[?contains(name, 'Microsoft.Compute/EncryptionAtHost')].{State:properties.state}" -o tsv) != "Registered" ]
do
echo "Still waiting for Feature Registration (EncryptionAtHost) to complete, this can take up to 15 minutes"
sleep 60
done
echo "Registration Complete"
az provider register --namespace Microsoft.Compute
Run the following command to log in to your Azure account:
Connect-AzAccountRun the following command to select your Azure subscription:
Set-AzContext -SubscriptionId <subscription-id>Run the following command to create the Astronomer service principal:
$sp = New-AzADServicePrincipal -AppId a67e6057-7138-4f78-bbaf-fd9db7b8aab0Run the following commands to get details about the Azure subscription and create a new role assignment for the Astronomer service principal:
$sp = Get-AzADServicePrincipal -ApplicationId a67e6057-7138-4f78-bbaf-fd9db7b8aab0$subid = (Get-AzContext).Subscription.id$ra = New-AzRoleAssignment -ObjectId $sp.id -RoleDefinitionName Owner -Scope "/subscriptions/$subid"Run the following commands to register the
EncryptionAtHostfeature:Register-AzProviderFeature -FeatureName EncryptionAtHost -ProviderNamespace Microsoft.Compute
while ( (Get-AzProviderFeature -FeatureName EncryptionAtHost -ProviderNamespace Microsoft.Compute).RegistrationState -ne "Registered") {echo "Still waiting for Feature Registration (EncryptionAtHost) to complete, this can take up to 15 minutes"; sleep 60} echo "Registration Complete"Register-AzResourceProvider -ProviderNamespace Microsoft.compute
Provide setup information to Astronomer support
After you've prepared your environment for data plane activation, provide Astronomer support with the following information:
- Your preferred Astro cluster name.
- Your Azure TenantID and SubscriptionID.
- Optional. Your preferred node instance type. The default is Standard_D4d_v5.
- Optional. Your preferred Postgres Flexible Server instance type. The default is Standard_D4ds_v4.
- Optional. Your preferred maximum node count.
- Optional. Your custom CIDR ranges for Astronomer service connections. The default is
172.20.0.0/19.
If you don't specify a preferred configuration for your organization, Astronomer support creates a cluster in CentralUS with the default configurations for Astro on Azure. See Azure resource reference.
Astronomer support creates the cluster
After you provide Astronomer support with the setup information for your organization, Astronomer support creates your first cluster on Azure.
Wait for confirmation from Astronomer support that the cluster has been created before creating a Deployment.
This feature is currently Private Preview. Contact Astronomer support to enable it.
When providing hosting services, Astronomer adheres to industry best practices and standards including the Health Insurance Portability and Accountability Act (HIPAA), Service Organization Control 2 (SOC2), and General Data Protection Regulation (GDPR).
Prerequisites
The setup process assumes that you've already provided Astronomer support with the following information:
- Your preferred cluster installation region. See the supported region lists for Azure.
- Optional. Your preferred worker instance type for your first cluster. See Azure cluster configurations.
- Optional. Your VNet peering requirements for Azure.
- The email address of your first Astro user.
If you haven't provided this information to Astronomer support, contact your Astronomer representative.
Astronomer support creates the cluster
Astronomer support creates your first Astro cluster in a dedicated Azure account after you've provided your setup information.
Wait for confirmation that the installation is successful before you access Astro and create a Deployment.
Access Astro
Optional. If you haven't created an Astronomer account, go to https://cloud.astronomer.io/ and create an account.
Go to https://cloud.astronomer.io, enter your email address, and then click Continue.
Select one of the following options to access the Cloud UI:
- Enter your password and click Continue.
- To authenticate with an identity provider (IdP), click Continue with SSO, enter your username and password, and then click Sign In.
- To authenticate with your GitHub account, click Continue with GitHub, enter your username or email address, enter your password, and then click Sign in.
- To authenticate with your Google account, click Continue with Google, choose an account, enter your username and password, and then click Sign In.
If you're the first person in an Organization to authenticate, you're added as a Workspace Admin to a new Workspace named after your Organization. You can add other team members to the Workspace without the assistance of Astronomer support. See Add a user. To integrate an identity provider (IdP) with Astro, see Set up an identity provider.
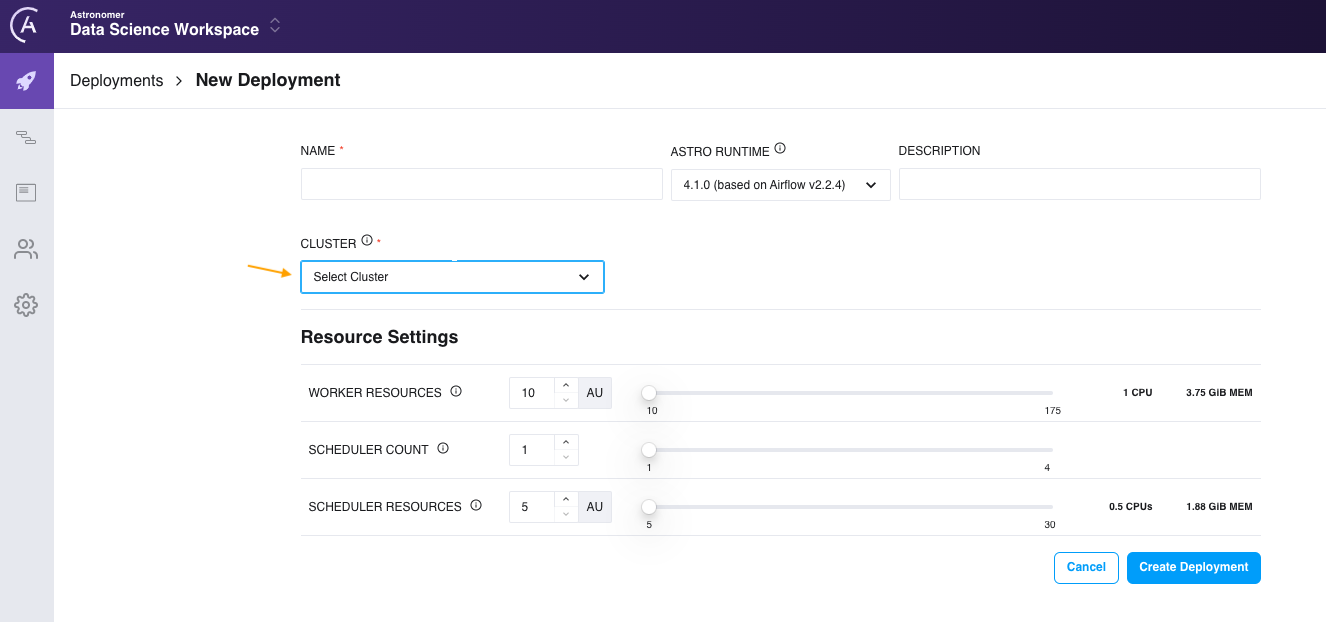
Create a Deployment
When Astronomer support confirms that your Astro cluster has been created, you can create a Deployment and start deploying DAGs. See Create a Deployment. When you create your Deployment, the Astro cluster created by Astronomer support appears as an option in the Cluster list as shown in the following image.