Install Astro on AWS
The Astro data plane on Amazon Web Services (AWS) runs on Elastic Kubernetes Service (EKS). You have two options to install Astro on AWS:
- Self-hosted - Create an Astro cluster in a dedicated AWS account that's hosted and owned by your organization. This ensures that all data remains within your network and allows your organization to manage infrastructure billing.
- Astronomer-hosted - Create an Astro cluster in a dedicated AWS account that's hosted and owned by Astronomer. This removes the complexity of adding another AWS account to your network.
With the two options, the user experience is identical and Astronomer is responsible for managing Astro. The differences between the two options are security and networking.
For a list of the AWS resources and configurations that Astronomer supports, see AWS resource reference. For more information about the shared responsibility model, see Shared responsibility model.
Set up
- Self-hosted
- Astronomer-hosted
To install Astro in a dedicated AWS account owned by your organization, you'll complete the following tasks:
- Create an account on Astro.
- Share AWS account information with Astronomer support.
- Create a cross-account IAM role that Astro can assume within your new AWS account.
Astronomer support will create a cluster within your AWS account that hosts the resources and Apache Airflow components necessary to deploy DAGs and execute tasks. If you'd like to support more than 1 Astro cluster, contact Astronomer support.
Prerequisites
An AWS IAM user with the following permissions:
cloudformation:*GetRoleGetRolePolicyCreateRoleDeleteRolePolicyPutRolePolicyListRolesUpdateAssumeRolePolicySee Creating an administrator IAM user and user group (console).
A dedicated AWS account with minimum EC2 service quotas.
A subscription to the Astro Status Page. This will ensure that you're alerted in the case of an incident or scheduled maintenance.
The following domains added to your organization's allowlist for any user and CI/CD environments:
https://cloud.astronomer.io/https://astro-<your-org>.datakin.com/https://<your-org>.astronomer.run/https://api.astronomer.io/https://images.astronomer.cloud/https://auth.astronomer.io/https://updates.astronomer.io/https://install.astronomer.io/
Astro requires a clean AWS account with a minimum set of EC2 service quotas. For security reasons, the install process is not currently supported on an AWS account that has other tooling running in it. For instructions on creating a new AWS account, follow AWS documentation.
The required EC2 service quotas are:
| QuotaCode | QuotaName | Minimum Value |
|---|---|---|
| L-1216C47A | Running On-Demand Standard (A, C, D, H, I, M, R, T, Z) instances | 40 |
| L-34B43A08 | All Standard (A, C, D, H, I, M, R, T, Z) Spot Instance Requests | 40 |
These are required to mitigate near term capacity risks and ensure a smooth onboarding experience on Astro. If you need to modify or increase a specific quota, see Amazon’s documentation on requesting a quota increase.
Once your AWS account is created, proceed to Step 1.
If you have one or more existing AWS accounts, you can use AWS Organizations to manage billing, users, and more in a central place. For more information on how to add your Astro AWS account to your AWS Organization, read Amazon's documentation.
VPC peering prerequisites (Optional)
If any AWS resources are on a private network, you can choose between two options:
- Allow traffic via the public internet and use allow-lists for communication.
- Create a VPC Peering connection between Astronomer's VPC and the VPCs for your broader network.
If you want to continue with the second option, you'll additionally need:
- A CIDR block (RFC 1918 IP Space) no smaller than a
/19range. You must ensure it does not overlap with the AWS VPC(s) that you will be peering with later. The default CIDR range is172.20.0.0/19. - VPC Name / ID for peering with Astronomer (accessible through the AWS VPC console).
- The IP addresses of your DNS servers.
Access Astro
Go to https://cloud.astronomer.io/ and create an account, or enter your email address, and then click Continue.
Select one of the following options to access the Cloud UI:
- Enter your password and click Continue.
- To authenticate with an identity provider (IdP), click Continue with SSO, enter your username and password, and then click Sign In.
- To authenticate with your GitHub account, click Continue with GitHub, enter your username or email address, enter your password, and then click Sign in.
- To authenticate with your Google account, click Continue with Google, choose an account, enter your username and password, and then click Sign In.
If you're the first person in your Organization to authenticate, you'll be granted Organization owner permissions. You can create a Workspace and add other team members to the Workspace without the assistance of Astronomer support. See Create a Workspace and Add a user. To integrate an identity provider (IdP) with Astro, see Set up an identity provider.
Retrieve an external ID from the Cloud UI
You must be an Organization Owner to view the external ID. If you are not an Organization Owner, the field will not appear in the Cloud UI.
In the Cloud UI, click the Settings tab.
Click Show in the AWS External ID field and then click Copy. This external ID is a unique identifier that Astro uses to connect to your AWS account.
Save the external ID as a secret or in another secure format. See How to use an external ID when granting access to your AWS resources to a third party.
Create a cross-account IAM role for Astro
Use the external ID to create a cross-account IAM role for Astro. Astronomer recommends using the AWS Management Console to create the role.
- AWS Management Console
- AWS Command Line
Open the Astronomer cross-account role CloudFormation template.
Enter the external ID that you copied in Step 2 in the ExternalId field.
Select the I acknowledge that AWS CloudFormation might create IAM resources with custom names checkbox.
Click Create Stack.
Open the AWS CLI and run the following command to create a cross-account IAM Role:
$ aws iam create-role --role-name astronomer-remote-management --assume-role-policy-document "{
    \"Version\": \"2012-10-17\",
    \"Statement\": [
        {
            \"Effect\": \"Allow\",
            \"Principal\": {
                \"AWS\": \"arn:aws:iam::406882777402:root\"
            },
            \"Action\": \"sts:AssumeRole\",
            \"Condition\": {
                \"StringEquals\": {
                \"sts:ExternalId\": \"$EXTERNAL_ID\"
                }
            }
        }
    ]
}"
Run the following command to attach a managed policy to the Astronomer remote management role.
$ aws iam attach-role-policy --policy-arn arn:aws:iam::aws:policy/AdministratorAccess --role-name astronomer-remote-managementThis command returns a YAML file containing role information:
{
  "Role":
    {
      "Path": "/",
      "RoleName": "astronomer-remote-management",
      "RoleId": "AROAZZTAM6QSYIFGCB37R",
      "Arn": "arn:aws:iam::673438299173:role/astronomer-remote-management",
      "CreateDate": "2021-06-30T17:47:39+00:00",
      "AssumeRolePolicyDocument":
        {
          "Version": "2012-10-17",
          "Statement":
            [
              {
                "Effect": "Allow",
                "Principal": { "AWS": "arn:aws:iam::406882777402:root" },
                "Action": "sts:AssumeRole",
                "Condition": { "StringEquals": { "sts:ExternalId": "" } },
              },
            ],
        },
    },
}
To provision additional Clusters after completing your initial installation, see Create a cluster.
Some AWS regions that Astronomer supports are disabled by default on AWS, including:
ap-east-1- Asia Pacific (Hong Kong)me-south-1- Middle East (Bahrain)
If you're setting up your first cluster in any of these regions, you need to complete the additional setup described in Create a cluster.
Provide setup information to Astronomer
After creating the AWS account, provide Astronomer support with the following information:
- Your AWS Account ID.
- Your preferred Astro cluster name.
- The AWS region that you want to host your cluster in.
- Your preferred node instance type.
- Your preferred maximum node count.
If you do not specify configuration preferences, Astronomer creates a cluster with m5.xlarge nodes and a maximum node count of 20 in us-east-1. For information on all supported regions, configurations, and defaults, see AWS cluster configurations.
VPC peering prerequisites (optional)
If you need to VPC peer with Astronomer, provide the following information to your Astronomer representative:
- Subnet CIDRs (RFC 1918 IP Space).
- VPC Name/ID and region for peering with Astronomer. This is accessible through the AWS VPC console.
- The IPs of your DNS servers.
Astronomer support creates the cluster
After you've created the cross-account IAM role for Astro, contact Astronomer support. Astronomer support will finish creating the cluster in your AWS account.
This process can take some time. Wait for confirmation from Astronomer support that the cluster has been created before creating a Deployment.
If you submitted a VPC peering request, you'll need to accept the request from Astronomer after Astro is installed. To accept the request, see Create a VPC peering connection.
When VPC peering with Astronomer is complete, configure and validate the following items to ensure successful network communications between Astro and your resources:
- Egress Routes on Astronomer Route Table
- Network ACLs and/or Security Group rules of your resources
When providing hosted services, Astronomer adheres to industry best practices and standards, including the Health Insurance Portability and Accountability Act (HIPAA), Service Organization Control 2 (SOC2), and General Data Protection Regulation (GDPR).
Prerequisites
The setup process assumes that you've already provided Astronomer support with the following information:
- Your preferred cluster installation region. See the supported region lists for AWS.
- Optional. Your preferred worker instance type for your first cluster. See AWS cluster configurations.
- Optional. Your VPC peering requirements for AWS.
- The email address of your first Astro user.
If you haven't provided this information to Astronomer support, contact your Astronomer representative.
Astronomer support creates the cluster
Astronomer support creates your first Astro cluster in a dedicated AWS account after you've provided your setup information.
Wait for confirmation that the installation is successful before you access Astro and create a Deployment.
Access Astro
Optional. If you haven't created an Astronomer account, go to https://cloud.astronomer.io/ and create an account.
Go to https://cloud.astronomer.io, enter your email address, and then click Continue.
Select one of the following options to access the Cloud UI:
- Enter your password and click Continue.
- To authenticate with an identity provider (IdP), click Continue with SSO, enter your username and password, and then click Sign In.
- To authenticate with your GitHub account, click Continue with GitHub, enter your username or email address, enter your password, and then click Sign in.
- To authenticate with your Google account, click Continue with Google, choose an account, enter your username and password, and then click Sign In.
If you're the first person in an Organization to authenticate, you're added as a Workspace Admin to a new Workspace named after your Organization. You can add other team members to the Workspace without the assistance of Astronomer support. See Add a user. To integrate an identity provider (IdP) with Astro, see Set up an identity provider.
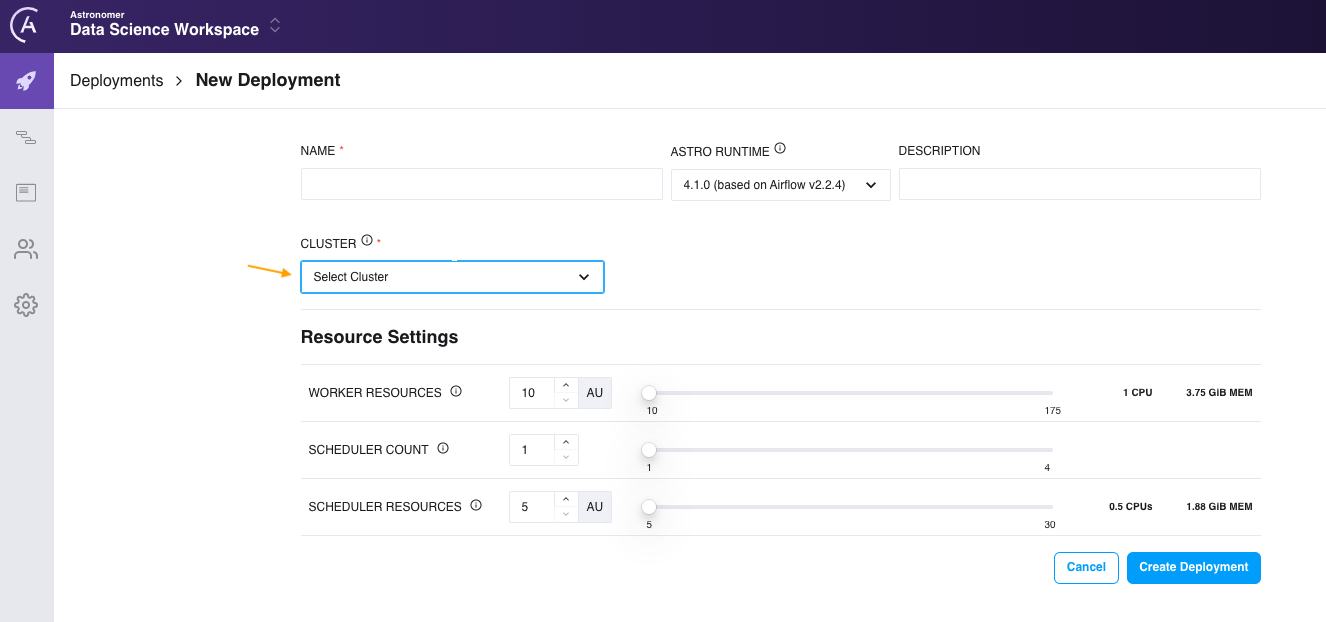
Create a Deployment
When Astronomer support confirms that your Astro cluster has been created, you can create a Deployment and start deploying DAGs. See Create a Deployment. When you create your Deployment, the Astro cluster created by Astronomer support appears as an option in the Cluster list as shown in the following image.