The Astro Python SDK for ETL
The Astro Python SDK is an open source Python package maintained by Astronomer that provides tools to improve the DAG authoring experience for Airflow users. The available decorators and functions allow you to write DAGs based on how you want your data to move by simplifying the data transformation process between different environments.
In this tutorial, you’ll learn how you can use Astro Python SDK functions for ETL use cases. Your DAGs will be easier to write and read, and require less code.
Assumed knowledge
To get the most out of this guide, you should have an understanding of:
- Airflow decorators. See Introduction to Airflow Decorators guide.
Astro Python SDK ETL functionality
The Astro Python SDK makes implementing ETL use cases easier by allowing you to seamlessly transition between Python and SQL for each step in your process. Details like creating dataframes, storing intermediate results, passing context and data between tasks, and creating Airflow task dependencies are all managed automatically. This lets you focus on writing execution logic in whichever language you need without needing to worry about Airflow orchestration logic.
More specifically, the Astro Python SDK has the following functions that are helpful when implementing an ETL framework:
load_file: If the data you’re starting with is in CSV, JSON, or parquet files (stored locally or on Amazon S3 or GCS), you can use this function to load it into your database.transform: This function allows you to transform your data with a SQL query. It uses aSELECTstatement that you define to automatically store your results in a new table. By default, theoutput_tableis given a unique name each time the DAG runs, but you can overwrite this behavior by defining a specificoutput_tablein your function. You can then pass the results of thetransformdownstream to the next task as if it were a native Python object.dataframe: Similar totransformfor SQL, thedataframefunction allows you to implement a transformation of your data using Python. You can easily store the results of thedataframefunction in your database by specifying anoutput_table, which is useful if you want to switch back to SQL in the next step or load your final results to your database.append: This function allows you to take resulting data from another function and append it to an existing table in your database. It is particularly useful in ETL scenarios and when dealing with reporting data.
For a full list of functions and documentation, see the Readme).
Getting started with the Astro Python SDK
To use the Astro Python SDK for your ETL example, you must complete a couple of setup steps.
Add the
astro-sdk-pythonPython package to your Airflow environment. Astro CLI users can add the package to yourrequirements.txtfile.Set the following environment variables:
export AIRFLOW__CORE__ENABLE_XCOM_PICKLING=True
export AIRFLOW__ASTRO_SDK__SQL_SCHEMA=<snowflake_schema>
If you are using the Astro CLI, you can add these variables to your
.envfile for local development.The
AIRFLOW__ASTRO_SDK__SQL_SCHEMAvariable should be the schema you want to store all intermediary tables in.
For more details on getting started, see the Astro Python SDK tutorial.
Example ETL implementation
To show the Astro Python SDK in action, you’ll start with a simple ETL use case. In this first scenario, you'll load data from two CSVs from Amazon S3 into Snowflake. Then you'll combine the data and perform some transformations before loading it into a results table. First, you'll implement this using built-in Airflow features, and then you'll learn how the Astro Python SDK can make it easier.
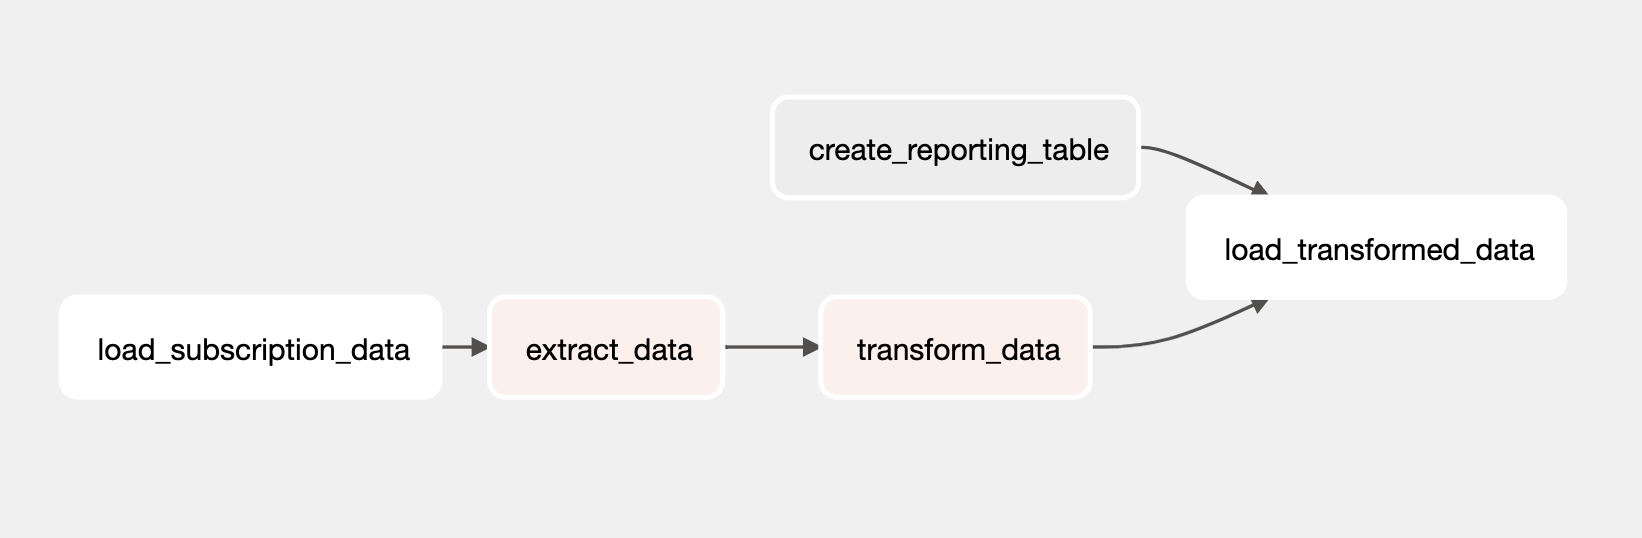
The DAG before the Astro Python SDK
Here is your ETL DAG implemented with OSS Airflow operators and decorators, as well as the TaskFlow API. You'll take "homes" data from two CSVs in Amazon S3, push the data to Snowflake, and then perform two transformation tasks before appending the results to a reporting table.
from datetime import datetime
import pandas as pd
from airflow.decorators import dag, task
from airflow.providers.snowflake.hooks.snowflake import SnowflakeHook
from airflow.providers.snowflake.operators.snowflake import SnowflakeOperator
from airflow.providers.snowflake.transfers.s3_to_snowflake import S3ToSnowflakeOperator
from airflow.providers.amazon.aws.hooks.s3 import S3Hook
S3_BUCKET = 'bucket_name'
S3_FILE_PATH = '</path/to/file/'
SNOWFLAKE_CONN_ID = 'snowflake'
SNOWFLAKE_SCHEMA = 'schema_name'
SNOWFLAKE_STAGE = 'stage_name'
SNOWFLAKE_WAREHOUSE = 'warehouse_name'
SNOWFLAKE_DATABASE = 'database_name'
SNOWFLAKE_ROLE = 'role_name'
SNOWFLAKE_SAMPLE_TABLE = 'sample_table'
SNOWFLAKE_RESULTS_TABLE = 'result_table'
@task(task_id='extract_data')
def extract_data():
    # Join data from two tables and save to dataframe to process
    query = ''''
    SELECT *
    FROM HOMES1
    UNION
    SELECT *
    FROM HOMES2
    '''
    # Make connection to Snowflake and execute query
    hook = SnowflakeHook(snowflake_conn_id=SNOWFLAKE_CONN_ID)
    conn = hook.get_conn()
    cur = conn.cursor()
    cur.execute(query)
    results = cur.fetchall()
    column_names = list(map(lambda t: t[0], cur.description))
    df = pd.DataFrame(results)
    df.columns = column_names
    return df.to_json()
@task(task_id='transform_data')
def transform_data(xcom: str) -> str:
    # Transform data by melting
    df = pd.read_json(xcom)
    melted_df = df.melt(
        id_vars=["sell", "list"], value_vars=["living", "rooms", "beds", "baths", "age"]
    )
    melted_str = melted_df.to_string()
    # Save results to Amazon S3 so they can be loaded back to Snowflake
    s3_hook = S3Hook(aws_conn_id="s3_conn")
    s3_hook.load_string(melted_str, 'transformed_file_name.csv', bucket_name=S3_BUCKET, replace=True)
@dag(start_date=datetime(2021, 12, 1), schedule_interval='@daily', catchup=False)
def classic_etl_dag():
    load_data = S3ToSnowflakeOperator(
        task_id='load_homes_data',
        snowflake_conn_id=SNOWFLAKE_CONN_ID,
        s3_keys=[S3_FILE_PATH + '/homes.csv'],
        table=SNOWFLAKE_SAMPLE_TABLE,
        schema=SNOWFLAKE_SCHEMA,
        stage=SNOWFLAKE_STAGE,
        file_format="(type = 'CSV',field_delimiter = ',')",
    )
    create_reporting_table = SnowflakeOperator(
        task_id="create_reporting_table",
        snowflake_conn_id=SNOWFLAKE_CONN_ID,
        sql='''
        CREATE TABLE IF NOT EXISTS homes_reporting (
            sell number,
            list number,
            variable varchar,
            value number
            );'''
    )
    load_transformed_data = S3ToSnowflakeOperator(
        task_id='load_transformed_data',
        snowflake_conn_id=SNOWFLAKE_CONN_ID,
        s3_keys=[S3_FILE_PATH + '/transformed_file_name.csv'],
        table=SNOWFLAKE_RESULTS_TABLE,
        schema=SNOWFLAKE_SCHEMA,
        stage=SNOWFLAKE_STAGE,
        file_format="(type = 'CSV',field_delimiter = ',')",
    )
    extracted_data = extract_data()
    transformed_data = transform_data(extracted_data)
    load_subscription_data >> extracted_data >> transformed_data >> load_transformed_data
    create_reporting_table >> load_transformed_data
classic_etl_dag = classic_etl_dag()
Although you achieved your ETL goal with the DAG, the following limitations made this implementation more complicated:
- Since there is no way to pass results from the
SnowflakeOperatorquery to the next task, you had to write your query in a_DecoratedPythonOperatorfunction using theSnowflakeHookand explicitly do the conversion from SQL to a dataframe yourself. - Some of your transformations are better suited to SQL, and others are better suited to Python, but transitioning between the two requires extra boilerplate code to explicitly make the conversions.
- While the TaskFlow API makes it easier to pass data between tasks, it stores the resulting dataframes as XComs by default. This means that you need to worry about the size of your data. You could implement a custom XCom backend, but that would require additional configuration.
- Loading data back to Snowflake after the transformation is complete requires writing extra code to store an intermediate CSV in Amazon S3.
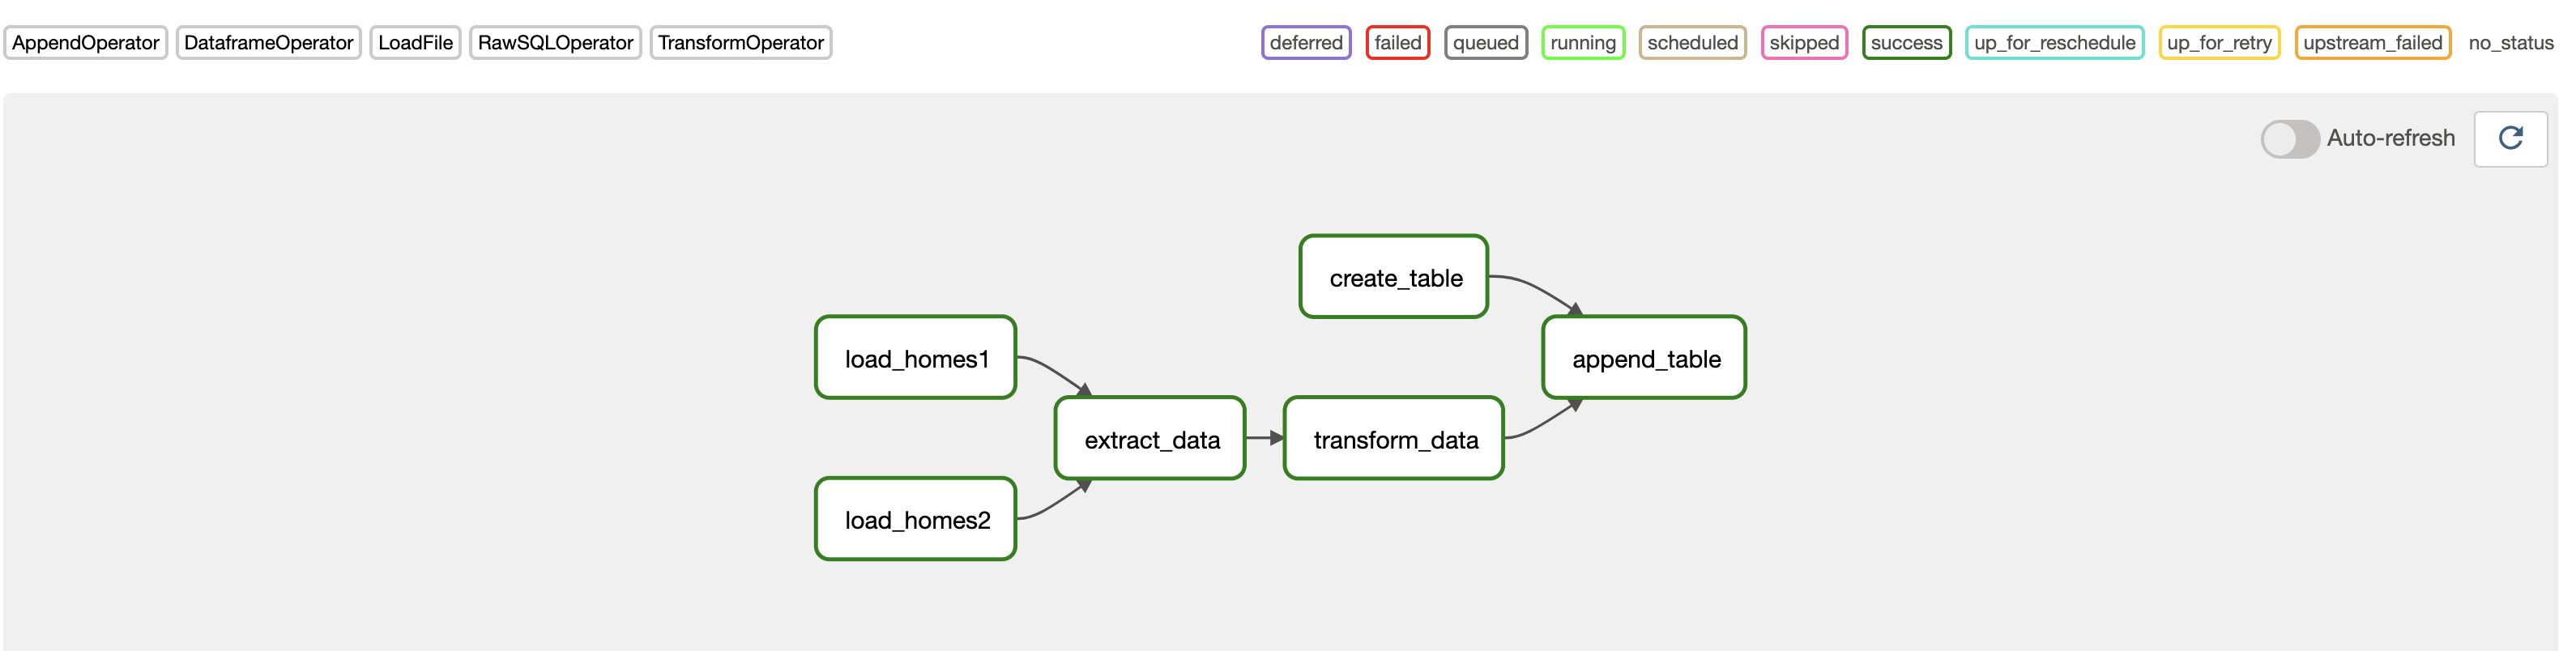
The DAG with the Astro Python SDK
Now, you'll use the Astro Python SDK to alleviate the challenges described in the previous example.
import os
from datetime import datetime
import pandas as pd
from airflow.decorators import dag
from astro.files import File
from astro.sql import (
    append,
    dataframe,
    load_file,
    run_raw_sql,
    transform,
)
from astro.sql.table import Metadata, Table
SNOWFLAKE_CONN_ID = "snowflake_conn"
AWS_CONN_ID = "aws_conn"
# The first transformation combines data from the two source tables
@transform
def extract_data(homes1: Table, homes2: Table):
    return """
    SELECT *
    FROM {{homes1}}
    UNION
    SELECT *
    FROM {{homes2}}
    """
# Switch to Python (Pandas) for melting transformation to get data into long format
@dataframe
def transform_data(df: pd.DataFrame):
    df.columns = df.columns.str.lower()
    melted_df = df.melt(
        id_vars=["sell", "list"], value_vars=["living", "rooms", "beds", "baths", "age"]
    )
    return melted_df
# Run a raw SQL statement to create the reporting table if it doesn't already exist
@run_raw_sql
def create_reporting_table():
    """Create the reporting data which will be the target of the append method"""
    return """
    CREATE TABLE IF NOT EXISTS homes_reporting (
      sell number,
      list number,
      variable varchar,
      value number
    );
    """
@dag(start_date=datetime(2021, 12, 1), schedule_interval="@daily", catchup=False)
def example_s3_to_snowflake_etl():
    # Initial load of homes data csv's from Amazon S3 into Snowflake
    homes_data1 = load_file(
        task_id="load_homes1",
        input_file=File(path="s3://airflow-kenten/homes1.csv", conn_id=AWS_CONN_ID),
        output_table=Table(name="HOMES1", conn_id=SNOWFLAKE_CONN_ID)
    )
    homes_data2 = load_file(
        task_id="load_homes2",
        input_file=File(path="s3://airflow-kenten/homes2.csv", conn_id=AWS_CONN_ID),
        output_table=Table(name="HOMES2", conn_id=SNOWFLAKE_CONN_ID)
    )
    # Define task dependencies
    extracted_data = extract_data(
        homes1=homes_data1,
        homes2=homes_data2,
        output_table=Table(name="combined_homes_data"),
    )
    transformed_data = transform_data(
        df=extracted_data, output_table=Table(name="homes_data_long")
    )
    create_results_table = create_reporting_table(conn_id=SNOWFLAKE_CONN_ID)
    # Append transformed data to reporting table
    # Dependency is inferred by passing the previous `transformed_data` task to `source_table` param
    record_results = append(
        source_table=transformed_data,
        target_table=Table(name="homes_reporting", conn_id=SNOWFLAKE_CONN_ID),
        columns=["sell", "list", "variable", "value"],
    )
    record_results.set_upstream(create_results_table)
example_s3_to_snowflake_etl_dag = example_s3_to_snowflake_etl()
The key differences with this implementation are:
- The
load_fileandappendfunctions take care of loading your raw data from Amazon S3 and appending data to your reporting table. You didn't have to write any extra code to get the data into Snowflake. In this implementation, you had aload_filetask for each file instead of one task for all files in Amazon S3, which supports atomicity. - Using the
transformfunction, you executed SQL to combine your data from multiple tables. The results are automatically stored in a Snowflake table. You didn't have to use theSnowflakeHookor write any of the code to execute the query. - You seamlessly transitioned to a transformation in Python with the
dffunction without needing to explicitly convert the results of your previous task to a Pandas dataframe. You then wrote the output of your transformation to your aggregated reporting table in Snowflake using thetarget_tableparameter, so you didn't have to worry about storing the data in XCom. - You didn't have to redefine your Airflow connections in any tasks that were downstream of your original definitions (such as
load_fileandcreate_reporting_table). Any downstream task that inherits from a task with a defined connection can use the same connection without additional configuration.
Overall, your DAG with the Astro Python SDK is shorter, simpler to implement, and easier to read. This allows you to implement even more complicated use cases easily while focusing on the movement of your data.