Orchestrate Databricks jobs with Airflow
Databricks is a popular unified data and analytics platform built around Apache Spark that provides users with fully managed Apache Spark clusters and interactive workspaces. Astronomer recommends using Airflow primarily as an orchestrator, and to use an execution framework like Apache Spark to do the heavy lifting of data processing. It follows that using Airflow to orchestrate Databricks jobs is a natural solution for many common use cases.
Astronomer has many customers who use Databricks to run jobs as part of complex pipelines. This can easily be accomplished by leveraging the Databricks provider, which includes Airflow hooks and operators that are actively maintained by the Databricks and Airflow communities. In this guide, you'll learn about the hooks and operators available for interacting with Databricks clusters and run jobs, and how to use both available operators in an Airflow DAG.
All code in this guide can be found on the Astronomer Registry.
Assumed knowledge
To get the most out of this tutorial, make sure you have an understanding of:
- The basics of Databricks. See Getting started with Databricks.
- Airflow fundamentals, such as writing DAGs and defining tasks. See Get started with Apache Airflow.
- Airflow operators. See Operators 101.
- Airflow connections. See Managing your Connections in Apache Airflow.
Databricks hooks and operators
The Databricks provider package includes many hooks and operators that allow users to accomplish most common Databricks-related use cases without writing a ton of code.
In Airflow 2.0, provider packages are separate from the core of Airflow. If you are running 2.0, you may need to install the apache-airflow-providers-databricks provider package to use the hooks, operators, and connections described here. In an Astronomer project this can be accomplished by adding the packages to your requirements.txt file. To learn more, see Provider Packages.
Hooks
Using the Databricks hook is the best way to interact with a Databricks cluster or job from Airflow. The hook has methods to submit and run jobs to the Databricks REST API, which are used by the operators described below. There are also additional methods users can leverage to:
- Get information about runs or jobs
- Cancel, start, or terminate a cluster
- Install and uninstall libraries on a cluster
Operators
There are currently two operators in the Databricks provider package:
- The
DatabricksSubmitRunOperatormakes use of the Databricks Runs Submit API Endpoint and submits a new Spark job run to Databricks. - The
DatabricksRunNowOperatormakes use of the Databricks Run Now API Endpoint and runs an existing Spark job.
The DatabricksRunNowOperator should be used when you have an existing job defined in your Databricks workspace that you want to trigger using Airflow. The DatabricksSubmitRunOperator should be used if you want to manage the definition of your Databricks job and its cluster configuration within Airflow. Both operators allow you to run the job on a Databricks General Purpose cluster you've already created or on a separate Job Cluster that is created for the job and terminated upon the job’s completion.
Documentation for both operators can be found on the Astronomer Registry.
Example - Using Airflow with Databricks
You'll now learn how to write a DAG that makes use of both the DatabricksSubmitRunOperator and the DatabricksRunNowOperator. Before diving into the DAG itself, you need to set up your environment to run Databricks jobs.
Create a Databricks connection
In order to use any Databricks hooks or operators, you first need to create an Airflow connection that allows Airflow to talk to your Databricks account. In general, Databricks recommends using a personal access token (PAT) to authenticate to the Databricks REST API. For more information on how to generate a PAT for your account, read the Managing dependencies in data pipelines.
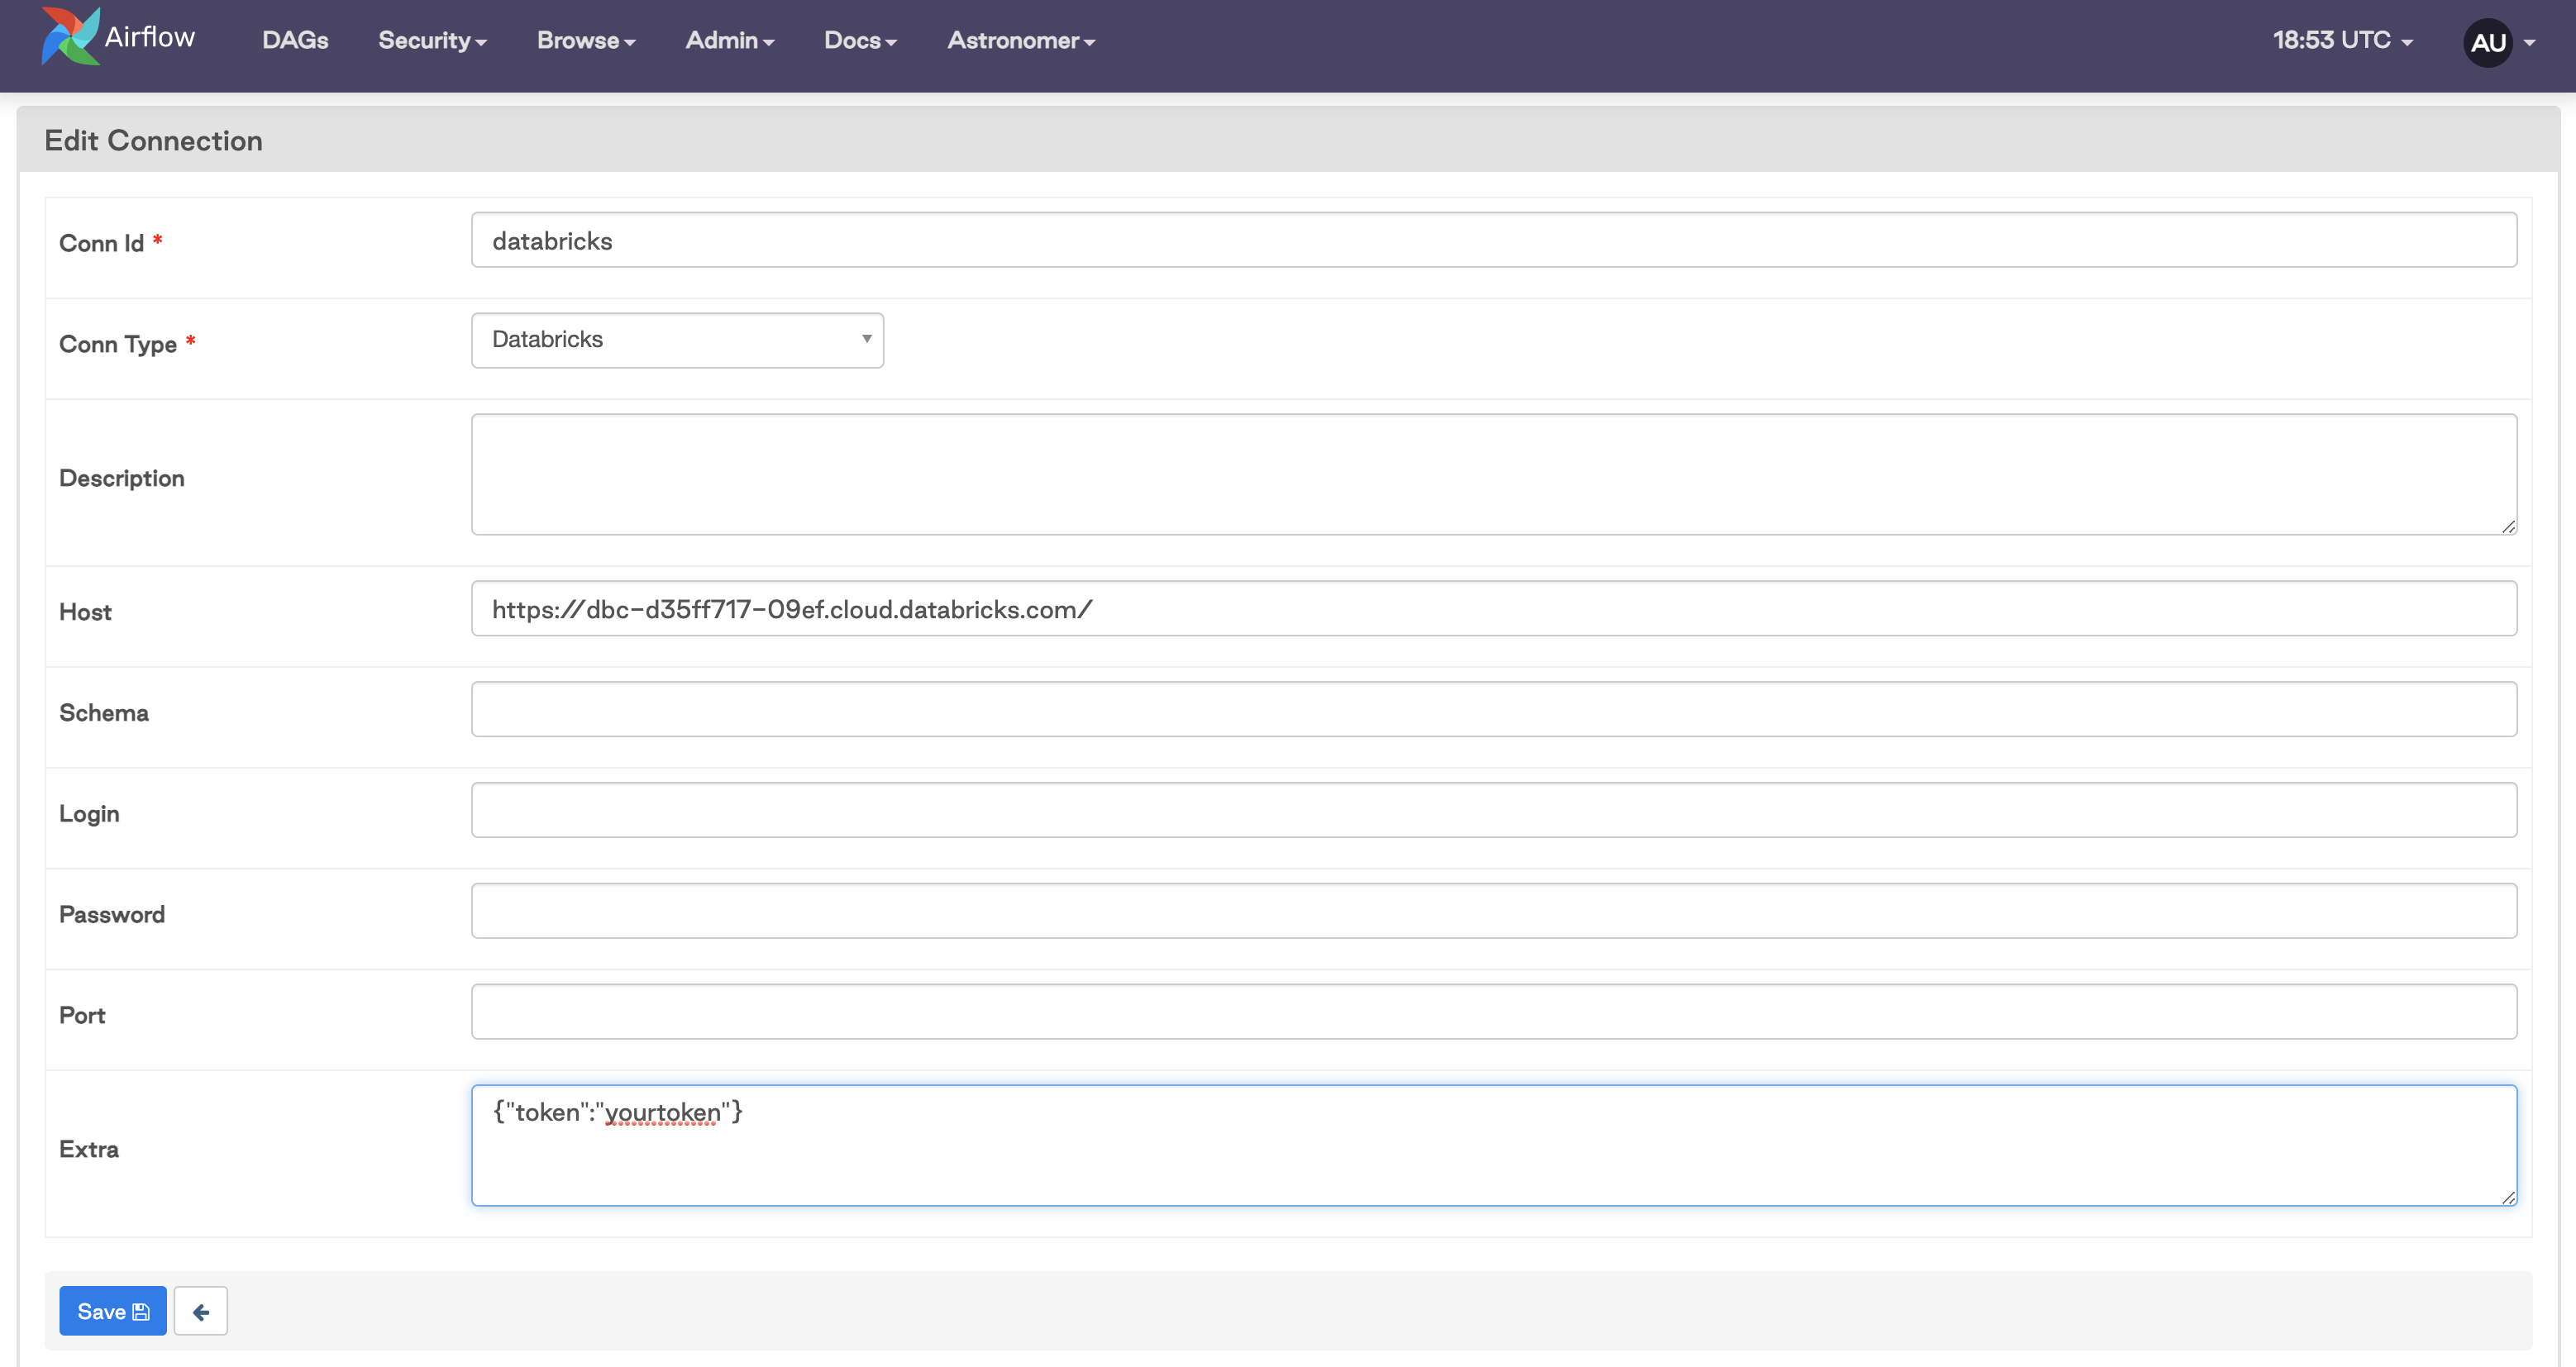
For this example, you'll use the PAT authentication method and set up a connection using the Airflow UI. It should look something like this:

The Host should be your Databricks workspace URL, and your PAT should be added as a JSON block in Extra.
Note that it is also possible to use your login credentials to authenticate, although this isn't Databricks' recommended method of authentication. To use this method, you would enter the username and password you use to sign in to your Databricks account in the Login and Password fields of the connection.
Create a Databricks job
In order to use the DatabricksRunNowOperator you must have a job already defined in your Databricks workspace. If you are new to creating jobs on Databricks, this guide walks through all the basics.
To follow the example DAG below, you will want to create a job that has a cluster attached and a parameterized notebook as a task. For more information on parameterizing a notebook, see this page.
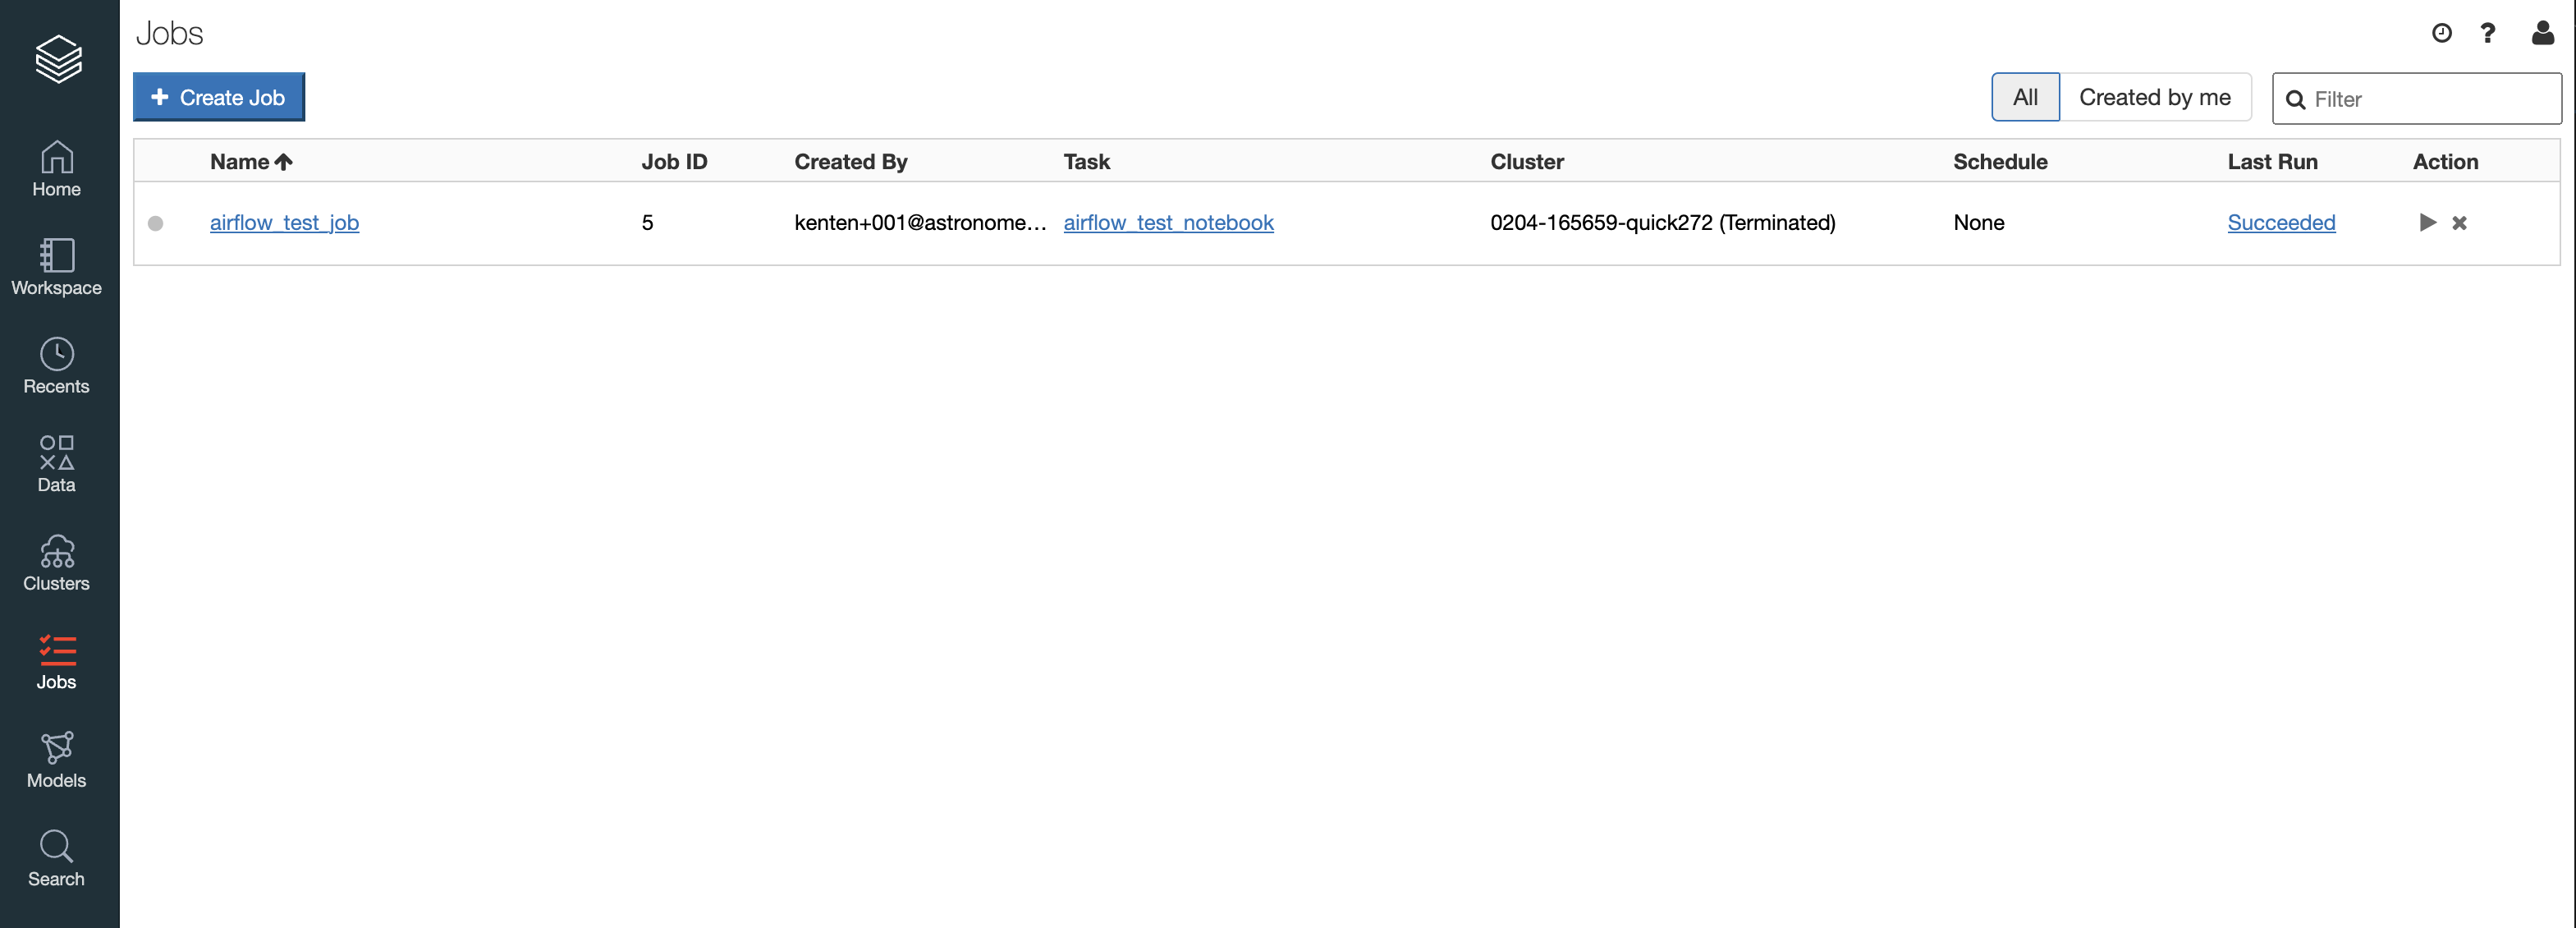
Once you create a job, you should be able to see it in the Databricks UI Jobs tab:

Define the DAG
Now that you have a Databricks job and Airflow connection set up, you can define your DAG to orchestrate a couple of Spark jobs. This example makes use of both operators, each of which are running a notebook in Databricks.
from airflow import DAG
from airflow.providers.databricks.operators.databricks import DatabricksSubmitRunOperator, DatabricksRunNowOperator
from datetime import datetime, timedelta

#Define params for Submit Run Operator
new_cluster = {
    'spark_version': '7.3.x-scala2.12',
    'num_workers': 2,
    'node_type_id': 'i3.xlarge',
}

notebook_task = {
    'notebook_path': '/Users/kenten+001@astronomer.io/Quickstart_Notebook',
}

#Define params for Run Now Operator
notebook_params = {
    "Variable":5
}

default_args = {
    'owner': 'airflow',
    'depends_on_past': False,
    'email_on_failure': False,
    'email_on_retry': False,
    'retries': 1,
    'retry_delay': timedelta(minutes=2)
}

with DAG('databricks_dag',
    start_date=datetime(2021, 1, 1),
    schedule_interval='@daily',
    catchup=False,
    default_args=default_args
    ) as dag:

    opr_submit_run = DatabricksSubmitRunOperator(
        task_id='submit_run',
        databricks_conn_id='databricks',
        new_cluster=new_cluster,
        notebook_task=notebook_task
    )
    opr_run_now = DatabricksRunNowOperator(
        task_id='run_now',
        databricks_conn_id='databricks',
        job_id=5,
        notebook_params=notebook_params
    )

    opr_submit_run >> opr_run_now
For both operators you need to provide the databricks_conn_id and necessary parameters.
For the DatabricksSubmitRunOperator, you need to provide parameters for the cluster that will be spun up (new_cluster). This should include, at a minimum:
- Spark version
- Number of workers
- Node type ID
These can be defined more granularly as needed. For more information on what Spark version runtimes are available, see the Databricks REST API documentation.
You also need to provide the task that will be run. In this example you use the notebook_task, which is the path to the Databricks notebook you want to run. This could also be a Spark JAR task, Spark Python task, or Spark submit task, which would be defined using the spark_jar_task, spark_python_test, or spark_submit_task parameters respectively. The operator will look for one of these four options to be defined.
For the DatabricksRunNowOperator, you only need to provide the job_id for the job you want to submit, since the job parameters should already be configured in Databricks. You can find the job_id on the Jobs tab of your Databricks account. However, you can also provide notebook_params, python_params, or spark_submit_params as needed for your job. In this case, you parameterized your notebook to take in a Variable integer parameter and passed in '5' for this example.
Error handling
When using either of these operators, any failures in submitting the job, starting or accessing the cluster, or connecting with the Databricks API will propagate to a failure of the Airflow task and generate an error message in the logs.
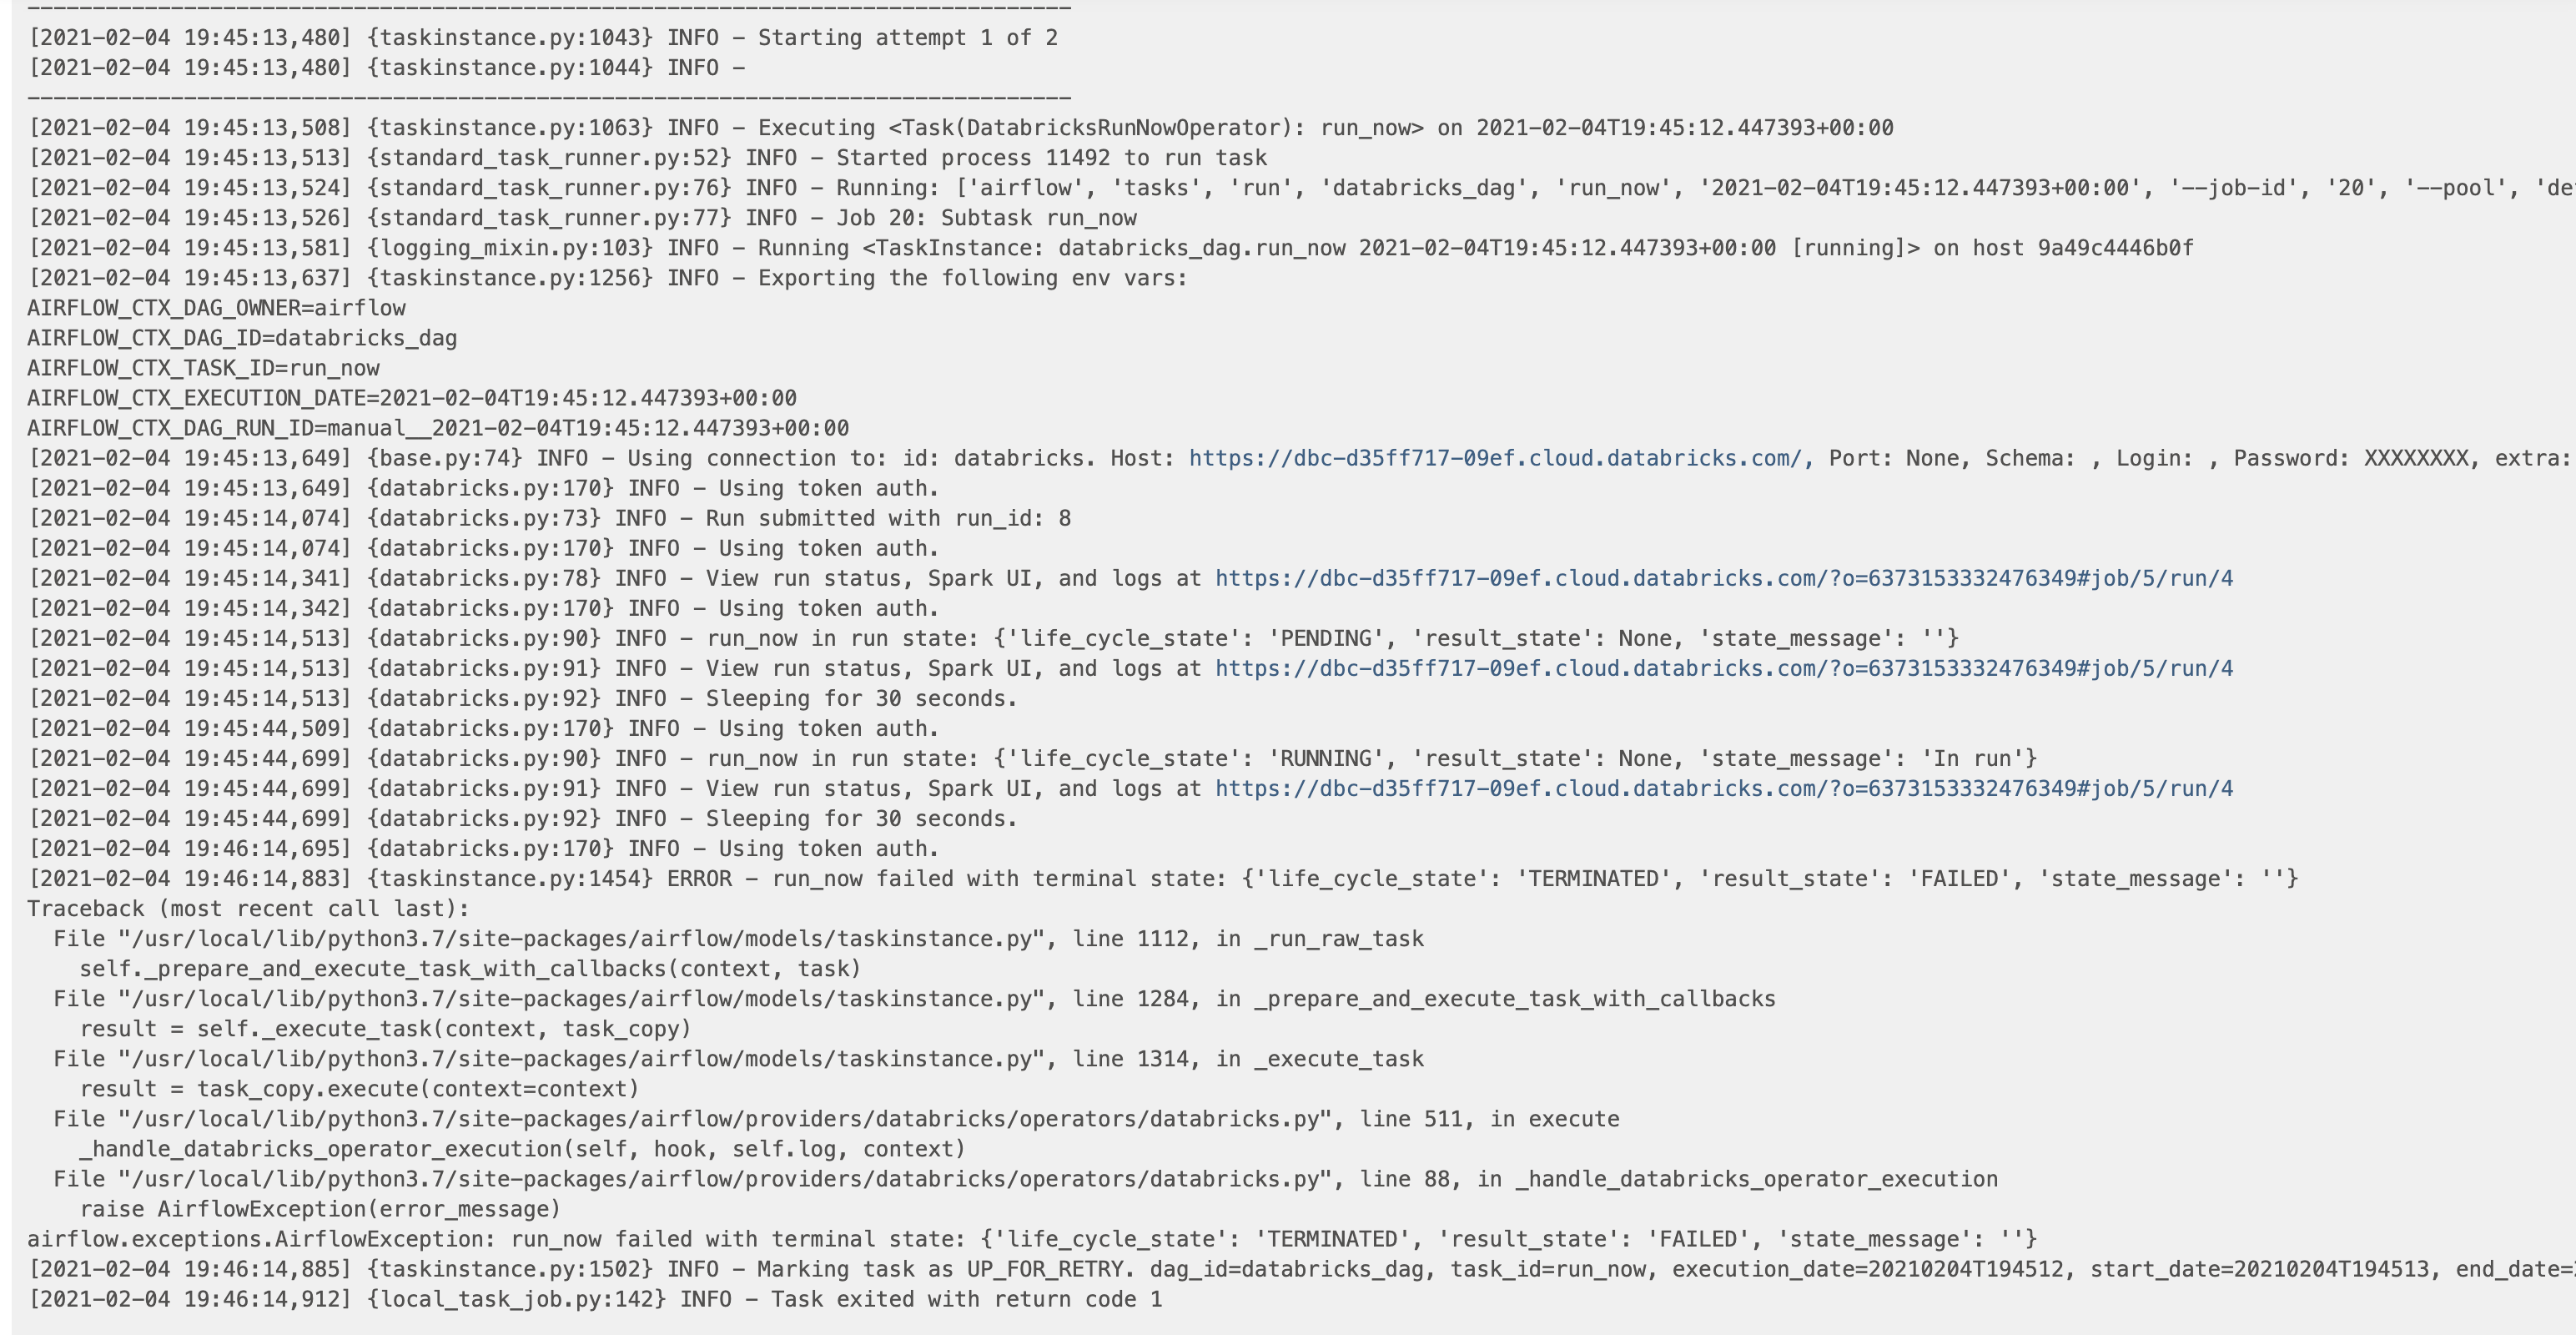
If there is a failure in the job itself, like in one of the notebooks in this example, that failure will also propagate to a failure of the Airflow task. In that case, the error message may not be shown in the Airflow logs, but the logs should include a URL link to the Databricks job status which will include errors, print statements, etc. For example, if you set up the notebook in Job ID 5 in the example above to have a bug in it, you get a failure in the task causing the Airflow task log to look something like this:

In the case above, you can click on the URL link to get to the Databricks log in order to debug the issue.
Next steps
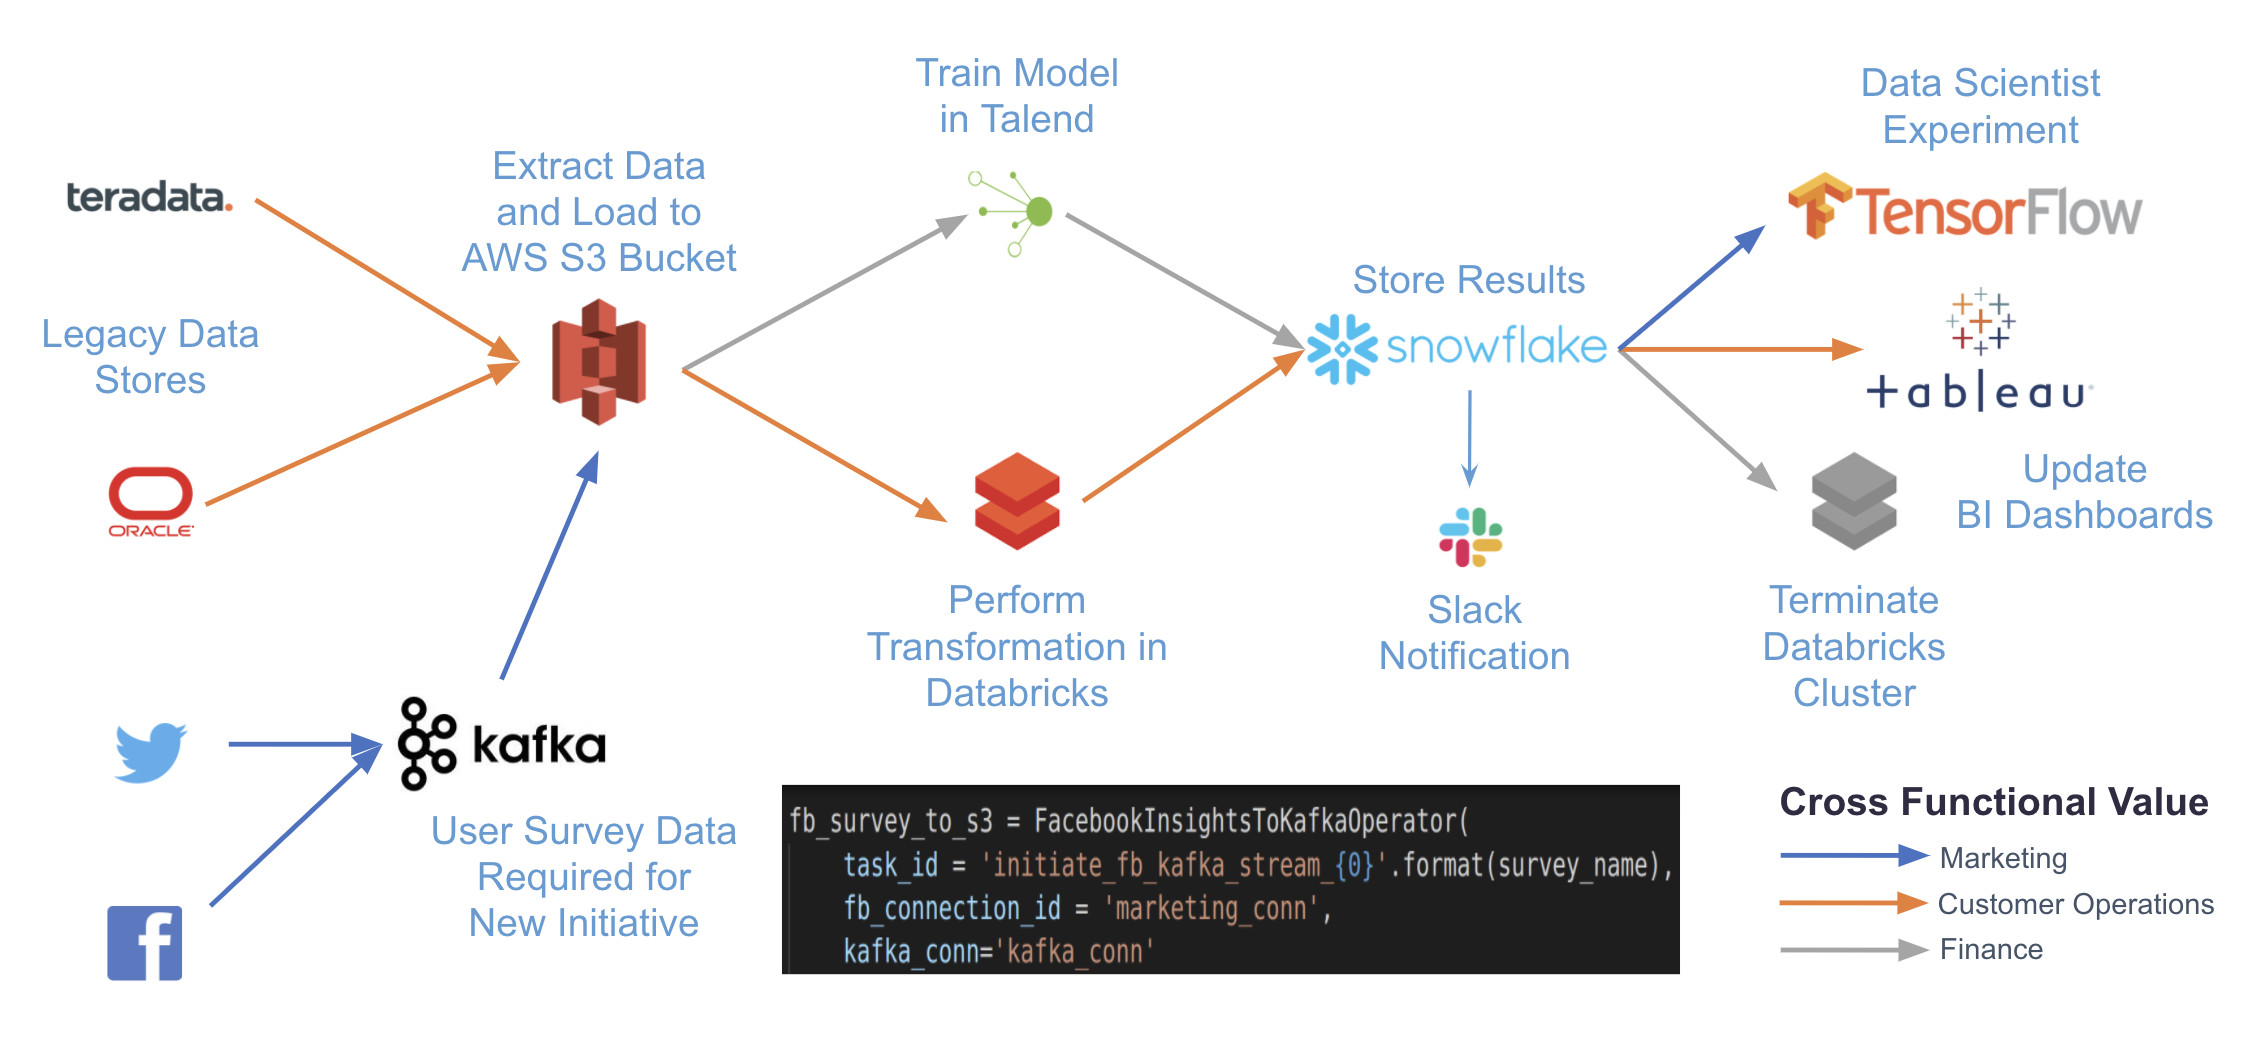
This example DAG shows how little code is required to get started orchestrating Databricks jobs with Airflow. By using existing hooks and operators, you can easily manage your Databricks jobs from one place while also building your data pipelines. With just a few more tasks, you can turn the DAG above into a pipeline for orchestrating many different systems:
