Using Airflow to Execute SQL
Executing SQL queries is one of the most common use cases for data pipelines. Whether you're extracting and loading data, calling a stored procedure, or executing a complex query for a report, Airflow has you covered. Using Airflow, you can orchestrate all of your SQL tasks elegantly with just a few lines of boilerplate code.
In this tutorial you'll learn about the best practices for executing SQL from your DAG, review the most commonly used Airflow SQL-related operators, and then use sample code to implement a few common SQL use cases.
All code used in this tutorial is located in the Astronomer GitHub.
Assumed knowledge
To get the most out of this guide, you should have an understanding of:
- Airflow operators. See Operators 101.
- Snowflake basics. See Introduction to Snowflake.
Best practices for executing SQL from your DAG
No matter what database or SQL version you're using, there are many ways to execute your queries using Airflow. Once you determine how to execute your queries, the following tips will help you keep your DAGs clean, readable, and efficient for execution.
Use hooks and operators
Using hooks and operators whenever possible makes your DAGs easier to read, easier to maintain, and improves performance. The SQL-related operators included with Airflow can significantly limit the code needed to execute your queries.
Keep lengthy SQL code out of your DAG
Astronomer recommends avoiding top-level code in your DAG file. If you have a SQL query, you should keep it in its own .sql file and imported into your DAG.
If you use the Astro CLI, you can store scripts like SQL queries in the include/ directory:
├─ dags/
|    ├─ example-dag.py
├─ plugins/
├─ include/
|    ├─ query1.sql
|    ├─ query2.sql
├─ Dockerfile
├─ packages.txt
└─ requirements.txt
An exception to this rule could be very short queries (such as SELECT * FROM table). Putting one-line queries like this directly in the DAG is fine if it makes your code more readable.
Keep transformations in SQL
Remember that Airflow is primarily an orchestrator, not a transformation framework. While you have the full power of Python in your DAG, Astronomer recommends offloading as much of your transformation logic as possible to third party transformation frameworks. With SQL, this means completing the transformations within your query whenever possible.
SQL operators
To make working with SQL easier, Airflow includes many built in operators. This tutorial discusses some of the most commonly used operators and shouldn't be considered a definitive resource. For more information about the available Airflow operators, see airflow.operators.
In Airflow 2+, provider packages are separate from the core of Airflow. If you're running Airflow 2+, you might need to install separate packages (such as apache-airflow-providers-snowflake) to use the hooks, operators, and connections described here. In an Astro project, you can do this by adding the package names to your requirements.txt file. To learn more, read Airflow Docs on Provider Packages.
Action operators
In Airflow, action operators execute a function. You can use action operators (or hooks if no operator is available) to execute a SQL query against a database. Commonly used SQL-related action operators include:
Transfer operators
Transfer operators move data from a source to a destination. For SQL-related tasks, they can often be used in the 'Extract-Load' portion of an ELT pipeline and can significantly reduce the amount of code you need to write. Some examples are:
- S3ToSnowflakeTransferOperator
- S3toRedshiftOperator
- GCSToBigQueryOperator
- PostgresToGCSOperator
- BaseSQLToGCSOperator
- VerticaToMySqlOperator
Examples
Now that you've learned about the most commonly used Airflow SQL operators, you'll use the operators in some SQL use cases. For this tutorial you'll use Snowflake, but the concepts shown can be adapted for other databases. Some of the environment setup for each example makes use of the Astro CLI and Astro project structure, but you can also adapt this setup for use with Apache Airflow.
Example 1: Execute a query
In this first example, a DAG executes two simple interdependent queries using SnowflakeOperator.
First you need to define your DAG:
from airflow import DAG
from airflow.contrib.operators.snowflake_operator import SnowflakeOperator
from datetime import datetime, timedelta

default_args = {
    'owner': 'airflow',
    'depends_on_past': False,
    'email_on_failure': False,
    'email_on_retry': False,
    'retries': 1,
    'retry_delay': timedelta(minutes=5)
}

with DAG('call_snowflake_sprocs',
         start_date=datetime(2020, 6, 1),
         max_active_runs=3,
         schedule_interval='@daily',
         default_args=default_args,
         template_searchpath='/usr/local/airflow/include',
         catchup=False
         ) as dag:

         opr_call_sproc1 = SnowflakeOperator(
             task_id='call_sproc1',
             snowflake_conn_id='snowflake',
             sql='call-sproc1.sql'
         )
         opr_call_sproc2 = SnowflakeOperator(
             task_id='call_sproc2',
             snowflake_conn_id='snowflake',
             sql='call-sproc2.sql'
         )

         opr_call_sproc1 >> opr_call_sproc2
The template_searchpath argument in the DAG definition tells the DAG to look in the given folder for scripts, so you can now add two SQL scripts to your project. In this example, those scripts are call-sproc1.sql and call-sproc2.sql, which contain the following SQL code respectively:
-- call-sproc1
CALL sp_pi();
-- call-sproc2
CALL sp_pi_squared();
sp_pi() and sp_pi_squared() are two stored procedures that are defined in a Snowflake instance. Note that the SQL in these files could be any type of query you need to execute. Sprocs are used here only as an example.
Finally, you need to set up a connection to Snowflake. There are a few ways to manage connections using Astronomer, including IAM roles, secrets managers, and the Airflow API. For this example, set up a connection using the Airflow UI. Because the connection in the DAG is called snowflake, your configured connection should look something like this:
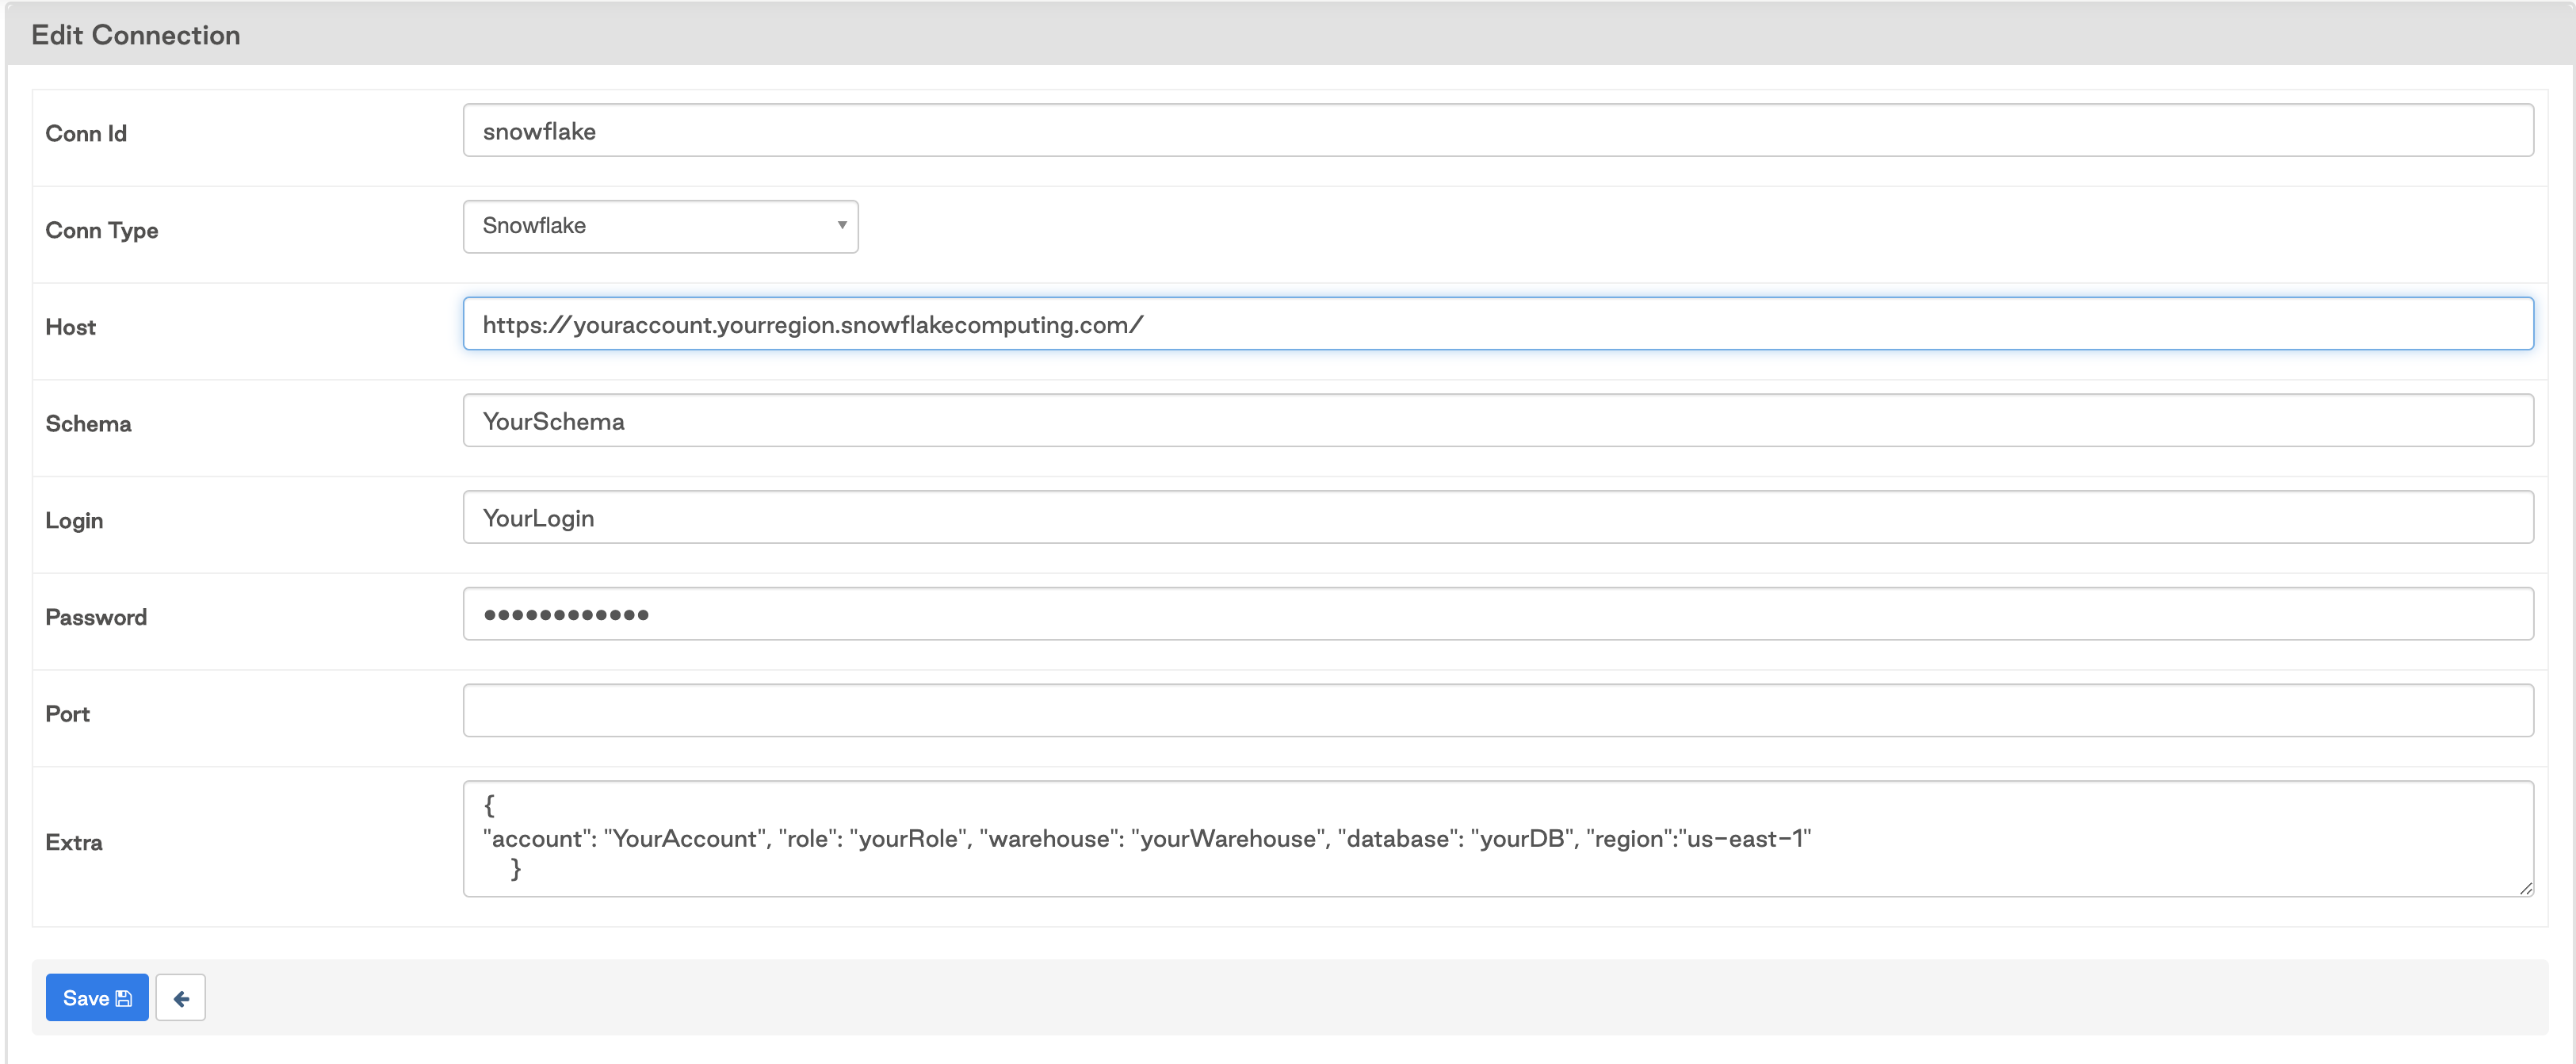
With the connection established, you can now run the DAG to execute the SQL queries.
Example 2: Execute a query with parameters
Using Airflow, you can also parameterize your SQL queries to make them more dynamic. Consider when you have a query that selects data from a table for a date that you want to dynamically update. You can execute the query using the same setup as in Example 1, but with a few adjustments.
Your DAG will look like the following:
from airflow import DAG
from airflow.contrib.operators.snowflake_operator import SnowflakeOperator
from datetime import datetime, timedelta

default_args = {
    'owner': 'airflow',
    'depends_on_past': False,
    'email_on_failure': False,
    'email_on_retry': False,
    'retries': 1,
    'retry_delay': timedelta(minutes=1)
}

with DAG('parameterized_query',
         start_date=datetime(2020, 6, 1),
         max_active_runs=3,
         schedule_interval='@daily',
         default_args=default_args,
         template_searchpath='/usr/local/airflow/include',
         catchup=False
         ) as dag:

         opr_param_query = SnowflakeOperator(
             task_id='param_query',
             snowflake_conn_id='snowflake',
             sql='param-query.sql'
         )
The DAG is essentially the same that you used in Example 1. The difference is in the query itself:
SELECT *
FROM STATE_DATA
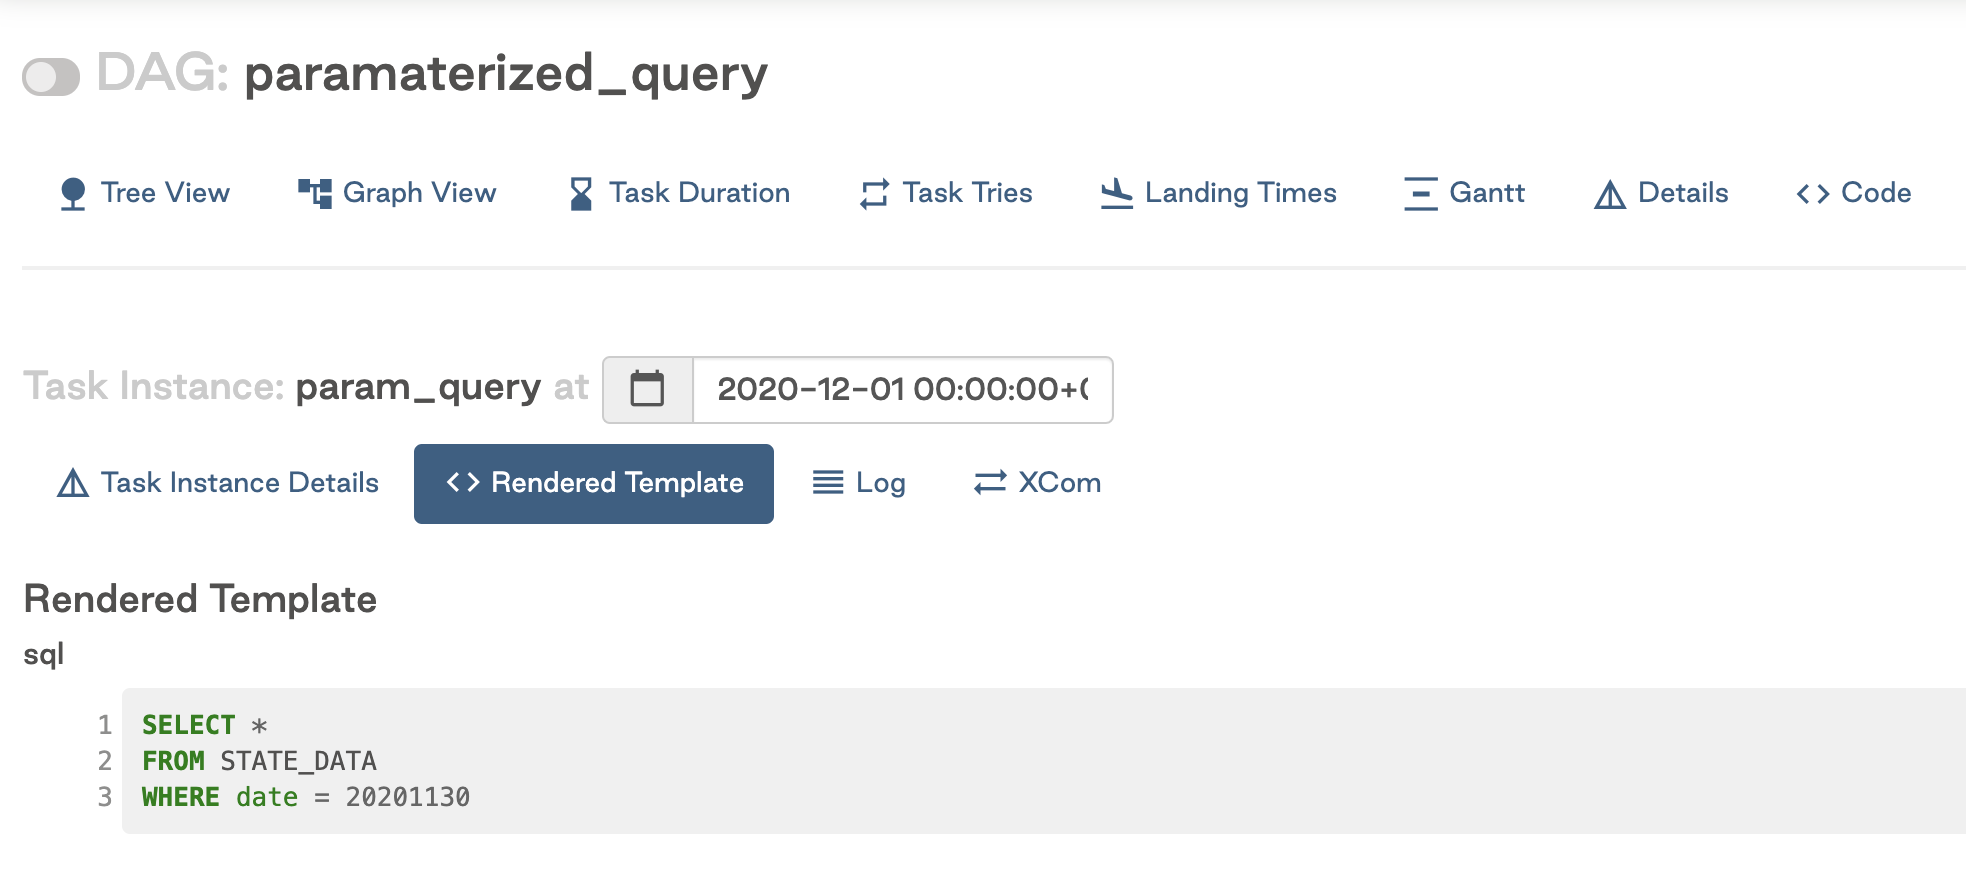
WHERE date = {{ yesterday_ds_nodash }}f
In this example, the query has been parameterized to dynamically select data for yesterday's date using a built-in Airflow variable with double curly brackets. The rendered template in the Airflow UI looks like this:
Astronomer recommends using Airflow variables or macros whenever possible to increase flexibility and make your workflows idempotent. The above example will work with any Airflow variables. For example, you could access a variable from your Airflow config:
SELECT *
FROM STATE_DATA
WHERE state = {{ conf['state_variable'] }}
If you need a parameter that is not available as a built-in variable or a macro, such as a value from another task in your DAG, you can also pass that parameter into your query using the operator:
opr_param_query = SnowflakeOperator(
             task_id='param_query',
             snowflake_conn_id='snowflake',
             sql='param-query.sql',
             params={"date":mydatevariable}
         )
And then reference that param in your SQL file:
SELECT *
FROM STATE_DATA
WHERE date = {{ params.date }}
Example 3: Load data
The next example loads data from an external source into a database table. You'll pull data from an API and save it to a flat file on Amazon S3, which you can then load into Snowflake.
This example uses the S3toSnowflakeTransferOperator to limit the code that you have to write.
First, create a DAG that pulls COVID data from an API endpoint for California, Colorado, Washington, and Oregon, saves the data to comma-separated values (CSVs) on S3, and loads each of those CSVs to Snowflake using the transfer operator. Here's the DAG code:
from airflow import DAG
from airflow.operators.empty import EmptyOperator
from airflow.operators.python_operator import PythonOperator
from plugins.operators.s3_to_snowflake_operator import S3ToSnowflakeTransferOperator
from airflow.providers.amazon.aws.hooks.s3 import S3Hook
from datetime import datetime, timedelta
import os
import requests
S3_CONN_ID = 'astro-s3-workshop'
BUCKET = 'astro-workshop-bucket'
name = 'covid_data' # swap your name here
def upload_to_s3(endpoint, date):
# Instantiate
s3_hook = S3Hook(aws_conn_id=S3_CONN_ID)
# Base URL
url = 'https://covidtracking.com/api/v1/states/'
# Grab data
res = requests.get(url+'{0}/{1}.csv'.format(endpoint, date))
# Take string, upload to S3 using predefined method
s3_hook.load_string(res.text, '{0}_{1}.csv'.format(endpoint, date), bucket_name=BUCKET, replace=True)
default_args = {
'owner': 'airflow',
'depends_on_past': False,
'email_on_failure': False,
'email_on_retry': False,
'retries': 1,
'retry_delay': timedelta(minutes=5)
}
endpoints = ['ca', 'co', 'wa', 'or']
date = '{{ yesterday_ds_nodash }}'
with DAG('covid_data_s3_to_snowflake',
start_date=datetime(2020, 6, 1),
max_active_runs=3,
schedule_interval='@daily',
default_args=default_args,
catchup=False
) as dag:
t0 = EmptyOperator(task_id='start')
for endpoint in endpoints:
generate_files = PythonOperator(
task_id='generate_file_{0}'.format(endpoint),
python_callable=upload_to_s3,
op_kwargs={'endpoint': endpoint, 'date': date}
)
snowflake = S3ToSnowflakeTransferOperator(
task_id='upload_{0}_snowflake'.format(endpoint),
s3_keys=['{0}_{1}.csv'.format(endpoint, date)],
stage='covid_stage',
table='STATE_DATA',
schema='SANDBOX_KENTEND',
file_format='covid_csv',
snowflake_conn_id='snowflake'
)
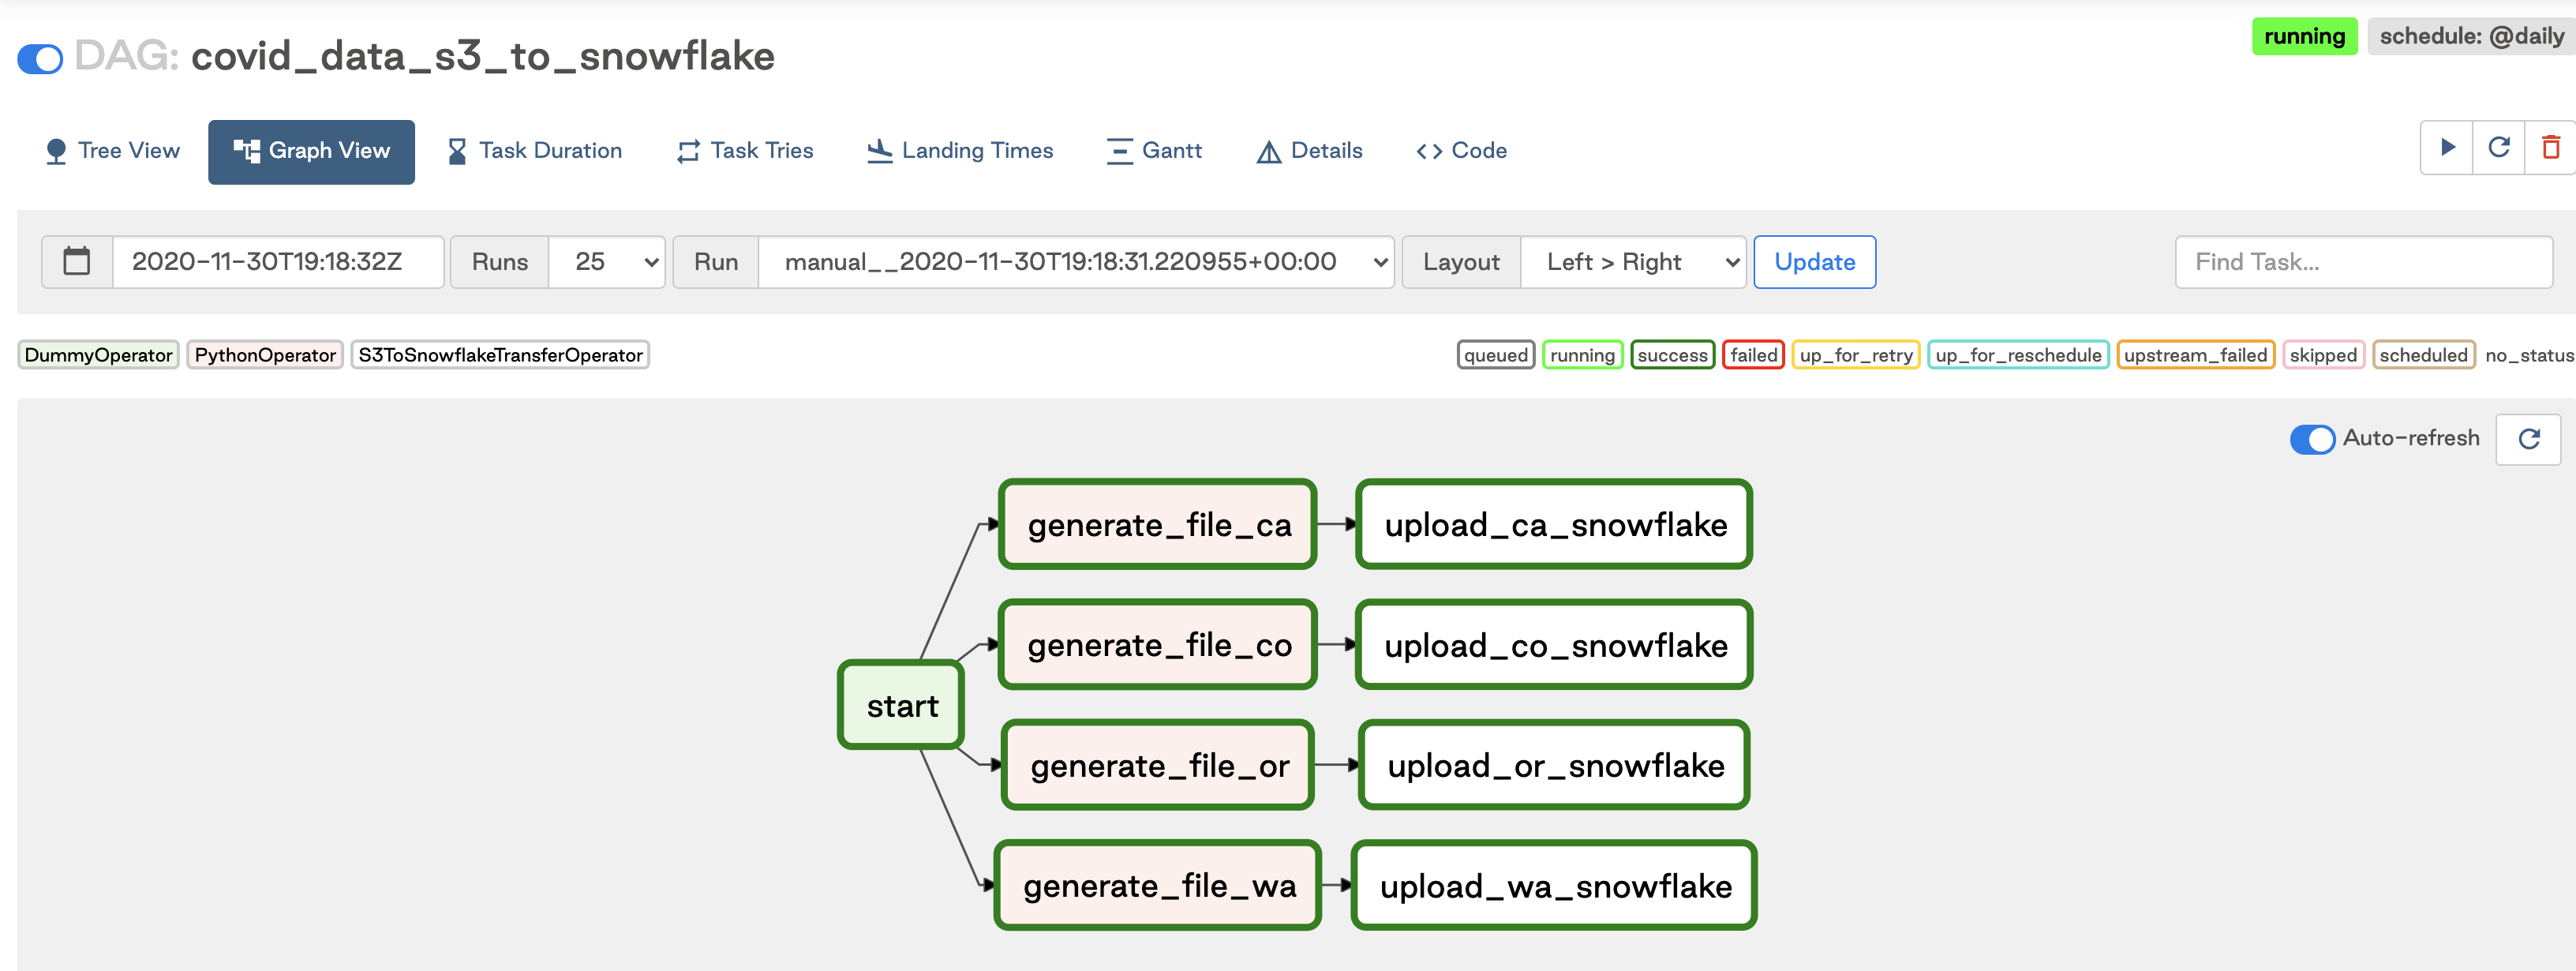
t0 >> generate_files >> snowflake
This image shows a graph view of the DAG:
There are a few things you need to configure in Snowflake to make this DAG work:
- A table that will receive the data (
STATE_DATAin this example). - A defined Snowflake stage (
covid_stage) and file format (covid_csv). See the Snowflake documentation.
Next, set up your Airflow connections. This example requires two connections:
- A connection to S3 (established using
astro-s3-workshopin the DAG above). - A connection to Snowflake (established using
snowflake. See Example 1 for a screenshot of what the connection should look like).
After this setup, you're ready to run the DAG! After a successful run, you can see the new data for today's date in your table.

Note that while this example is specific to Snowflake, the concepts apply to any database you might be using. If a transfer operator doesn't exist for your specific source and destination tools, you can always write your own (and maybe contribute it back to the Airflow project)!
Example 4: Use pandas
While Astronomer recommends using SQL-related operators and keeping any data transformations in SQL, for some use cases this doesn't work. For instance, pivoting data into a new format for a report can be difficult to complete with SQL alone. In this next example, you'll make use of Python libraries to integrate your SQL operator into a Python function.
The following DAG pivots a table of data in Snowflake into a wide format for a report using Python:
from airflow import DAG
from airflow.operators.python_operator import PythonOperator
from airflow.contrib.hooks.snowflake_hook import SnowflakeHook
from plugins.operators.s3_to_snowflake_operator import S3ToSnowflakeTransferOperator
from airflow.providers.amazon.aws.hooks.s3 import S3Hook
from datetime import datetime, timedelta
import pandas as pd

filename = 'pivoted_data'
S3_CONN_ID = 'astro-s3-workshop'
BUCKET = 'astro-workshop-bucket'

def pivot_data(**kwargs):
    #Make connection to Snowflake
    hook = SnowflakeHook(snowflake_conn_id='snowflake')
    conn = hook.get_conn()

    #Define SQL query
    query = 'SELECT DATE, STATE, POSITIVE FROM STATE_DATA;'

    #Read data into pandas dataframe
    df = pd.read_sql(query, conn)

    #Pivot dataframe into new format
    pivot_df = df.pivot(index='DATE', columns='STATE', values='POSITIVE').reset_index()

    #Save dataframe to S3
    s3_hook = S3Hook(aws_conn_id=S3_CONN_ID)
    s3_hook.load_string(pivot_df.to_csv(index=False),
                        '{0}.csv'.format(filename),
                        bucket_name=BUCKET,
                        replace=True)

default_args = {
    'owner': 'airflow',
    'depends_on_past': False,
    'email_on_failure': False,
    'email_on_retry': False,
    'retries': 1,
    'retry_delay': timedelta(minutes=1)
}

with DAG('pandas_processing',
         start_date=datetime(2020, 6, 1),
         max_active_runs=1,
         schedule_interval='@daily',
         default_args=default_args,
         catchup=False
         ) as dag:

        opr_pivot_data = PythonOperator(
            task_id='pivot_data',
            python_callable=pivot_data
        )

        opr_load_data = S3ToSnowflakeTransferOperator(
            task_id='load_data',
            s3_keys=['{0}.csv'.format(filename)],
            stage='covid_stage',
            table='PIVOT_STATE_DATA',
            schema='SANDBOX_KENTEND',
            file_format='covid_csv',
            snowflake_conn_id='snowflake'
        )

        opr_pivot_data >> opr_load_data
In the DAG, the Python function pivot_data executes the SQL query and saves the results in a pandas dataframe using the read_sql function. It then pivots the data to the desired format and saves it to Amazon S3. Lastly, the downstream task opr_load_data loads that data back to Snowflake using the transfer operator described in Example 3.
Example 5 - Use dag-factory
If you're unfamiliar with Airflow or Python, you can use dag-factory to generate DAGs using a YAML configuration file.
Once you've installed dag-factory in your Airflow environment, you can add your SQL query tasks to a YAML configuration file and add this to your project's include/ directory:
dag_factory_query:
  default_args:
    owner: 'example_owner'
    start_date: 2020-12-02
    retries: 1
    retry_delay_sec: 300
  schedule_interval: '0 3 * * *'
  concurrency: 1
  max_active_runs: 1
  dagrun_timeout_sec: 60
  default_view: 'tree'  # or 'graph', 'duration', 'gantt', 'landing_times'
  orientation: 'LR'  # or 'TB', 'RL', 'BT'
  tasks:
    task_1:
      operator: airflow.contrib.operators.snowflake_operator.SnowflakeOperator
      snowflake_conn_id: 'snowflake'
      sql: 'SELECT * FROM STATE_DATA'
Then, create a DAG file:
from airflow import DAG
import dagfactory
dag_factory = dagfactory.DagFactory("/usr/local/airflow/include/config_file.yml")
dag_factory.clean_dags(globals())
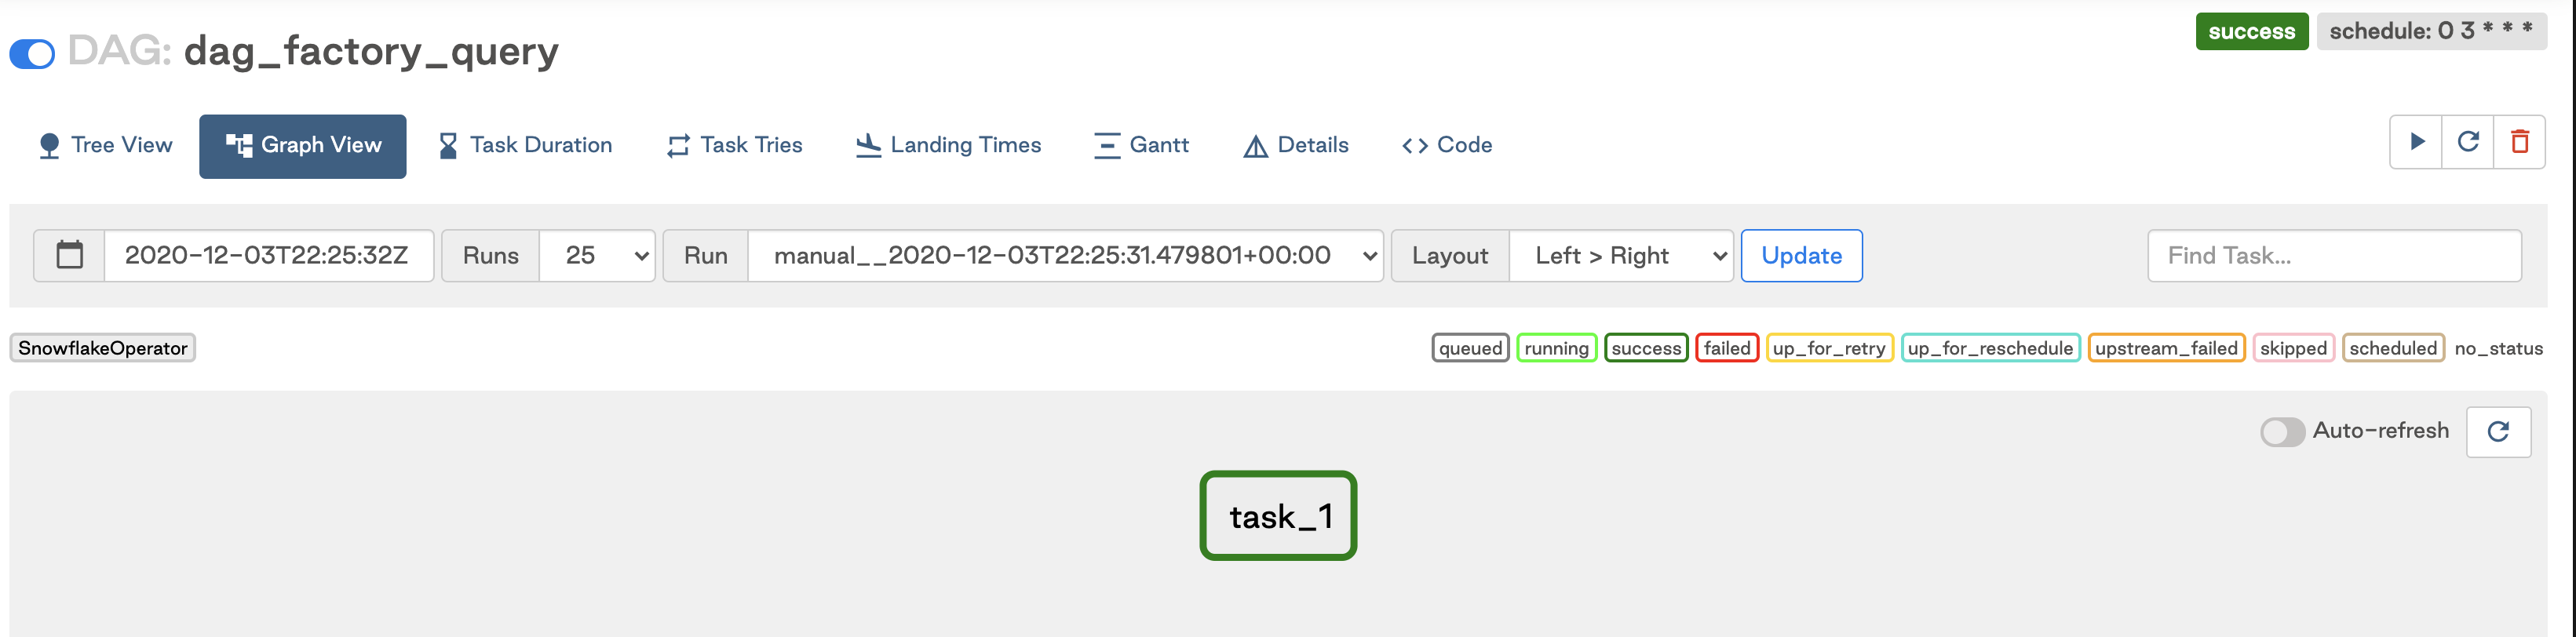
dag_factory.generate_dags(globals())
Once you Deploy it, the DAG will show a single task the Airflow UI:
Next steps
You've learned how to interact with your SQL database from Airflow. There are some topics you didn't cover, including:
- How does it work behind the scenes?
- What if you want to retrieve data with the PostgresOperator?
- Is it scalable?
Find out more on Astronomer's Academy Course on Airflow SQL for free today.